Origin
The inspiration for this post came from the excellent talk by Harmj0y at SO-CON 2020. I have been meaning to dig into using Jenkins to automate the building of red team tooling for some while now, but having recently completed the RTO exam, I felt it was time to have a play!
The Gist referenced by Harmjoy can be found here.
Aims
Before starting this mini project, my aim was to build a reasonably simple CI pipeline to:
- Get the latest version of Rubeus
- Perform some obfuscation
- Compile it.
- Have a less detectable Rubeus executable
With an aim to be able to take this code and re-use it on various other projects/repos as we wish, so modularity is a key aim here.
There are a fair amount of similarities between this post and the OffensivePipeline project, but I wanted to expand my knowledge within Jenkins rather than using C#, which I am already pretty comfortable with. I also feel Jenkins is likely to offer more flexibility in the future as I expand this project further.
An important caveat before we begin, I realise this guide only touches on some very basic obfuscation. The resulting binary will still be easily detectable, but this guide should highlight some of the basics!
Initial Jenkins Configuration
There are plenty of guides out there for installing Jenkins, so I wont labour the point here. A blog post from XenoSCR helped me at the start to install and configure Jenkins, as well as setting up a basic pipeline.
As stated earlier I wanted to be able to compile the projects within Jenkins, so naturally MSBuild was going to be the main candidate to do this. As usual, StackOverflow contains a guide on how to setup MSBuild in Jenkins, which I will cover below.
First, lets go to Manage Jenkins -> Plugin Manager. I didn’t have an MSBuild entry in my Global Tool Configuration page, so I had to go and install it from the Plugin Manager
When this has downloaded, we will add our configuration by going to Manage Jenkins -> Global Tool Configuration and scrolling down to the MSBuild section.

Click on ‘Add MSBuild’ and fill in the details for the path to MSBuild. Ensure you use the path to MSBuild for your installation of Visual Studio, I originally set it to the path for v4.0.3019 but I had a lot of issues with it failing to compile the project correctly.

Jenkins Pipeline
As described by Will in his talk, we will use ‘Pipelines’ to perform this compilation. From the Jenkins Dashboard we can click on New Item, and then select ‘Pipeline’.

For a basic project, lets use the code sample below. This will download Rubeus from GitHub and then show the contents of the folder.
pipeline {
    agent any

    environment {
        PROJECT_NAME = "Rubeus"
    }

    stages {
    	stage('Checkout') {
    	    steps {
                git """https://github.com/GhostPack/${env.PROJECT_NAME}.git"""
    	    }
    	}

        stage('Echo') {
            steps {
                bat """dir C:\\ProgramData\\Jenkins\\.jenkins\\workspace\\MSBuildTest\\${env.PROJECT_NAME}"""
            }
        }
    }
}
Click on Save, and then on Build Now. We can then click on ‘Console Output’ to show us what Jenkins is doing. This should reveal the information below, which will show us the root directory of our Rubeus directory – proving we can clone the repository via code!
Now we can prove that we can actually run a job and it will execute code, lets try to automate a bit more of this. We currently are pulling the repo and running dir, lets try to actually compile this code into an executable.
Compiling Rubeus
Thanks to us configuring MSBuild earlier, we can now refer to it from within our pipeline – no need to mess around with remembering the path all of the time!
First off, MSBuild has a *fairly* complex command line structure, so I first got this working in the command line before porting it across to Jenkins. This isnt helped by Rubeus using .NET v4.0 which is no longer officially supported by Microsoft, so I was unable to find a legit download of the binary. Due to this, I used .NET v4.8 which isnt the best option for us in terms of compatibility, but we can always change that down the road!
After a lot of trial and error with MSBuild and the various command line options, my final command was:
"C:\Program Files\Microsoft Visual Studio\2022\Community\MSBuild\Current\Bin\MSBuild.exe" /p:Configuration=Release "/p:Platform=Any CPU" /maxcpucount:2 /nodeReuse:false /p:TargetFrameworkMoniker=".NETFramework,Version=v4.8" Rubeus.sln
We now get a success message from MSBuild!

Lets now change our jenkinsfile up so that it will compile the tool using MSBuild. We will wrap that earlier MSBuild command in a new stage to help keep our project nice and modular:
stage('Compile') {
    steps {
        bat "\"${tool 'MSBuild_VS2022'}\\MSBuild.exe\" /p:Configuration=${env.CONFIG} \"/p:Platform=${env.PLATFORM}\" /maxcpucount:%NUMBER_OF_PROCESSORS% /nodeReuse:false /p:TargetFrameworkMoniker=\".NETFramework,Version=v4.8\" ${env.PROJECT_FILE_PATH}"
    }
}
I also added in a temporary stage to print out the contents of the Rubeus\bin\Release folder. This helped me test that it had actually compiled the executable and saved me a few clicks as I debugged the pipeline.

With these additions, our jenkinsfile now looks like the code below. You can see I have added some more environment variables, which will help me to reuse this code for other repositories.
pipeline {
    agent any

    environment {
        PROJECT_NAME = "Rubeus"
        PROJECT_FILE_PATH = "Rubeus.sln"
        CONFIG = 'Release'
        PLATFORM = 'Any CPU'
    }

    stages {
    	stage('Checkout') {
    	    steps {
                git """https://github.com/GhostPack/${env.PROJECT_NAME}.git"""
    	    }
    	}

        stage('Echo') {
            steps {
                bat """dir C:\\ProgramData\\Jenkins\\.jenkins\\workspace\\MSBuildTest\\${env.PROJECT_NAME}"""
            }
        }

        stage('Compile') {
            steps {
                bat "\"${tool 'MSBuild_VS2022'}\\MSBuild.exe\" /p:Configuration=${env.CONFIG} \"/p:Platform=${env.PLATFORM}\" /maxcpucount:%NUMBER_OF_PROCESSORS% /nodeReuse:false /p:TargetFrameworkMoniker=\".NETFramework,Version=v4.8\" ${env.PROJECT_FILE_PATH}"
            }
        }

        stage('Echo Post Compilation') {
            steps {
                bat """dir C:\\ProgramData\\Jenkins\\.jenkins\\workspace\\MSBuildTest\\${env.PROJECT_NAME}\\bin\\${CONFIG}"""
            }
        }
    }
}
We can assess our progress by uploading our binary to VirusTotal. Whilst I wouldnt do this on a live test, it is handy for assessing how well this pipeline works. We will test this again at the end of this post, but for now our binary is only detected by 41 vendors – even though it is totally unobfuscated.
Jenkins Shared Libraries
We now have a good base to build from, as we can pull the latest version of Rubeus and compile it just from a click of a button! Our aim now is to remove some well known strings from the Rubeus executable. This will be the first baby steps towards us obfuscating our executable file.
To do this, we will use Shared Libraries to bundle up samples of code which we will reuse. For example, this will be stuff such as changing the default GUIDs, removing comments and so on. Conceptually, this is very similar to using functions when programming.
First off, we will create a shared library by creating a folder structure as shown below. I based my library on this blog post.
- obfuscation-lib/
  --> vars/
      --> someFunction.groovy
The code for my someFunction.groovy file was:
def call(String name = 'User') {
    echo "Welcome, ${name}."
}
Annoyingly, we can’t include a local path to a Shared Library in Jenkins, as it expects us to load it from Git. There is a nice hacky workaround where we can load a local Git repository using the file:// protocol handler, as described here.
To prep my library for this, I created a new git repository and committed my code to it. You have to remember to commit your code after every change to your library!

We will then go to Manage Jenkins -> Configure System -> Global Pipeline Libraries, and add our library in.

We can choose a name here, I will go for obfuscation-lib, and then we set the project repository to point at the location of our newly created git repository.
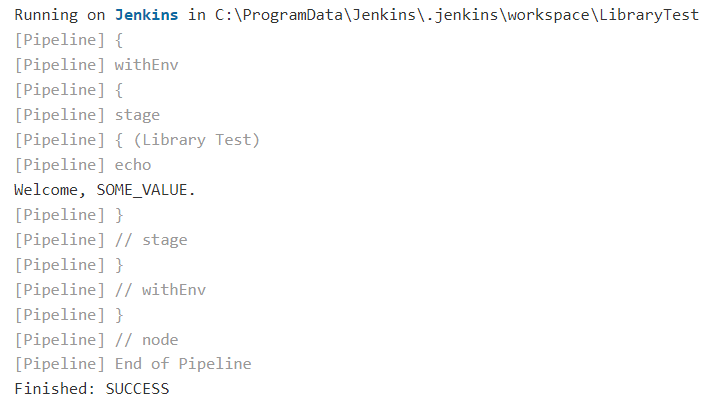
Back in our pipeline’s jenkinsfile, we now have to import this library using the name we just set (At the top of the above photo). We import it with the following code:
@Libary('LIBRARY_NAME')_Don’t forget the underscore after the bracket, else it wont work!
To summarise, with our shiny new library, this gives us the following very basic pipeline below. Whilst you don’t have to use variables in our function call, I wanted to ensure it would work.
@Library('obfuscation-lib')_

pipeline {
    agent any

    environment {
        SOME_VAR = "SOME_VALUE"
    }

    stages{
        stage('Library Test') {
            steps{
                someFunction "${SOME_VAR}"
            }
        }
    }
}
As shown below, it will print out our variables.
Comment Obfuscation
Putting this altogether, lets use our obfuscation-lib library to obfuscate something useful within our target repository. To do this, we will build a pretty basic string replacement function. We will use this to replace any phrases which are known to set off EDR/AV alerts. A basic example would be replacing any mention of ‘mimikatz’.
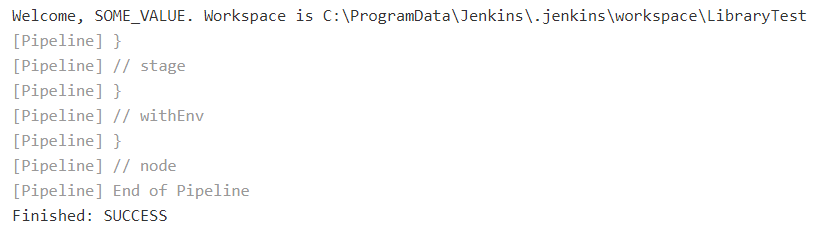
Firstly, lets get the path to the Jenkins workspace. Ideally we will do this without having to manually specify it for each function call. Luckily we can use ${WORKSPACE} within our shared library to get this path. We can now update our library and it will print the directory out.
def call(String name = 'User') {
    echo "Welcome, ${name}. Workspace is ${WORKSPACE}"
}
Commit our changes and re-run the pipeline, and we get the following:
From here, we will use some code from this post to create a simple find and replace tool.
//Heavily adapted from http://www.ensode.net/roller/dheffelfinger/entry/groovy_script_to_find_and
def call(String extension = '*.cs', String findText = '', String replaceText = '') {
//Navigate to the current workspace
def currentDir = new File("${WORKSPACE}");
def backupFile;
def fileText;
currentDir.eachFileRecurse({
file ->
for (ext in exts){
if (file.name.endsWith(extension)) {
fileText = file.text;
backupFile = new File(file.path + ".bak");
backupFile.write(fileText);
fileText = fileText.replaceAll(findText, replaceText)
file.write(fileText);
}
}
})
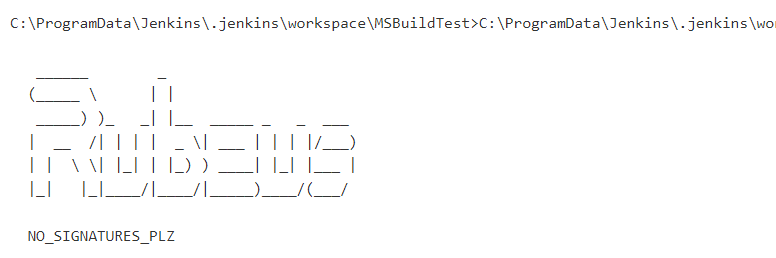
}We will now add another stage into the pipeline, called “Obfuscate“. We will attempt to obfuscate the version number to demonstrate our function works. Also I will modify the “Echo Post Compilation” step to instead run Rubeus so we can check if the version number changed or not. This leaves us with these two new stages below.
stage('Obfuscate') {
    steps {
        replaceAll(".cs", "v2.0.2", "NO_SIGNATURES_PLZ")
          }
}

stage('Execute Post Compilation') {
    steps {
        bat """C:\\ProgramData\\Jenkins\\.jenkins\\workspace\\MSBuildTest\\${env.PROJECT_NAME}\\bin\\${CONFIG}\\Rubeus.exe"""
    }
}
After running this, it with an error relating to “expected to call java.io.File.eachFileRecurse but wound up catching org.jenkinsci.plugins.workflow.cps.CpsClosure2.call error“. This is explained here, but basically we need to add @NonCPS to the top of our custom function.
We now end up with the following jenkinsfile:
@Library('obfuscation-lib')_

pipeline {
    agent any

    environment {
        PROJECT_NAME = "Rubeus"
        PROJECT_FILE_PATH = "Rubeus.sln"
        CONFIG = 'Release'
        PLATFORM = 'Any CPU'
    }

    stages {
    	stage('Checkout') {
    	    steps {
                git """https://github.com/GhostPack/${env.PROJECT_NAME}.git"""
    	    }
    	}

        stage('Echo') {
            steps {
                bat """dir C:\\ProgramData\\Jenkins\\.jenkins\\workspace\\MSBuildTest\\${env.PROJECT_NAME}"""
            }
        }

        stage('Obfuscate') {
            steps {
                replaceAll(".cs", "v2.0.2", "NO_SIGNATURES_PLZ")
            }
        }

        stage('Compile') {
            steps {
                bat "\"${tool 'MSBuild_VS2022'}\\MSBuild.exe\" /p:Configuration=${env.CONFIG} \"/p:Platform=${env.PLATFORM}\" /maxcpucount:%NUMBER_OF_PROCESSORS% /nodeReuse:false /p:TargetFrameworkMoniker=\".NETFramework,Version=v4.8\" ${env.PROJECT_FILE_PATH}"
            }
        }

        stage('Execute Post Compilation') {
            steps {
                bat """C:\\ProgramData\\Jenkins\\.jenkins\\workspace\\MSBuildTest\\${env.PROJECT_NAME}\\bin\\${CONFIG}\\Rubeus.exe"""
            }
        }
    }
}
And then our custom function:
//Heavily adapted from  from http://www.ensode.net/roller/dheffelfinger/entry/groovy_script_to_find_and
@NonCPS
def call(String extension = '.cs', String findText = '', String replaceText = '') {
    //Navigate to the current workspace
    def currentDir = new File("${WORKSPACE}");
    def fileText;

    currentDir.eachFileRecurse({
        file ->
            if (file.name.endsWith(extension)) {
                fileText = file.text;
                fileText = fileText.replaceAll(findText, replaceText)
                file.write(fileText);
            }
    })
}
Now when we run our pipeline, we can see that we have modified the version number which Rubeus puts out to the console:
Extending Our Custom Function (Again)
We can further extend this function to create a basic function which performs some common OPSEC considerations for a C# projects. There is a lot of different checks which could be built in here, but we will focus on two main ones just to prove the point:
- Change the GUID of the binary
- Remove assembly information
Changing the GUID
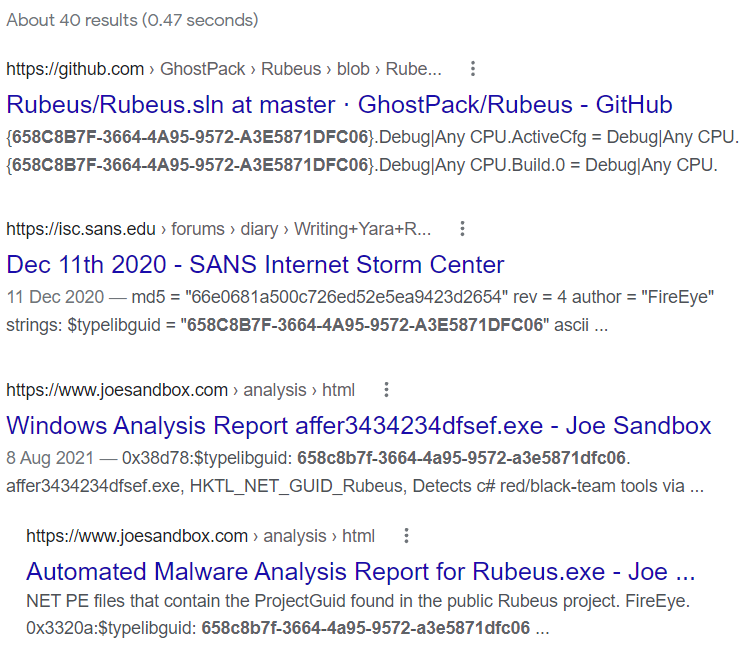
As we can see from the AssemblyInfo.cs file, Rubeus uses a GUID of 658c8b7f-3664-4a95-9572-a3e5871dfc06.
This will tip off any analyst that we are using Rubeus, as we can see from Googling the GUID:
We will first use a regex to escape this. I found https://www.freeformatter.com/java-regex-tester.html a great resource when developing these Java regexes, and it saves re-running the pipeline over and over again! To save you from having to write Java regex, below is my code:
@NonCPS
def call() {
    //Replace the default GUID & assembly info
    sanitiseAssemblyInfo();
}

@NonCPS
def sanitiseAssemblyInfo(){
    def assemblyInfoFile = new File("${WORKSPACE}\\${PROJECT_NAME}\\Properties\\AssemblyInfo.cs");
    def assemblyInfoText = assemblyInfoFile.text;

    //Replace the default GUID (e.g. "[assembly: Guid("658c8b7f-3664-4a95-9572-a3e5871dfc06")]")
    def newGUID = "[assembly: Guid(\"${UUID.randomUUID().toString()}\")]"
    assemblyInfoText = assemblyInfoText.replaceAll(/\[assembly:\sGuid.*/, newGUID)
}
After committing our changes and running the pipeline, we can see that the AssemblyInfo.cs file has been modified, and we have a new GUID.

We can then extend our function to clear all the assembly values, only leaving a version number. This follows a very similar pattern to the function above:
@NonCPS
def call() {
    //Replace the default GUID & assembly info
    sanitiseAssemblyInfo();
}

@NonCPS
def sanitiseAssemblyInfo(){
    def assemblyInfoFile = new File("${WORKSPACE}\\${PROJECT_NAME}\\Properties\\AssemblyInfo.cs");
    def assemblyInfoText = assemblyInfoFile.text;

    //Replace the default GUID (e.g. "[assembly: Guid("658c8b7f-3664-4a95-9572-a3e5871dfc06")]")
    def newGUID = "[assembly: Guid(\"${UUID.randomUUID().toString()}\")]"
    assemblyInfoText = assemblyInfoText.replaceAll(/\[assembly:\sGuid.*/, newGUID)

    //Replace any entry beginning with "[assembly: Assembly", removing the value within the brackets.
    //I.e. [assembly: AssemblyTitle("Rubeus")] ==> [assembly: AssemblyTitle("")]
    //See https://stackoverflow.com/a/38296697 for more info
    assemblyInfoText = assemblyInfoText.replaceAll(/(\[assembly:\sAssembly.*\(\").*/, '$1\")]')

    //Finally, we will set the AssemblyVersion value to be 1.0.0.0 just to make it look a bit more legit
    assemblyInfoText = assemblyInfoText.replaceAll(/\[assembly:\sAssemblyVersion.*/, "[assembly: AssemblyVersion(\"1.0.0.0\")]")

    //And write it all to the file :)
    assemblyInfoFile.write(assemblyInfoText);
}
Now if we view the AssemblyInfo.cs file, we can see that the assembly information has been stripped out successfully.
Putting this all together, we have our final jenkinsfile:
@Library('obfuscation-lib')_

pipeline {
    agent any

    environment {
        PROJECT_NAME = "Rubeus"
        PROJECT_FILE_PATH = "Rubeus.sln"
        CONFIG = 'Release'
        PLATFORM = 'Any CPU'
    }

    stages {
        stage('Checkout') {
    	    steps {
                git """https://github.com/GhostPack/${env.PROJECT_NAME}.git"""
    	    }
    	}

        stage('Obfuscate') {
            steps {
                replaceAll(".cs", "v2.0.2", "NO_SIGNATURES_PLZ")
                cSharpBasicOpsec()
            }
        }

        stage('Compile') {
            steps {
                bat "\"${tool 'MSBuild_VS2022'}\\MSBuild.exe\" /p:Configuration=${env.CONFIG} \"/p:Platform=${env.PLATFORM}\" /maxcpucount:%NUMBER_OF_PROCESSORS% /nodeReuse:false /p:TargetFrameworkMoniker=\".NETFramework,Version=v4.8\" ${env.PROJECT_FILE_PATH}"
            }
        }

        stage('Execute Post Compilation') {
            steps {
                bat """C:\\ProgramData\\Jenkins\\.jenkins\\workspace\\MSBuildTest\\${env.PROJECT_NAME}\\bin\\${CONFIG}\\Rubeus.exe"""
            }
        }
    }
}
In addition to these functions, I then added another find and replace to remove the default help text for Rubeus. After compiling this project, we can now see that only 32 vendors detect the code – meaning we have defeated 9 of them!
What Next?
From this point, there is a lot of different ways which you could take this project. Harmj0y touches on a few within his talk, but some of the easier items I have implemented are:
Changing The Namespace
The Rubeus namespace is very well known, so changing this was one of my first priorities.

This is easily visible within the project:
Removal Of ‘Bad’ Functions
Using our offensive-lib library, I created a new function to remove any functions which are known to be easily detectable. As mentioned before, I used this to remove the default help text functions “ShowLogo” and “ShowUsage” in Rubeus.

For now, I have opted to just replace the function with a single new line, though this could be replaced with C# code, should we need to preserve functionality.
Implementing Automatic AMSI Checking
By using the ThreatCheck project by RastaMouse, we can have our pipeline automatically check itself against AMSI signatures. We will just run the check and manually review the output, but for production use we would likely implement this as a test – so that any code detected by AMSI is not compiled for use.
Slack Intergration
Instead of having to review the output of our builds, we can instead use a plugin and Slack WebHooks to get the data sent straight to us!

Summary
This is just the first baby steps into using Jenkins for OffSecOps, but hopefully it shows the potential use of a system such as this.
Some of the next steps I have planned include implementing more GitHub projects, as well as running multiple pipelines to automatically build my red teaming toolset.