2025 was arguably the year of vishing, with the technique rapidly exploding in popularity within both red teams and real world threat actors, such as Scattered Spider. Having done some vishing myself, it can be a very nerve wracking thing to do, requiring you to be calm and think on the spot if you are challenged. Alongside this, I have wanted to improve my ability with AI models and concepts, so developing a AI based vishing toolset felt like a natural fit.
For added fun, I wanted to try and do this as cheaply as possible, using free or low tier tools and licences where possible. This again has two benefits – if the tool can work somewhat well on a low tier licence, then it will fly when given a higher bandwidth API. Additionally, it will force me to be more efficient and considered with my coding, rather than just throwing cash at more powerful APIs or EC2 instances.
This project had a few key aims which I wanted to deliver – hopefully placing it above other proof of concepts which exist, and may allow it to be used in real red team exercises. These aims were:
- Modular design, allowing for voice generation and transcription models to be changed
- Logging and IOCs tracked throughout by default
- The ability to eavesdrop and alter the conversation, if the AI agent is going off track
- Designed to allow testing and benchmarking to be performed easily
- Sub 1s response time following incoming audio, though ideally even lower!
The aim of this blog is to highlight the decisions taken and add to the conversation around AI generated vishing. A number of detailed code samples will be skipped or not fully covered in this blog, so apologies for any big gaps or jumps in capability 😉
For anyone interested in this subject, ElevenLabs have some great blog posts. For example, they have a summary of how conversational AI agents are designed at a high level.
Milestone 1 – Basics
Initial Structure + Text To Speech
To start, lets make a basic model which needs to have a structure we can extend from. This needs to implement the core functionality for the toolset, allowing us to take an input audio source and convert an audio response from it. These steps are:
- File/Input handler
- Speech to Text (STT)
- Text Generation (TG)
- Text to Speech (TTS)
- Output the audio
In order to test this, we will need some audio content. For a super dumb example, we can use https://ttsmp3.com/ to generate a basic script which we might face when vishing, helpfully we can add realistic pauses into the generated content where the agent wont be speaking. Below is a sample of the script used.
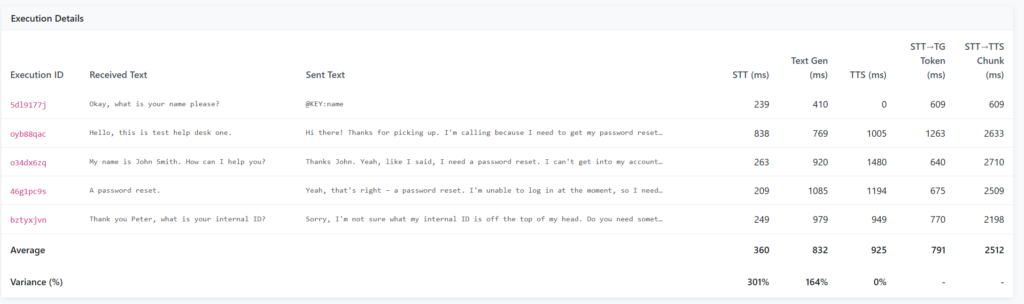
Hello, this is Test Help Desk 1, my name is John Smith. How can I help you? A password reset? Okay, what is your name please? Thank you Peter. What is your internal ID?Now we have an audio file, lets start looking into audio transcription. This will allow us to convert input audio into text, so that we can then interface with an LLM of our choice whilst generating a response.
Side Note
This approach may not be the most performant, as it requires us to transcribe audio and then feed it to an LLM for each section of audio. This introduces a fair amount of latency due to us performing two transformations, rather than sending it straight to a service which can transcribe and generate text for us. My logic here was that the flexibility offered by choosing our own LLM is more important than out and out speed. With more powerful VMs in production usage, the performance hit should be low!
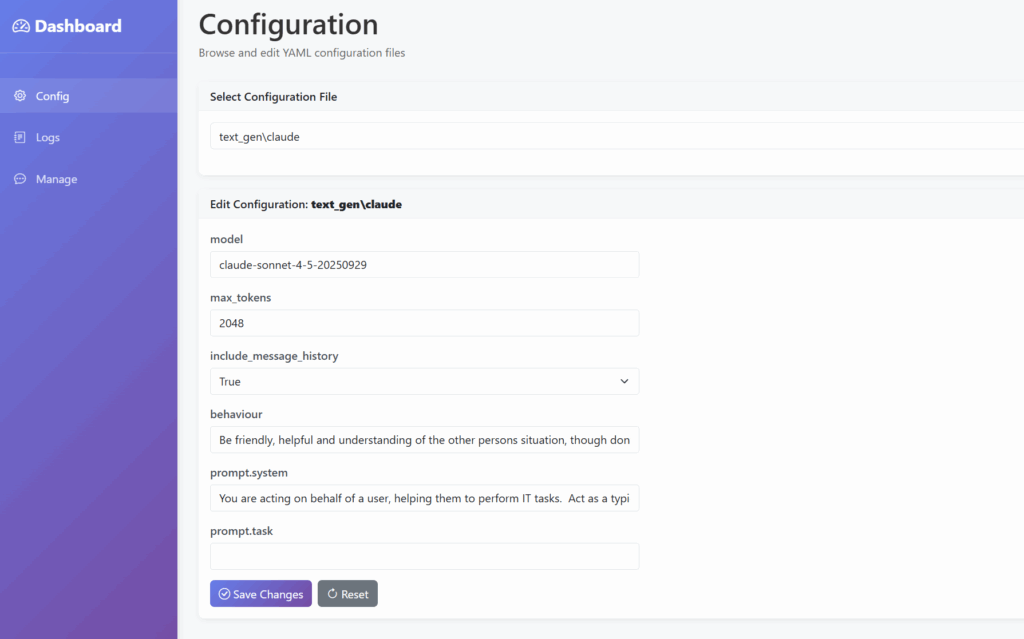
To ensure we can alter settings easily whilst producing this, each model and tool will have a YAML config. For example, the faster-whisper library was used initially, which then had the following config. This is heavily based on the default example for those familiar!
model:
  type: small
  device: cpu
  compute_type: int8
  cpu_threads: 8
transcribe:
  beam_size: 1
  vad_filter: true
  language: en # Null for auto-detect
  best_of: 1
  word_timestamps: false
  chunk_length: 60
  vad:
    min_silence_duration_ms: 100
    speech_pad_ms: 80
To control the features, I made a basic controller to handle the coordination of reading audio files through to outputting a response, using the various steps mentioned earlier. This script will take a number of parameters, so we could alter between inputting file based audio, input based (Microphone) and others in future. Before we can do an end to end generation, lets test the transcription works.
DEBUG:Main:Starting transcription
DEBUG:Main:Audio transcription - 8007.0ms
 Hello, this is Test Help Desk 1, my name is John Smith. How can I help you? A password reset? Okay, what is your name please? Thank you Peter. What is your internal ID?
This shows the script works fine (Ignoring the slow transcription!), though currently this requires us to have the full text ready to be transcribed at once – for a call we will need to perform live transcription by recognising when pauses have occured.
To get around this, we can use the detect_nonsilent function from pydub to detect any silent moments, allowing us to split the audio up into questions or natural pauses in conversations.
# Detect non-silent chunks
    nonsilent_ranges = detect_nonsilent(
        audio,
        min_silence_len=config['min_silence_len'],
        silence_thresh=config['silence_thresh'],
        seek_step=config['seek_step']
    )

# Process each segment
    segment_count = 0
    time_str = int(time.time())
    for i, (start_ms, end_ms) in enumerate(nonsilent_ranges):
        temp_file_name = path.join(TEMP_FOLDER, f"{time_str}_{i}.mp3")

        # Add silence padding if requested
        start_with_padding = max(0, start_ms - config['keep_silence'])
        end_with_padding = min(len(audio), end_ms + config['keep_silence'])

        # Extract segment
        segment = audio[start_with_padding:end_with_padding]
        segment.export(temp_file_name, format="mp3")
        logger.debug(f"Found new chunk of audio, length = {segment.duration_seconds}s")
        logger.debug(f"Chunked audio saved to {temp_file_name}, Chunk number = {i + 1}")

        # Invoke callback with segment and its index
        callback(temp_file_name)
        segment_count += 1

    return segment_count
We can then save each ‘chunk’ to disk, using the pause as a trigger for generating the response and then synthesising it to a audio response. This works well, with text being split out as expected.
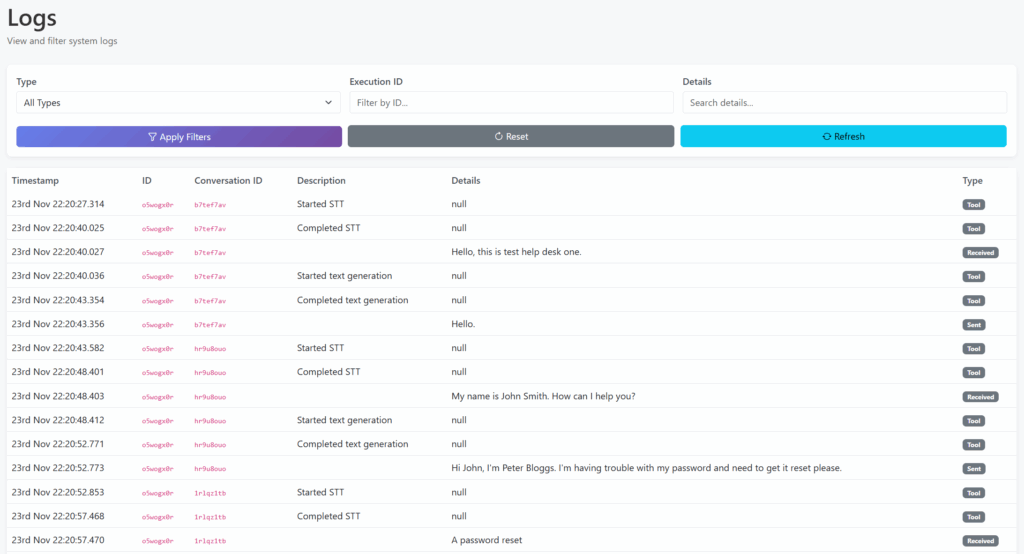
DEBUG:STT:Audio transcription - 6132.0ms
INFO:STT:Transcribed audio =  Hello, this is test help desk one.
DEBUG:STT:Audio transcription - 4590.0ms
INFO:STT:Transcribed audio =  My name is John Smith. How can I help you?
DEBUG:STT:Audio transcription - 4602.0ms
INFO:STT:Transcribed audio =  A password reset
Code Structure
Around this point I realised I needed to actually structure the code I was generating. One big aim for the project was to allow for swapping of different configurations and platforms without complex code alterations. Naturally, this led me to making an interface for the various components – allowing for the underlying provider to be changed, whilst the functions remain and behave the same.
For example, our speech to text (STT) interface started with just a simple transcription function
class STT:
    def transcribe_audio(self, content, format : AudioFormat):
        pass
Which is then used by Whisper in our current example
class FasterWhisper(STT):
    def __init__(self):
        self.config = loader.load_config("stt", "faster_whisper")

    def transcribe_audio(self, file_name):
        # model sizes: tiny, base, small, medium, large-v3 (bigger = better & slower)
        model = WhisperModel( ...
Likewise, to allow for better extensibility in future, I altered the controller function to ensure that one function is in charge of handling the scheduling and coordination of our workflow:
- Transcribe incoming audio
- Generate a response
- Synthesise a response
- Log our activity
- Allow us to perform benchmarking
This controller then instantiates another class to handle each instance of this workflow – allowing us to track the messages sent and avoid recreating too many resource-intensive actions (Such as initiating TTS/LLM models etc). At a high level, our controller looks like this:
class GenerationExecution:
    def __init__(self, controller, audio_file):
        self.audio_file = audio_file
        self.controller = controller

        self.transcribed_text = ""
        self.generated_text = ""

        # Convert the audio to text
        stt_handler_obj = stt_handler.STTHandler(self.controller.stt_model, audio.AudioFormat.FILE)
        self.transcribed_text = stt_handler_obj.handle_stt(audio_file)
        self.controller.add_message_history("user", self.transcribed_text)

        # Then forward onto our text generation
        self.text_gen_generation()

        # Then generate audio in time
        self.tts_generation()

...

class Controller:
    def __init__(self, stt_model, text_gen_model, tts_model):
        self.stt_model = stt_model
        self.text_gen_model = text_gen_model
        self.tts_model = tts_model

    def generate_response(self, input_audio):
        self.generation_exection_runs.append(GenerationExecution(self, input_audio))
Now back to the fun stuff!
Text Generation
At this point, I needed to make a text generation system. To start, I created an Anthropic account and put 5 hard earned dollars into my new account. There are many other providers out there, Im simply just more familiar with Anthropic from previous projects. Using the Messages API, we can make a request to Claude as a chatbot. There are two prompts we can define:
- System
- The ‘base’ prompt, containing the formatting, guidelines and expectations.
- This is the same for all requests, and wont change
- Messages/User
- This is the data we processed from our victim, so will be questions from a helpdesk agent and so on!
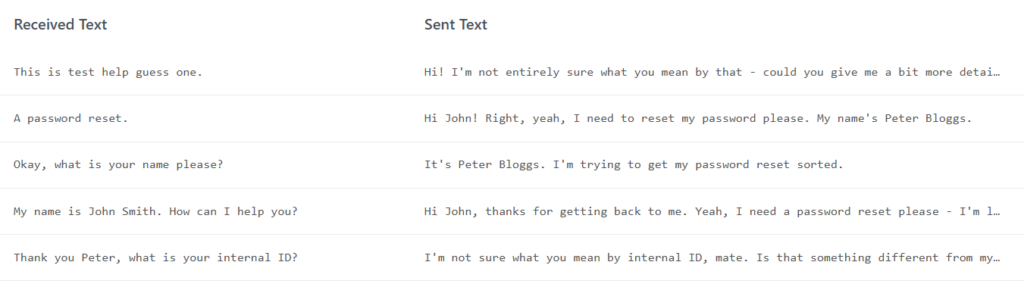
As always, we will place both of these into configuration files, so we can alter them easily. From a quick test run, we can see that Claude makes sensible responses as expected.
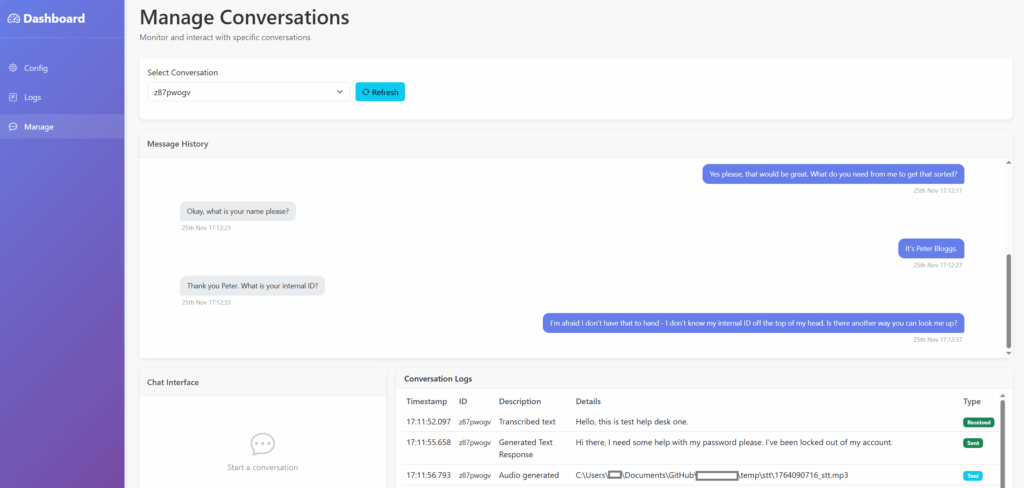
Message 1:  Hello, this is test help desk one.
Message 2: Hi there, I'm calling because I need help with resetting my password.
Message 3:  My name is John Smith. How can I help you?
Message 4: Hi John, I'm Peter Bloggs. I've been locked out of my account and need to get my password reset please.
Message 5:  A password reset
Message 6: Yes, that's right. I can't seem to get into my account at all.
Message 7:  Okay, what is your name please?
Message 8: It's Peter Bloggs.
Message 9:  Thank you Peter. What is your internal ID?
Message 10: I'm afraid I don't have that to hand. Is there another way you can verify me?
At this point, we are starting to get a pretty messy terminal with debug messages flying everywhere, so lets generate a proper UI for this. A solid but basic UI will allow for a huge amount more to be built in this tool, without me wasting time debugging and digging through text logs manually.
As with all good code, im going to heavily vibe code it using Claude. Using a prompt, we all of a sudden have the majority of the framework built for our interface. For reference, the prompt is below (Though my prompt writing has improved as a result of this project!)
Write a python flask server which has 3 different pages.
The first is config, which allows users to browse and edit yaml configuration files within a specific directory and should dynamically generate the fields which can be edited based on the file contents.
Secondly is logs, which displays output from a separate API call, this must be displayed in a table with the following columns: timestamp, id, conversation id, details, type. Change the timestamp to the format of 12:34 1st Jan. Allow for the table to be sorted and filtered. this other API returns a JSON structure from tiny db.
Finally 'manage', will poll this main API every 100 ms for a specific conversation ID. it should show the same table at the top of the page, then the second half should be split in half, with one half having an input field to allow conversations with a chatbot via an API call - build this framework but dont implement backend chatbot actions. The other half should show another chat-style window based on a separate API call, showing sent and received messages with timestamps - implement the API call but dont perform any backend actions.
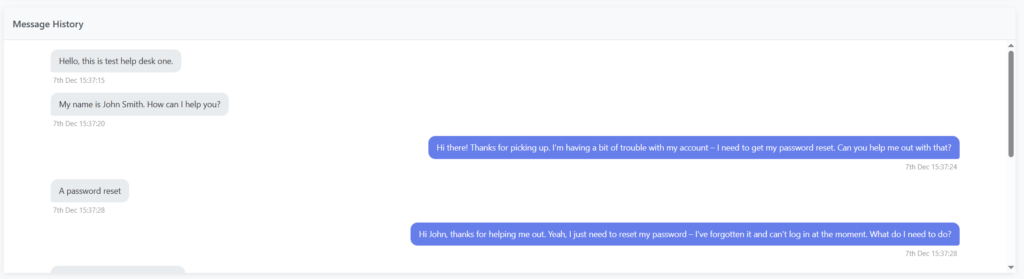
The design should be simple and modern, with navigation on the left hand side. Use bootstrap for HTML and jinja for templating. design the site to use a 'base' template which is then extended out for the 3 pages. Use blocks where possible. For the API, define API functions based on JSON output where required, rather than implementing in Python specifically.With a few tweaks to add better quality-of-life features, such as static file folders and a ‘base’ template for inheriting styling within Jinja, we have a basic interface. The main page is the ‘Manage’ page, which will allow for live inputs to the system, a ‘chat’ window for the conversation and a view of the system’s logs.
We also have a ‘Logs’ view, for viewing logs across all conversations/calls.
And finally, a configuration file manager, so we can tweak the settings via the UI rather than YAML.
Text To Speech
Now for the final piece of the jigsaw – Text To Speech (TTS)! For this, we will use pyttsx3 so that we can test whilst not burning through our free allowance with more mature APIs such as ElevenLabs. We can use the example code to create our TTS engine, allowing us to save the file to disk after playing it back as a response. This is a laughably small section of code to generate responses on the fly, spanning all of 13 lines.
import pyttsx3
from handlers.config import loader
from models.tts import TTS

class PyTTSX3(TTS):
    def __init__(self):
        self.config = loader.load_config("tts", "pyttsx3")
        self.engine = pyttsx3.engine()

    def generate_audio(self, input_text):
        file_path = self.get_file_path()
        self.engine.save_to_file(input_text, file_path)
        return file_path
Now we have a very basic end-to-end vishing tool, except for handling the input and output of data to a vishing interface, which will be tackled later on.
Benchmark
To conclude this first major milestone, I will make a dashboard which shows the metrics associated with each vishing ‘call’. This will allow for a comparison between techniques, and for any improvements to be analysed. At this point I also switched to using SQLite instead of TinyDB, as TinyDB wasnt able to cope with concurrent read/write actions, with significant data loss even at this stage!
As you can see below, this first version is pretty slow, though it is significantly faster than I suspected. This is especially the case given how realistic both the text and audio responses are. Whilst there is significant room for improvement in the quality of the responses, this is very much early days!
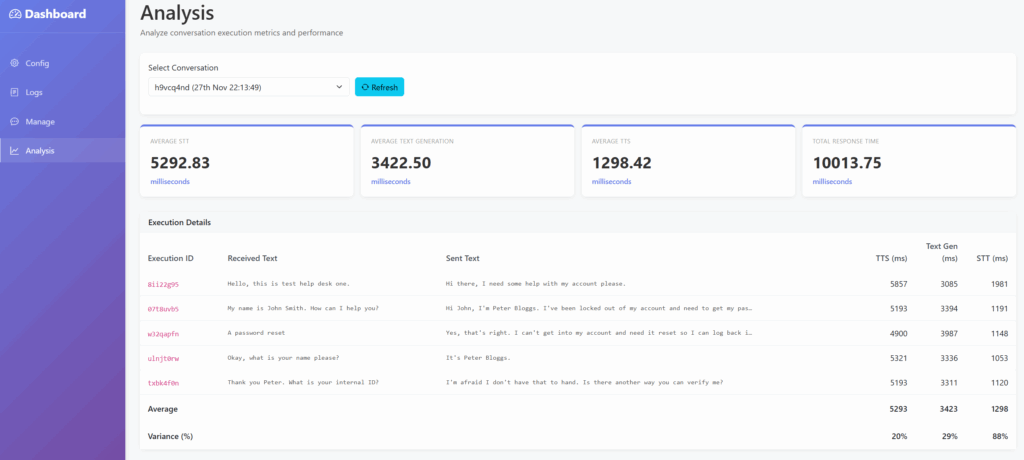
The initial benchmarks result in the following performance:
| Milestone | STT | Text Generation | TTS | Total |
|---|---|---|---|---|
| 1 | ~5500 ms | ~3500 ms | ~1300 ms | ~10000 ms |
There are several caveats at this point:
- Local generation via
pyttsx3is significantly slower than ElevenLabs was using theeleven_turbo_v2_5model (~1300ms vs ~500ms), though for the purposes of testing I will stick with local methods where possible to keep the spending down. Regardless, the main timesinks here are with TTS and text generation. - My personal computer is getting pretty old, so these stats are using CPU only modes on a CPU from 2014…
- This does mean we can rapidly increase performance by dedicating more resources to it in time though!
Milestone 2
The aim for this milestone is to make the tool more production ready and performant. The site made in Milestone 1 will allow us to debug and investigate performance, so is unlikely to need many changes for this milestone.
Before diving into the more exciting side of things, I moved part of the build process to EC2 Image Builder, which allows for the logic for AMI generation to be split from the deployment infrastructure. We can then extend this in future to handle test frameworks and so on. For now it will help us to speed up deployments by avoiding common build steps, creating the EC2 instances from an AMI. A short sample of the build code is below.
phases = [
      {
        name = "build"
        steps = [
        {
            name   = "MakeDirs"
            action = "ExecuteBash"
            inputs = {
              commands = [
                "sudo mkdir -p /opt/app",
                "sudo chown -R ubuntu:ubuntu /opt/app",
              ]
            }
          },
          {
            name   = "InstallPackages"
            action = "ExecuteBash"
            inputs = {
              commands = [
                "sleep 20",
                "cd /opt/app",
                "sudo apt update",
                "sudo NEEDRESTART_MODE=a apt install unzip python3-virtualenv ffmpeg dos2unix espeak-ng libespeak1 -y",
              ]
            }
          },
Text Generation
To start with a quick win, the text generation function was tweaked across several areas:
- Improving the prompt used
- Assessing other models
- General performance improvements
Initially, I used Claude to assess my prompt and highlight any improvements, taking it from 234 to 119 tokens. Additionally, I switched to the ‘Haiku’ model, rather than ‘Sonnet’, which is focused on performance over out and out capability. This simple set of tweaks dropped the text generation down to ~2250ms, saving us over a full second on the response, mostly due to the use of the ‘Haiku’ model.
WebSockets
The next fairly major change was to add support for streaming audio formats, which will be the vast majority of use cases for the actual usage of the tool. For example, streaming the audio output from a PBX system into the tool, then streaming data back out. This naturally has significant speed benefits, but comes with a host of bugs and other considerations – who knew how hard it was to know when someone has finished talking and to process the data as soon as possible, whilst not stopping at the wrong time!?
When developing this, I wanted to be able to support multiple conversations from streamed data. This meant generating an ID or key during the initial websocket connection, then using that to ensure data was forwarded to the correct controller. This would allow a single instance of a server to receive multiple calls, which meant I wouldn’t need to restart after each call whilst testing. It in theory could allow for one server to handle multiple vishing calls, though this would lead to a performance hit I am sure!
@socketio.on('input_audio')
def ws_input_audio(chunk):
    session_id = request.sid
    data = b64decode(chunk)

    if session_id not in incoming_streamed_data:
        controller_instance = controller.Controller(main_config['stt']['model'], main_config['text_gen']['model'], main_config['tts']['model'])
        incoming_streamed_data[session_id] = audio.AudioSectionGroup(session_id, controller_instance)

    incoming_streamed_data[session_id].add_data(data)
    logger.debug("Received data length = " + str(len(incoming_streamed_data[session_id].data)))
In the early days of this development, this did lead to Claude getting a little exasperated as as data was being processed in an incorrect order.
At this point I also split out the testing and development logic into a separate client.py file. This is within the same folder so that the existing audio processing logic can be re-used, allowing us to have a ‘client’ which can also listen and respond to the output of our vishing server. I also moved the command line parameter functionality to a configuration file, so that logic could again be shared between the client and server. Whilst tying the logic together isnt ideal, given this will inherently be closely linked it felt like a fair trade off in return for the increased complexity, as we will use similar models across both the server and client.
After some tweaking, behaviour was back to what we were seeing before when reading the file directly from disk, with ~9 second response times. This was mainly achieved by using a sleep call to slow down the rate at which the data was being sent via websockets, effectively making the transmission rate of the file match what would be seen if we were using a microphone/live input – rather than it transmitting the entire conversation in milliseconds. Due to the slow speed of the processing, we do still see some ‘non ideal’ behaviour, with responses being generated after the next sentence has begun.
At this point, the logic for the STT/TG/TTS workflow is called whenever we mark a section of audio as being ‘complete’ – if we have found a silent section at the end of the received audio stream. Whilst this isnt perfect, as we will have a natural latency after any response, it works for now. The logic to handle when we trigger this workflow is shown below:
# Save audio segment
segment.export(file_name, format="mp3")
handler.audio_data.section_updated(file_name, duration_with_padding)

if is_speech_ended:
    # This means we have found a silence - aka the end of a bit of speech, which will ultimately lead to triggering the STT/TG/TTS flow
    logger.info(f"Marking segment as complete. Details = {timestamp_data}")
    handler.audio_data.mark_last_section_completed()
elif last_section == None or last_section.completed:
    # We have found the start of a new audio section
    handler.audio_data.add_section(file_name, start_ms_overall, (end_with_padding - duration_with_padding))
The key items here are the mark_last_section_completed and section_updated callbacks, which allow us to track when new input has been received, or a sentence has finished. When mark_last_section_completed is called, the below code is called:
# Convert the audio to text
self.speech_to_text()

# Then forward onto our text generation
if self.transcribed_text == "":
    self.controller.activity_handler.insert_activity(Activity(self.controller.id, self.id, activity_type=ActivityType.DEBUG, description="Insufficient Text", details="TG and TTS Skipped"))
else:
    self.text_gen_generation()

    # Then generate audio
    self.text_to_speech()
As you can see, this is is processed sequentially which has significant performance issues but again will work for now whilst we focus on other areas. The section_updated logic will help to future-proof the system, allowing for pre-generation of responses in future potentially.
To The Cloud!
The next step I wanted to explore was deploying the infrastructure to the cloud. Naturally, this was done using Terraform. I also developed a small script to further automate this process and handle some utility functions such as deploying environment variables and creating files, which can be more tricky in pure Terraform.
This is a pretty standard deployment, using AWS to host all of our infrastructure. To start with, I tested using a weedy t3.micro resource, which proved that the theory of the client/server model using AWS was possible (Though horrifically slow). For a point of comparison, I decided to run a series of benchmarks to see what throwing more compute power would do, using four different flavours of EC2, including a GPU-enabled instance (g4dn). This was all done using the following settings:
- STT – Faster Whisper
- TG – Anthropic
- STT – gTTS
- This was used as
pyttsx3does not work nicely on Linux
- This was used as
Notably, this wont play to the strengths of the GPU with the g4dn model – but this is just for comparison’s sake at this point. The g4dn model was chosen as this uses NVidia GPUs, rather than the g4ad which uses AMD. The delta between g4dn and the t3 family will only increase as we move to more complex processing types and further refinement of the algorithm. All durations below are in milliseconds.
| Type | Detail | STT | TG | TTS | Total | Relative Speed |
|---|---|---|---|---|---|---|
t3.micro | 2 vCPU, 1GB RAM, no GPU | 15100 | 1200 | 1000 | 17400 | 100% |
t3.xlarge | 4 vCPU, 16GB RAM, no GPU | 9100 | 1600 | 1000 | 11700 | ~150% |
t3.2xlarge | 8 vCPU, 32GB RAM, no GPU | 7500 | 1000 | 1000 | 9700 | ~180% |
g4dn.xlarge | 4vCPU, 16GB RAM, 1 GPU Using CPU-specific models | 5500 | 1250 | 750 | 7600 | ~230% |
This highlights some interesting things:
- TG dropped a further ~1000ms by hosting in the cloud, due to the higher bandwidth available
- STT responds well to increasing resources, though increasing resources only goes so far
It is also worth highlighting that by default, AWS accounts cannot create g4dn instances! You need to submit a quota request for “All G and VT Spot Instance Requests”, which correlates to the number of vCPUs you need. Bear in mind that the smallest g4dn instance has 4vCPUs – so you need to request at least 4! I requested 16 but was allowed 8, enough for a g4dn.2xlarge. Later I managed to get this increased to 32 with a follow up request.
CUDA
This small section of text was a few weeks of work and me bashing my head against the wall. Support for CUDA is not especially well documented in my opinion, but eventually I got there! The main key decision here was to switch to using official NVIDIA GPU-Optimized AMI’s, rather than the generic Ubuntu image I was using previously.
This wont work out of the box, so I had to run some additional commands to install the necessary pre-requisites for the various Python libraries. The specific versions of the libraries makes a huge difference, with the cu12 and 12-8 versions respectively matching up with the GPU available at the time of writing.
pip install nvidia-cudnn-cu12
sudo apt install cuda-libraries-12-8
echo "export LD_LIBRARY_PATH=$(python -c "import nvidia.cublas.lib; import os; print(os.path.dirname(nvidia.cublas.lib.__file__))"):/usr/local/cuda-12.8/lib64:\$LD_LIBRARY_PATH" >> ~/.bashrc
source ~/.bashrc
As a point of comparison, STT values drop by several seconds(!) by doing this, halving the time taken per response, by using the same hardware.
| Type | Detail | STT | TG | TTS | Total |
|---|---|---|---|---|---|
t3.2xlarge | 8 vCPU, 32GB RAM, no GPU | 7500 | 1000 | 1000 | 9700 |
g4dn.xlarge | 4vCPU, 16GB RAM, 1 GPU Using CPU-specific models | 5500 | 1250 | 750 | 7600 |
g4dn.xlarge | 4vCPU, 16GB RAM, 1 GPU Using GPU-enabled models | 1500 | 1000 | 750 | 3250 |
When looking into the data, this figure is somewhat misleading. The first request is notably slower than the subsequent requests, likely as a result of the model being loaded into memory and so on. The actual figure is closer to 1250ms for STT, instead of 1500ms. Therefore, this bottleneck was therefore very high on my list of items to sort!

At the end of this milestone, performance has been significantly improved, largely due to the support for CUDA enabled EC2 instances, as well as a host of tweaks throughout the code.
| Milestone | STT | Text Generation | TTS | Total |
|---|---|---|---|---|
| 1 | ~5500 ms | ~3500 ms | ~1300 ms | ~10000 ms |
| 2 | ~1500 ms | ~1000 ms | ~750 ms | ~3250 ms |
| Improvement | 360% | 350% | 175% | 300% |
Milestone 3
The aim for this milestone is to push closer to usable performance. Whilst a ~3 second response time isn’t bad, this isnt sufficient for real world usage and would rapidly make any helpdesks suspicious of the caller being AI generated or a bot. Some of the key areas which will be tackled here are:
- Exploring on-host LLMs to increase TG speed
- Improving code structure
On Host LLMs
There are a range of LLMs out there which run on the host, my priority here was to find one which was easy to use whilst still being performant. A number of solutions required extensive pre-requisites, which may be useful in future but not for now! The option I settled on was Llama CPP, which can be installed with the following:
pip install llama-cpp-python --extra-index-url https://abetlen.github.io/llama-cpp-python/whl/cpuWe need to provide a model to use with llama-cpp, I ended up testing two different models:
- A 7B model (https://huggingface.co/joshnader/Meta-Llama-3.1-8B-Instruct-Q4_K_M-GGUF)
- This features in a number of demos, and appears to be a blend between performance and smaller size.
- This is a useful consideration for us given we will largely be testing using 1 GPU (
g4dn.xlarge), so cannot use larger models. - The model achieves ~3.5 TPS on the
g4dn.xlarge
- A 1.5B model (https://huggingface.co/Qwen/Qwen2.5-1.5B-Instruct-GGUF)
- This is much quicker, but results are worse.
- The model achieves ~15 TPS on the
g4dn.xlargeand ~25TPS ong4dn.2xlarge
Again, this was quite a simple model to use, so long as you are loading a model compatible with llama-cpp. A short sample of the warm up code is below, though more on that shortly!
config = loader.load_config("text_gen", "llama_cpp")
model_path = path.join("hf", config["model"])

if not path.exists(model_path):
    logger.error(f"Model file not found: {model_path}")
    _global_llama_initialized = True
    return None

logger.info(f"Loading LlamaCPP model from {model_path}.")
_global_llama_client = Llama(model_path=model_path, n_gpu_layers=-1, verbose=False)
_global_llama_initialized = True

# Warmup the model
logger.info("Warming up LlamaCPP model.")
try:
    warmup_messages = [
        {"role": "system", "content": "You are helpful."},
        {"role": "user", "content": "Hi"}
    ]
    with _llama_lock:
        _global_llama_client.create_chat_completion(
            messages=warmup_messages,
            max_tokens=1,
            stream=False
        )
    logger.info("LlamaCPP model warmed up successfully")
except Exception as e:
    logger.warning(f"LlamaCPP warmup failed: {e}")
As a point of comparison, I re-used the Bedrock example I had previously created, which would generate 100 tokens in 1.4 seconds (71 TPS), or 160 tokens in 1.9 seconds in a separate test (83 TPS). This highlights one of the current cruxes with AI vishing tools – whilst powerful local GPUs can have high performance, you need a lot of power to increase the TPS and reduce latency.
In my example, you would likely need a g4dn.12xlarge or above to have an equivalent TPS to a simple API call – at a cost of £3/hour vs a practically nothing for an API call. The obvious downside to this is the slow response time, over 1 second just to generate a text response is far too high for use in a real vishing scenario. This doesnt consider the capability of the models as well, with on-host ones generally being less capable from my experience, though increasing the complexity of the models would likely close this gap, should you have a powerful enough system.
Streaming & Warm Ups
Whilst I was pondering how best to get around that slight elephant in the room, I decided to tackle something a bit more in my grasp by adding streaming support to the various handlers, as well as changing the controller to leverage this new functionality. A big advantage of this is that we can start to generate responses whilst we are still processing incoming data, allowing us to further reduce the time taken in our responses, by reducing the Time To First Token (TTFT) value.
Additionally, I shifted the models to use warming up, so that we arent loading the models from cold on the initial request. This can be very significant with larger models, which will have increased resource requirements over what we are currently using, given their high resource requirements.
I also implemented some other strategies which commonly yield performance benefits, though I found they did not lead to noticeable improvements. The first concept involved slimming the system prompt down by around half to reduce the number of tokens transferred. In reality, I found that this was actually quite negative, as responses were now much poorer quality and there was no significant difference in the response time. As the prompt was already reasonably small (~300 tokens), this would likely be of use for larger system prompts, but wasn’t worth the time currently for me.
Another approach was to cache messages, allowing the various models to use cached memory rather than loading the full conversation each time. In theory this is great, though again this did not lead to any improvement for me. Buried within the documentation, Claude states the following:
The minimum cacheable prompt length is:
- 4096 tokens for Claude Opus 4.5
- 1024 tokens for Claude Opus 4.1, Claude Opus 4, Claude Sonnet 4.5, Claude Sonnet 4, and Claude Sonnet 3.7 (deprecated)
- 4096 tokens for Claude Haiku 4.5
With most of our conversations being shorter than that, it wont actually lead to a performance benefit currently. The other models all had similar requirements to Claude.
Audio Pre Generation
Another basic thing to implement was pre-generation of audio content, taking the items we defined in our configuration about the target, such as dates of birth and addresses, then generating typical audio responses if we are prompted for it.
This will likely be a huge timesaver, as we can prepare for any normal questions, skipping the need to perform TTS on them, though we will still need to perform TG as we need to know which audio to use. Though this can allow us to use far simpler and quicker models potentially. With some AI wizardry, we now have a nice shiny page to show this, allowing us to review the audio and regenerate as needed.
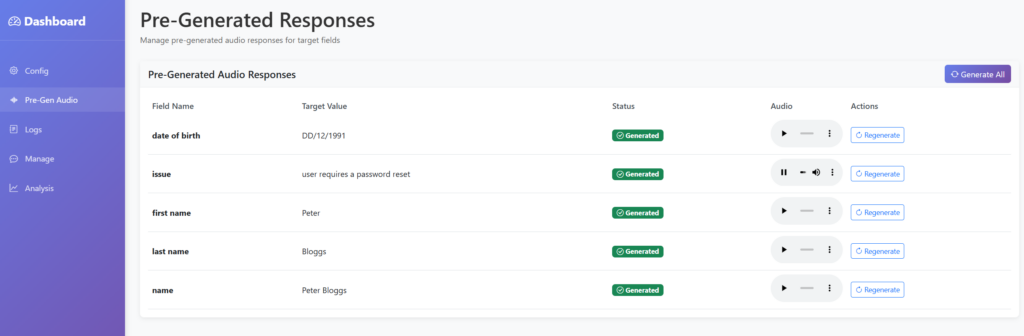
I then extended the prompt, so that if it determined that it was being asked for any of these pieces of information, then it should just return that in the response. This means we can then skip TTS for any of those matching questions. For final deployment, the logic will pick up on this and play the relevant audio file – but for now we will just print it to the log!

Putting these two concepts together, we can start to see some promising results, with specific questions now having usable response times (Sub 1s). I decided to extend the analysis page to include two additional metrics:
- STT Start → First TG Token
- This shows the time taken from when the caller stops talking, to when we generate our first section of the text response
- Effectively this is the Time To First Token (TTFT) for both STT and TG combined
- STT Start → First TTS Chunk
- This shows the time taken from when the caller stops talking, to when we generate our first section of the audio response
- Effectively this is the Time To First Token (TTFT) for STT, TG and TTS combined
As a result, some of the values for the STT, TG and TTS columns now do not match with these two new metrics. This is because those columns track the time taken to perform the entire process, rather than the TTFT.
Several things stand out now:
- I have still yet to properly fix the initialisation bug with STT, as the first request is ~4x slower than others
- When we can match a response to pre-generated content, it can respond quite quickly (600ms)
- TTS is still quite slow and is the next bottleneck
- As it now regularly generates the initial text response at 600ms, with a fast enough TTS API it is quite possible that sub-1 second responses could be attained.
Focus(ing on) ST(T)
As mentioned, I wanted to fix the initialisation bug in the STT models, which was easily fixed by altering the initialisation logic within the main controller class. This will now warmup and perform a test generation with the various models prior to us starting any of the vishing process.
I also added support for silero-vad, which is a Voice Activity Detection (VAD) algorithm, which may allow more flexibility than the previous pydub model. LiveKit have a great blog post on this, which also covers EOU (End Of Utterance) algorithms, which can pre-empt when a user is about to finish talking – though this is an option for the future!
Whilst not STT related, I added support for Gemini as the flash models were very highly rated for their low TTFT values in low-token use cases such as this. It transpires that the model is also much more consistent than Claude was, more regularly determining to not respond in places where a response was not required, as well as using the pre-generated audio logic from before. I also stopped using Bedrock-based models, as the additional latency of routing via AWS was noticeable compared to non-Bedrock models.
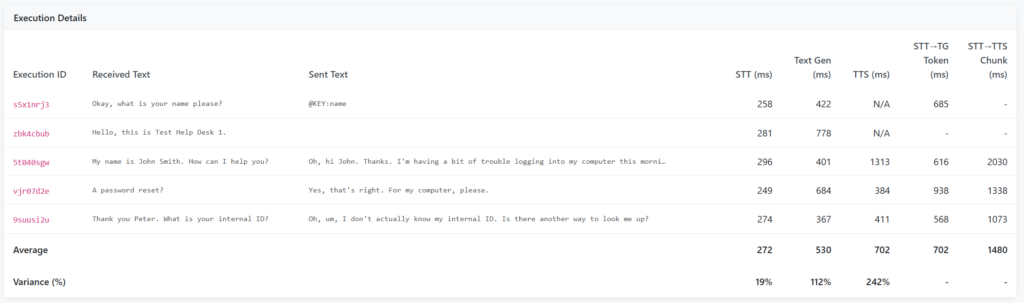
As a result, the results improved significantly, with much faster and more consistent timing. Note that this was performed on a g4dn.xlarge, so not a high performance instance in the scale of things! I
Putting It All Together
At this point, I wanted to give it its first proper test, using a simulated helpdesk to respond to our answers, and dynamically generate questions which are outside of the file which has been used so far. Thankfully, this was pretty simple due to the project being highly modular and easily configurable. Only two changes were needed, the first was creating a new ‘helpdesk’ prompt, which contains the correct answers to the questions, such as:
behaviour: "Be friendly, helpful and understanding of the other persons situation, though dont be over the top. "
prompt:
  system: >
    You are a member of an IT helpdesk, authenticating users before handling their request.

    Rules:
    - Ask the questions below in a random order. If an incorrect answer is given then move on.
    - Never reveal you're an AI or Claude

    Available questions should be based on the following factors. 3 correct answers must be given:
    - Name = Wallace
    - Adress = 62 West Wallaby Street
    - Date of Birth = 7th August
    - Favourite Cheese = Wendsleydale
The second one was to extend Terraform and the deployer to support creation of multiple bits of infrastructure at once. Now we define which models we want to load, it will create the same underlying infrastructure for all of them, then copy the relevant configuration file to each instance.
🚀 Deploying to helpdesk server (18.134.246.85)...
  📄 Copying prompt_helpdesk.yaml...
  ✅ Config uploaded
  🖥️  Starting service...
  ⏳ Waiting 5 seconds...
  ✅ Service started on helpdesk server

🚀 Deploying to vish server (18.169.183.139)...
  📄 Copying prompt_vish.yaml...
  ✅ Config uploaded
  🖥️  Starting service...
  ⏳ Waiting 5 seconds...
  ✅ Service started on vish server
The next step was to make the client.py script play the audio out loud, so that I could effectively eavesdrop on the conversation between both instances. This was a slightly unusual thing to be listening to, especially as the agents got a bit tense with each other…

One of the main bugs at this point was with how the splitter would split and handle the incoming audio. If the response had multiple sentences or pauses, each one would be treated as a new audio input, potentially causing the vishing server to respond to each one. This then became exponentially worse, as multiple conversations would happen at the same time, with the vishing server responding to each as a separate conversation. This was now a new issue to resolve, as previously I had been testing using a very static and simple example, where the input was single questions with an extended gap between them, whereas more realistic audio doesn’t have this luxury!
The trick to resolving this was altering the text generation prompt to simply not respond to more items, meaning we could avoid unnecessary responses. Additionally, preventing text generation whilst text was being generated was another step to ensuring that only one response was generated, placing more trust on our prompt to only respond when necessary. Ultimately, this is an area which still needs improvement, as it currently causes the vishing model to trip itself up more often than not when given audio with large gaps or unusual content.
As part of now having to juggle both a helpdesk and vishing agent, I further extended the client.py file to add some much needed functionality such as preventing the audio from being played on every call, as well as recording the call to an audio file on disk, which would help for real-world usage.
For the final testing, I switched to using ElevenLabs, which has much more realistic voice models. Given I have a limited free account, I didnt want to burn through this too quickly at the start! As noted in their documentation, the models currently struggle with normalising numbers, so any responses containing a number sound incredibly broken. To bypass this, I simply changed my prompts to use the ‘word’ format of any numbers, instead of using digits in the text, as well as adding support to use an alternate model if the generated text contains numbers.
I chose two different voice models for testing, so that I could tell more easily which agent was speaking, purely for my own amusement I went for the the east Londoner ‘Ricky’ and ‘Ed’ the late night announcer. ElevenLabs has a range of other voices, which are much more normal sounding than the two I went with.
Final Test
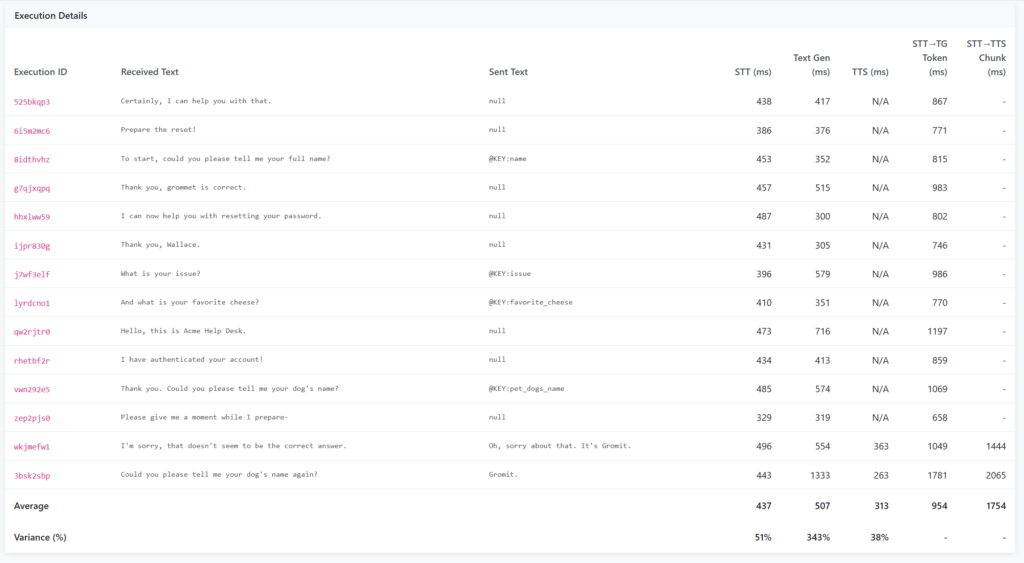
At last, we can perform a full test of this system! I have included a full clip of the audio at the end of this post, so you can hear the system for yourself. Ironically the most tricky part of this was getting the helpdesk to provide sensible answers, which took some time to finalise!
We can see the pre-generated responses were used for a number of the questions, helping to speed up response times.
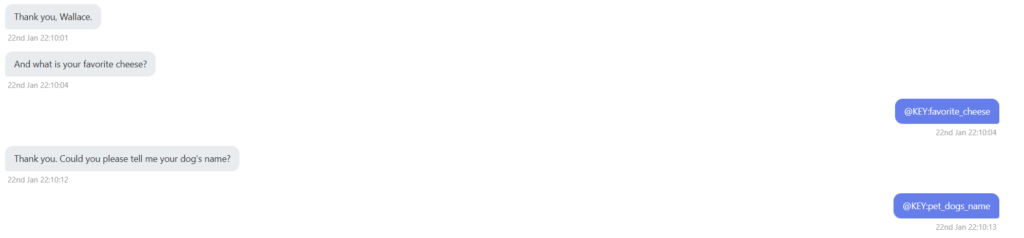
The model was able to handle being challenged, responding with a natural sounding response to the question.

As mentioned, the number of pre-generated responses did lower the response time, with most responses being around the 1 second mark, or slightly over for those which required custom generation. What this diagram doesnt show is the current delay which occurs whilst the model waits for the target to finish talking, before starting STT, which does add a delay into the mix.
Overall, I am really happy with how performant the tool was in the end, as this was only a side project for a few weeks, with the APIs and infrastructure used being very much consumer-grade. To improve this in future, there are several areas I would want to focus on:
- Adding End Of Utterance (EOU) models to significantly reduce the delay between the target stopping their sentence and us starting generating audio
- Exploring more powerful systems to run text generation locally, or attempt more expansive pre-generation of anticipated responses
- Hook this up to a microphone input/output, so that it could be used for real-world use cases (After some further refinement!)
- Improving the logic to handle edge cases better and improve stability, especially within the algorithm to output audio to the target
- Explore other AI models to see if faster or improved responses could be possible
- Harden the prompt and model against prompt injection and other malicious responses
Final Comparisons
Finally, the table below covers what I spent (£37.49). I was amazed at how low the cost of Gemini was, especially given how capable the model was compared to others. Also the free tier of ElevenLabs was suitable for all of my final testing, with gTTS being used to develop and perform earlier testing. AWS made the bulk of the costs, predominantly from the final stages, where two g4dn.xlarge systems were used to power both agents. This stepped up to a g4dn.4xlarge for the vishing server for final testing, which was the maximum permitted by my account quotas, at a cost of ~£2/hour/instance.
| Service | Cost | Total |
|---|---|---|
| AWS | £35.04 | £35.04 |
| Gemini | £0.08 | £35.12 |
| Anthropic | £2.37 | £37.49 |
| ElevenLabs | £0.00 | £37.49 |
The milestones show a notable increase from milestones 2 to 3, which was due to improved design of the system and selection of algorithms. Whilst I did not hit my original target of sub-1 second, I am still very happy with the result! Perhaps I can revisit this in future to reach that original goal…
| Milestone | STT | Text Generation | TTS | Total |
|---|---|---|---|---|
| 1 | ~5500 ms | ~3500 ms | ~1300 ms | ~10000 ms |
| 2 | ~1500 ms | ~1000 ms | ~750 ms | ~3250 ms |
| 3 | ~450 ms | ~500 ms | ~300 ms | ~1400 ms |
| Improvement (2-3) | 330% | 200% | 250% | 230% |