Introduction
This post will cover the basics of Active Directory Certificate Services (AD CS) and how we can use certificates for offensive security. I have two other posts on this subject. The first of which covers some of the dangerous misconfigurations. And secondly, how we can actually perform the attacks.
For those unfamiliar, AD CS is the server role used to issue and manage digital certificates within a server estate. This is a role which can have massive security implications if it is incorrectly configured. Certificates can be used for a large number of uses, from HTTPS through to authenticating to a domain.
All of the page references in this post refer to the white-paper produced by SpecterOps.
- Introduction
- Installation
- Core Concepts
- Interacting with AD CS
- Dealing With Certificates
- Conclusion
- Common Errors
Installation
We will assume we already have Server 2019 installed and running as a domain controller. Dinika-15 on Medium has made a great guide to follow for the installation of AD CS.
For our purposes, we will add the ‘Active Directory Certification Services‘ role to the server. Optionally, will can install ‘CA Web Enrollment‘ to have some fun with NTLM relays as part of the ‘ESC8’ attack. This is shown below:
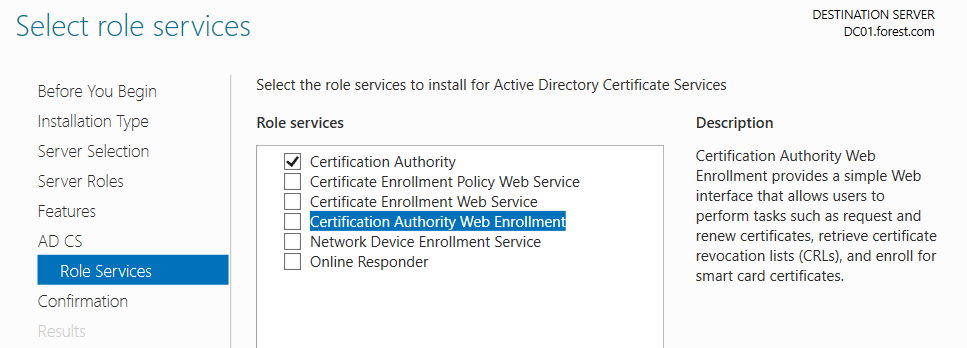
If we do want to perform the ESC8 attack, ensure that you install AD CS on a server that isnt operating as a domain controller, due to their enhanced SMB signing protection. I didnt realise this for a few days and so most of my screenshots will reference my DC (DC01)!
Click through the wizard until we get to the confirmation screen. By default, I allow it to restart as needed! It didn’t seem to need it, but I have seen other server roles require several restarts.

Now we have it installed!
I would then recommend a restart to ensure the server is more predicable.
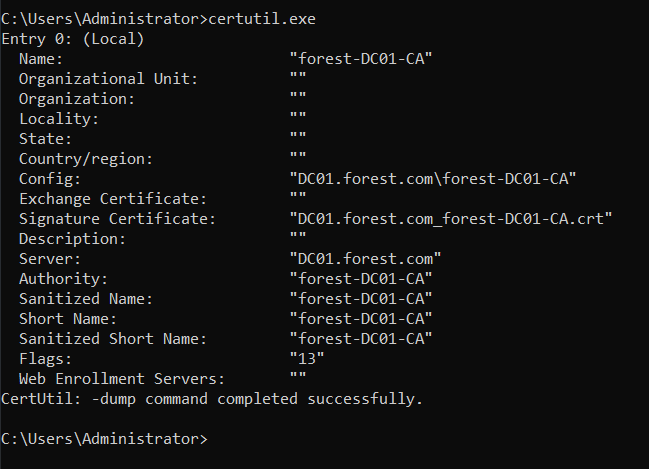
Then run certutil.exe on the CS server to show AD CS details & confirm we have it installed.
Core Concepts
Certficates
Certificates in AD can be used for many different functions, but this research focuses on those certificates which allow for domain authentication. In effect, a certificate which allows for authentication has a lot of similarities with an SSH private key – as you can authenticate without knowing the current password and the credentials are stored in a single file.
Certificate Template
A certificate template is effectively a blueprint for a certificate. Each certificate request must use a template, and so the settings of a template will dictate the resulting certificate. For example, a vulnerable template might allow any AD user to authenticate to AD with it. (Page 16)
Certificate Signing Request (CSR)
A CSR is the request made by a client to the AD CS server, in order to obtain a certificate. For example, Joe Bloggs will submit a CSR to the AD CS server in order to obtain a certificate.(Page 15)
Extended Key Usages (EKU) Object Identifiers (OIDs)
Despite the incredibly complex name (EKU OIDs), these are a reasonably straight-forward concept at a high level. These values dictate what a certificate template can be used for. These uses can be things such as authenticating to the domain to signing code.
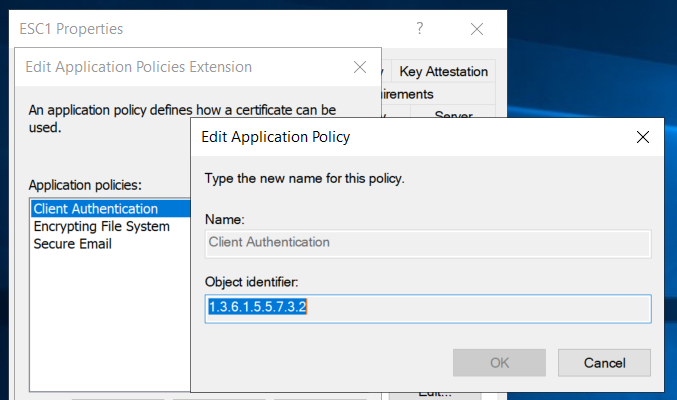
As described on page 18, the 1.3.6.1.5.5.7.3.2 OID can be used for Client Authentication. This means if we can obtain a certificate which includes that OID, we can use the certificate to authenticate to the domain. We will cover these more later on!
Subject Alternative Names (SANs)
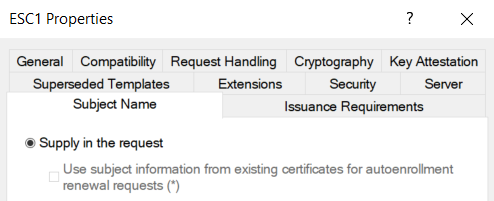
On a certificate template, there is an option to allow the requester to specify which principal the certificate can be used as. For example, if the SAN option is set on a template, and the template allows for client authentication then you could leverage the certificate to log in as any user. This is as bad as it sounds, and is covered in more detail within ESC1 (Page 54).
Interacting with AD CS
There are a number of tools which can be used to interact with AD CS, the table below lists a number of them:
| Tool Name | Description | Usage |
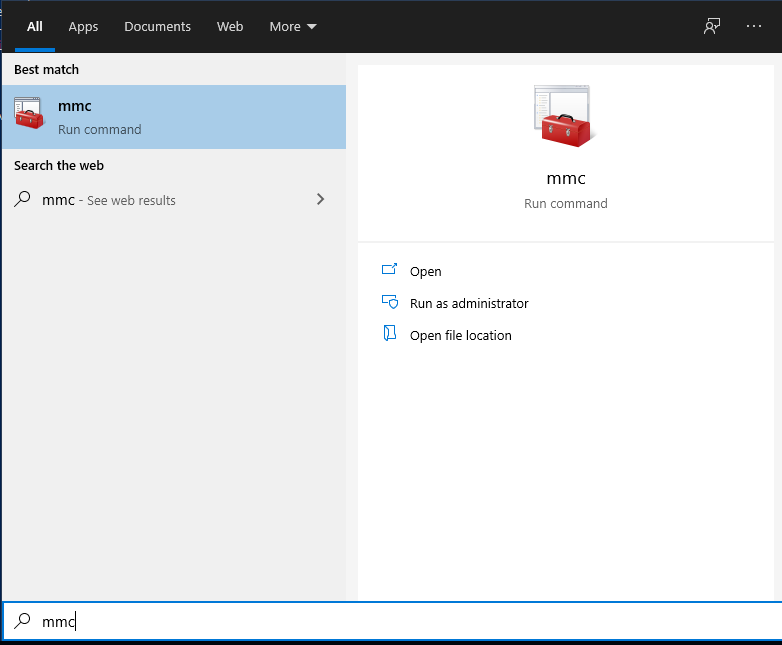
| MMC | MMC can be used to request, import and export certificates from a device. | Run -> mmc |
| ADSI Edit | This can show us the raw AD information on the certification services. This is handy for debugging issues and the various ACEs and ACLs we will encounter! | On a DC, search for ADSI Edit |
| Certification Authority | This tool will show details on the Certificate Templates, issued certificates and failed requests. | On the CS server, Run -> certsrv |
| Certificate Templates Console | Shows more detail on Certificate Templates. | Right click on Certificate Templates within certsrv |
| Certify | Automates a large part of this work, used for interacting with AD CS via CLI. | Download from GitHub |
| ForgeCert | If you manage to steal a CA certificate, this will allow ‘Golden Certificate’ attacks. Covered under DPERSIST1. | Download from GitHub |
For ADSI Edit, we must use the ‘Configuration’ naming context. To do this, open ADSI edit and right click on the ‘ADSI Edit’ entry at the top of the navigation tree.
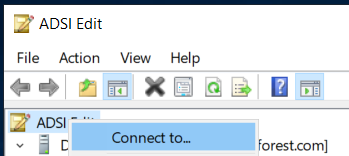
Then click on Connect To and select the ‘Configuration’ option in the dropdown.
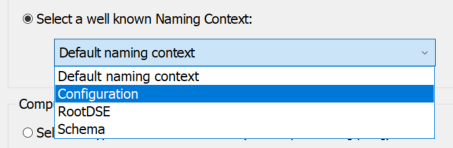
Click on ok and we can view information on AD CS at CN=Services -> CN=Public Key Services. We should now be able to see the container for Certificate Templates and other configuration items.
Dealing With Certificates
Requesting a Certificate
For this guide, we will use MMC to request our certificates. At the time of writing, Certify and ForgeCert were yet to be released. Therefore, we will focus on using built-in Windows tooling to achieve these attacks, which has the added advantage of living off the land! certreq can be used to perform these attacks via the CLI if desired.
On your domain-joined low-privilege machine, open up mmc by searching for it in the search bar.
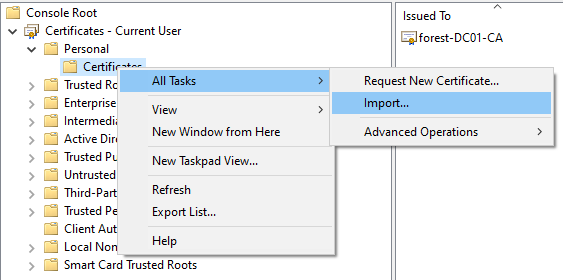
Click on File -> Add/Remove Snap-in, then select the ‘Certificates’ option and click ok. We will now have loaded in the Certificates snap-in, which we can use to request certificates. To request a certificate, right click on the Personal entry, then All Tasks and then Request New Certificate.

Click through the wizard and then we will select the default User template.
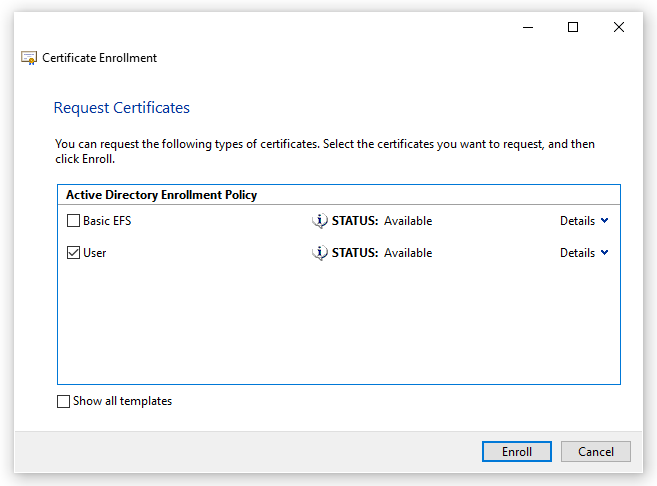
Then click on Enroll and we will get a certificate in our ‘personal’ folder.

This is effectively the ‘PERSIST1‘ attack within the whitepaper (Page 49).
Exporting a Certificate
We will often want to export a certificate in order to maintain persistance over an account or machine. For example, if we abuse ESC1 or ESC2, we can login as a user or machine without having valid credentials for the account – so long as we have a valid certificate.
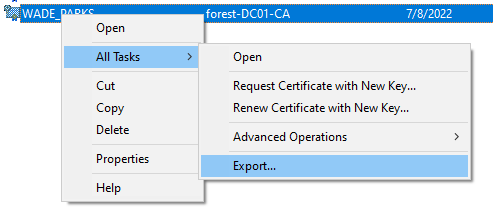
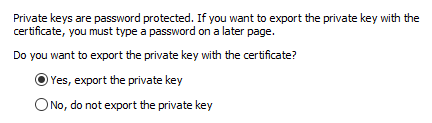
To export a certificate, go to the Personal folder within mmc and right click on the certificate to export. Select Export, at the wizard we will export the private key as well.
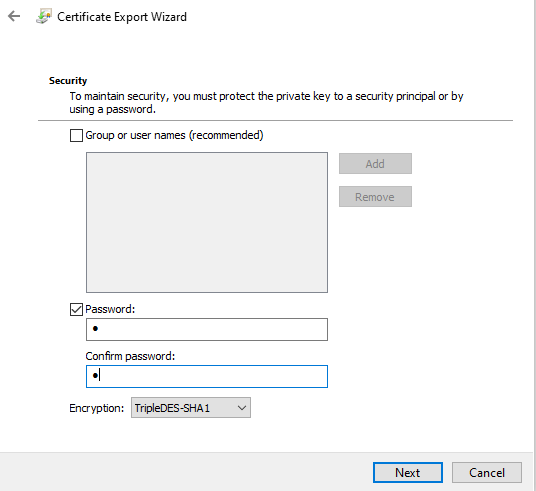
Because we are exporting the private key, we must password protect the exported certificate file. Oddly there are no password restrictions here, so we will use a password of ‘a‘.
Importing a Certificate
Importing a certificate is very straight-forward. Right click on the ‘Personal’ folder within MMC, we will then select ‘Import’.
Click through the wizard, on the file selector make sure you select ‘All Files’ as it will default to .cer and *.crt files. You will need to put in your password from when you exported it.
Conclusion
Hopefully this very brief introduction was of use! To put this knowledge into action, I have posts on both how to configure a vulnerable AD CS environment and how to perform the various AD CS attacks here. Below are some errors which I encountered, which didnt have very simple explanations on Google!
Common Errors
CRL Server is not reachable (CRYPT_E_REVOCATION_OFFLINE)
To get around this error, we can disable CRL checking by running the following on the DC:
certutil -setreg ca\CRLFlags +CRLF_REVCHECK_IGNORE_OFFLINEThis will commonly show the “The revocation function was unable to check revocation because the revocation server was offline” or CRYPT_E_REVOCATION_OFFLINE error
KRB-ERROR (16) : KDC_ERR_PADATA_TYPE_NOSUPP
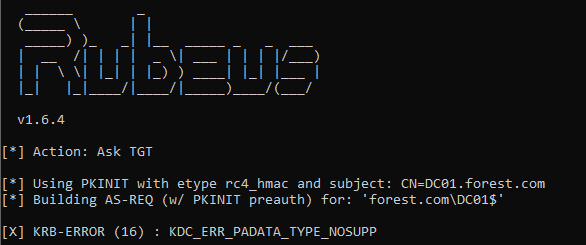
This error typically appears when you haven’t imported the Domain Controller Authentication certificate onto the Domain Controller. This process is covered in more detail by Citrix here.
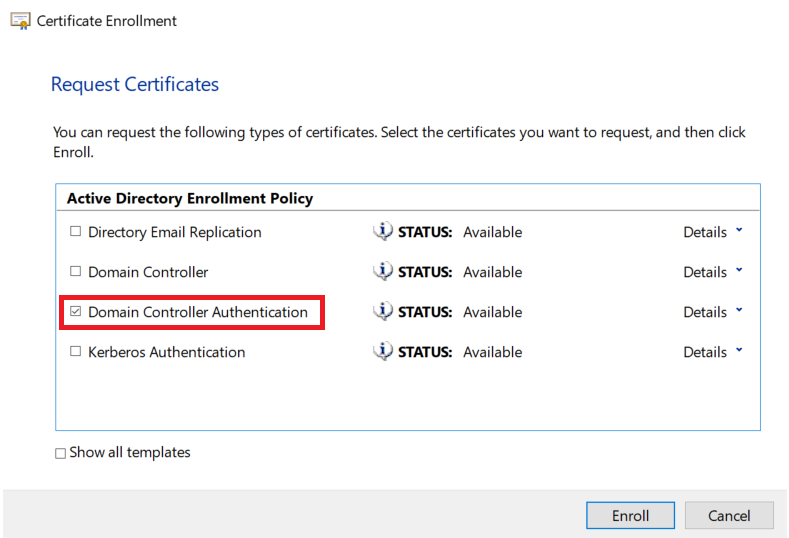
In short, go onto your DC and open MMC. In MMC add the Certificates add-on for the computer account and request the Domain Controller Authentication certificate.
KRB-ERROR (62) : KDC_ERR_CLIENT_NOT_TRUSTED
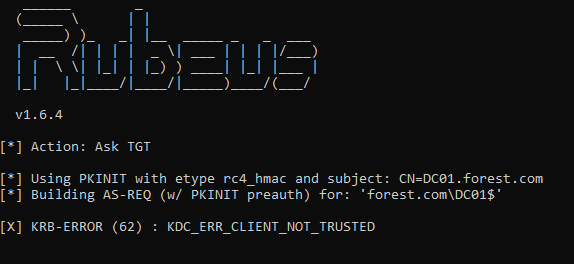
Thanks to a tweet from GentilKiwi, we can fix this by running the following on a Domain Controller.
certutil -pulseI found I had to reinstall the Domain Controller Authentication certificate again, as shown in KRB-ERROR(16) above, but this will depend on your environment!
The requested certificate template is not supported by this CA
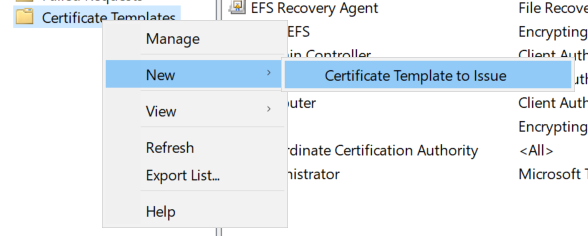
This error occurs when you attempt to request a certificate template which has not been enabled. A template can be enabled within certsrv by selecting ‘Certificate Template to Issue’. Select the certificate you want to issue and click OK.
Other KRB-ERROR codes
If you encounter other error codes, eventid.net is a great resource to explain what they mean. Often the codes are fairly self-explanatory!

!['r.•lp
8888
listening on [any] 8888
connect to [10.10.14.67] from
/bin/sh: e: can't access ttv;
(UNKNOWN) [10.129.131.144]
job control turned off
33662
(katiSkaIi)-C
total
-rwxr-xr-x I kali kali 1830 Apr
10.10.14.67
tsudol password for kali:
serving HTTP on ø.ø.e.ø port se
16 12.
•29 49491.py
(http•
12 : 35.
10.129.131.1&0 -
10.129.131.1"
- [16/Apr/2e21
[16/Apr/2021
- [16/Apr/2ø21
.//e.ø.ø.ø:8ø/) .
•GET 'payload HTTP/I.I• 2øø
•GET 'payload HTTP/1 1
•GET 'payload HTTP/I.I
. • 200
• 2øø](https://http418infosec.com/wp-content/uploads/2021/06/b94ed-image-5.png?w=1024&h=173)
![p 9999
listening on (any] 9999 .
connect to [le.10.14.671 from (UNKNOWN) [1ø.129.131.144] 48124
/bin/sh: o: can't access tty; job control turned off
$ whoami
$ python3 —c ' import Pty;
pwnascriptkiddie:/home/kid$ sudo -1
sudo -I
Matching Defaults entries for pm on scriptkiddie:
env_reset, mail_badpass,
/usr/locat/bin\ : /usr/sbin\ /usr/bin\ /sbin\ : /bin\ : /snap/bin
User pm may run the following cMnands on scriptkiddie:
(root) NOPASSWD: /opt/metasp10it-framework-6.ø.9/msfcons01e
1
pwnOscriptkiddie : / home/ kid$](https://http418infosec.com/wp-content/uploads/2021/06/72cbd-image-9.png)
![msf6 > cd /home/kid
cd /home/kid
ms.f.$ bash script.sh
bash script. sh
[i] exec: bash script.sh
kali@ kali
nc -nvlp
7777
listening on [any] 7777
connect to [10.10.14.671 from (UNKNOWN) [le.129.131.144J 53892
whoani](https://http418infosec.com/wp-content/uploads/2021/06/33729-image-11.png)